Cirkit Designer Logo
Cirkit Designer
Your all-in-one circuit design IDE
Home / 
Component Documentation

How to Use npk sensor: Examples, Pinouts, and Specs

Image of npk sensor
Cirkit Designer LogoDesign with npk sensor in Cirkit Designer

Introduction

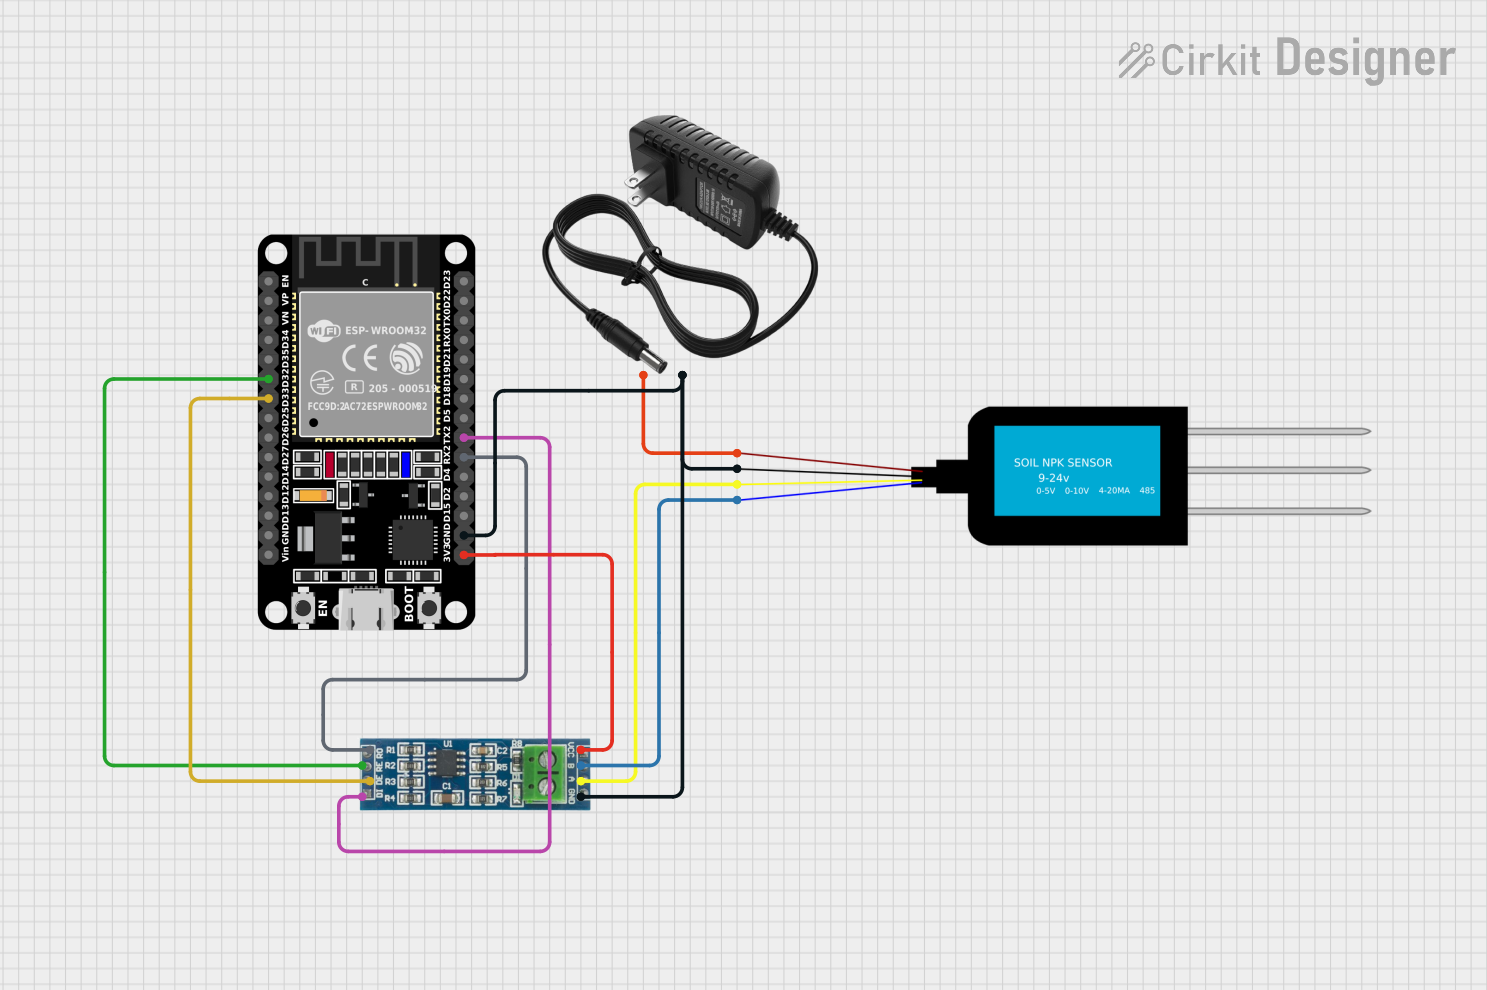
The NPK Sensor is an essential tool for agricultural technology, enabling precise measurement of soil fertility by quantifying the levels of Nitrogen (N), Phosphorus (P), and Potassium (K). These macronutrients are critical for plant health and growth. The sensor is widely used in smart farming systems, precision agriculture, and research to optimize crop yield and monitor soil health.

Explore Projects Built with npk sensor

Use Cirkit Designer to design, explore, and prototype these projects online. Some projects support real-time simulation. Click "Open Project" to start designing instantly!
Arduino UNO-Based NPK Soil Sensor with OLED Display and RS-485 Communication
Image of npk: A project utilizing npk sensor in a practical application
This circuit is designed to measure soil nutrient levels using an NPK soil sensor and display the results on an OLED screen. An Arduino UNO microcontroller reads data from the soil sensor via an RS-485 module and processes the information to display nitrogen, phosphorus, and potassium levels on the OLED display.
Cirkit Designer LogoOpen Project in Cirkit Designer
Arduino UNO-Based Soil Nutrient and Moisture Monitoring System with RS485 and Battery Power
Image of SOIL NUTRIENTS, NPK: A project utilizing npk sensor in a practical application
This circuit uses an Arduino UNO to read soil nutrient levels (Nitrogen, Phosphorous, and Potassium) from an NPK Soil Sensor via an RS485 module and soil moisture levels from a Capacitive Soil Moisture Sensor. The data is then printed to the Serial Monitor for monitoring purposes.
Cirkit Designer LogoOpen Project in Cirkit Designer
Arduino UNO-Based Soil Nutrient and Moisture Monitoring System with RS485 Communication
Image of NPK final: A project utilizing npk sensor in a practical application
This circuit uses an Arduino UNO to read soil nutrient levels (Nitrogen, Phosphorous, and Potassium) via an NPK Soil Sensor connected through an RS485 module, and soil moisture levels via a Capacitive Soil Moisture Sensor. The data is then printed to the Serial Monitor for analysis.
Cirkit Designer LogoOpen Project in Cirkit Designer
ESP32-Based Soil Nutrient Analyzer with RS-485 Communication
Image of npk: A project utilizing npk sensor in a practical application
This circuit is designed to measure soil nutrient levels using an NPK Soil Sensor, with data communication facilitated by an RS-485 module. The ESP32 microcontroller is used to process the sensor data, which is likely transmitted over RS-485 for remote monitoring or control. A 12V power supply provides the necessary power to the sensor, while the ESP32 is powered by its 3.3V pin, and the common ground ensures all components share a reference potential.
Cirkit Designer LogoOpen Project in Cirkit Designer

Explore Projects Built with npk sensor

Use Cirkit Designer to design, explore, and prototype these projects online. Some projects support real-time simulation. Click "Open Project" to start designing instantly!
Image of npk: A project utilizing npk sensor in a practical application
Arduino UNO-Based NPK Soil Sensor with OLED Display and RS-485 Communication
This circuit is designed to measure soil nutrient levels using an NPK soil sensor and display the results on an OLED screen. An Arduino UNO microcontroller reads data from the soil sensor via an RS-485 module and processes the information to display nitrogen, phosphorus, and potassium levels on the OLED display.
Cirkit Designer LogoOpen Project in Cirkit Designer
Image of SOIL NUTRIENTS, NPK: A project utilizing npk sensor in a practical application
Arduino UNO-Based Soil Nutrient and Moisture Monitoring System with RS485 and Battery Power
This circuit uses an Arduino UNO to read soil nutrient levels (Nitrogen, Phosphorous, and Potassium) from an NPK Soil Sensor via an RS485 module and soil moisture levels from a Capacitive Soil Moisture Sensor. The data is then printed to the Serial Monitor for monitoring purposes.
Cirkit Designer LogoOpen Project in Cirkit Designer
Image of NPK final: A project utilizing npk sensor in a practical application
Arduino UNO-Based Soil Nutrient and Moisture Monitoring System with RS485 Communication
This circuit uses an Arduino UNO to read soil nutrient levels (Nitrogen, Phosphorous, and Potassium) via an NPK Soil Sensor connected through an RS485 module, and soil moisture levels via a Capacitive Soil Moisture Sensor. The data is then printed to the Serial Monitor for analysis.
Cirkit Designer LogoOpen Project in Cirkit Designer
Image of npk: A project utilizing npk sensor in a practical application
ESP32-Based Soil Nutrient Analyzer with RS-485 Communication
This circuit is designed to measure soil nutrient levels using an NPK Soil Sensor, with data communication facilitated by an RS-485 module. The ESP32 microcontroller is used to process the sensor data, which is likely transmitted over RS-485 for remote monitoring or control. A 12V power supply provides the necessary power to the sensor, while the ESP32 is powered by its 3.3V pin, and the common ground ensures all components share a reference potential.
Cirkit Designer LogoOpen Project in Cirkit Designer

Technical Specifications

Key Technical Details

  • Operating Voltage: 5V DC
  • Output Voltage: 0-3V DC
  • Measuring Range:
    • Nitrogen (N): 0-999 mg/kg
    • Phosphorus (P): 0-999 mg/kg
    • Potassium (K): 0-999 mg/kg
  • Accuracy: ±2%
  • Operating Temperature: -10°C to 50°C
  • Interface: Analog

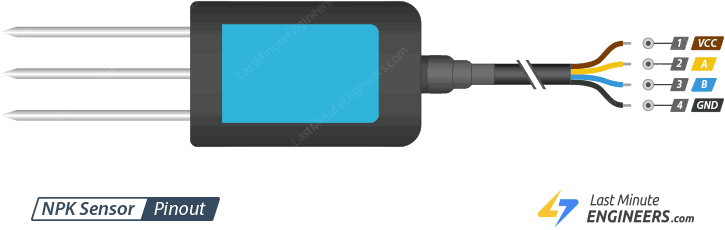
Pin Configuration and Descriptions

Pin Number Description Type
1 VCC Power
2 GND Ground
3 Analog Output (AO) Output
4 Digital Output (DO) Output
5 Serial Data Output Output
6 Serial Clock Input Input

Usage Instructions

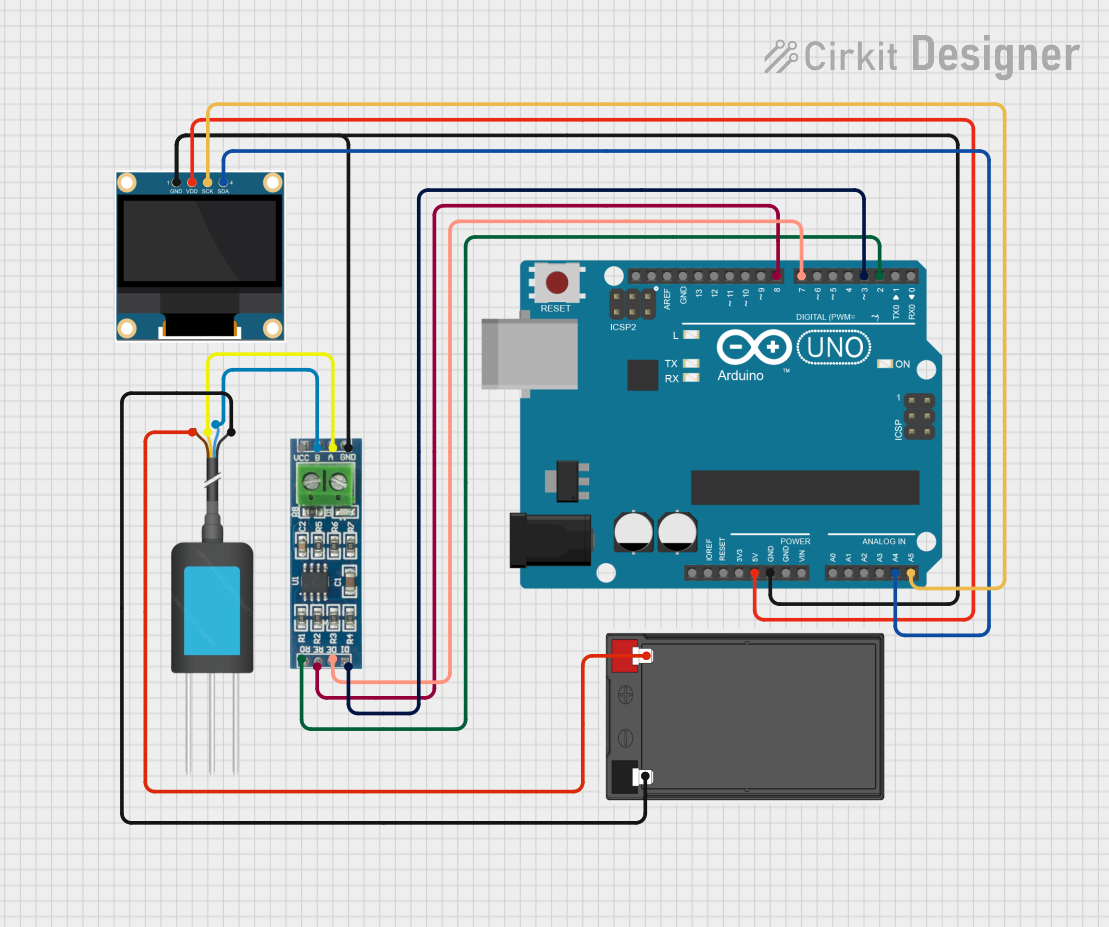
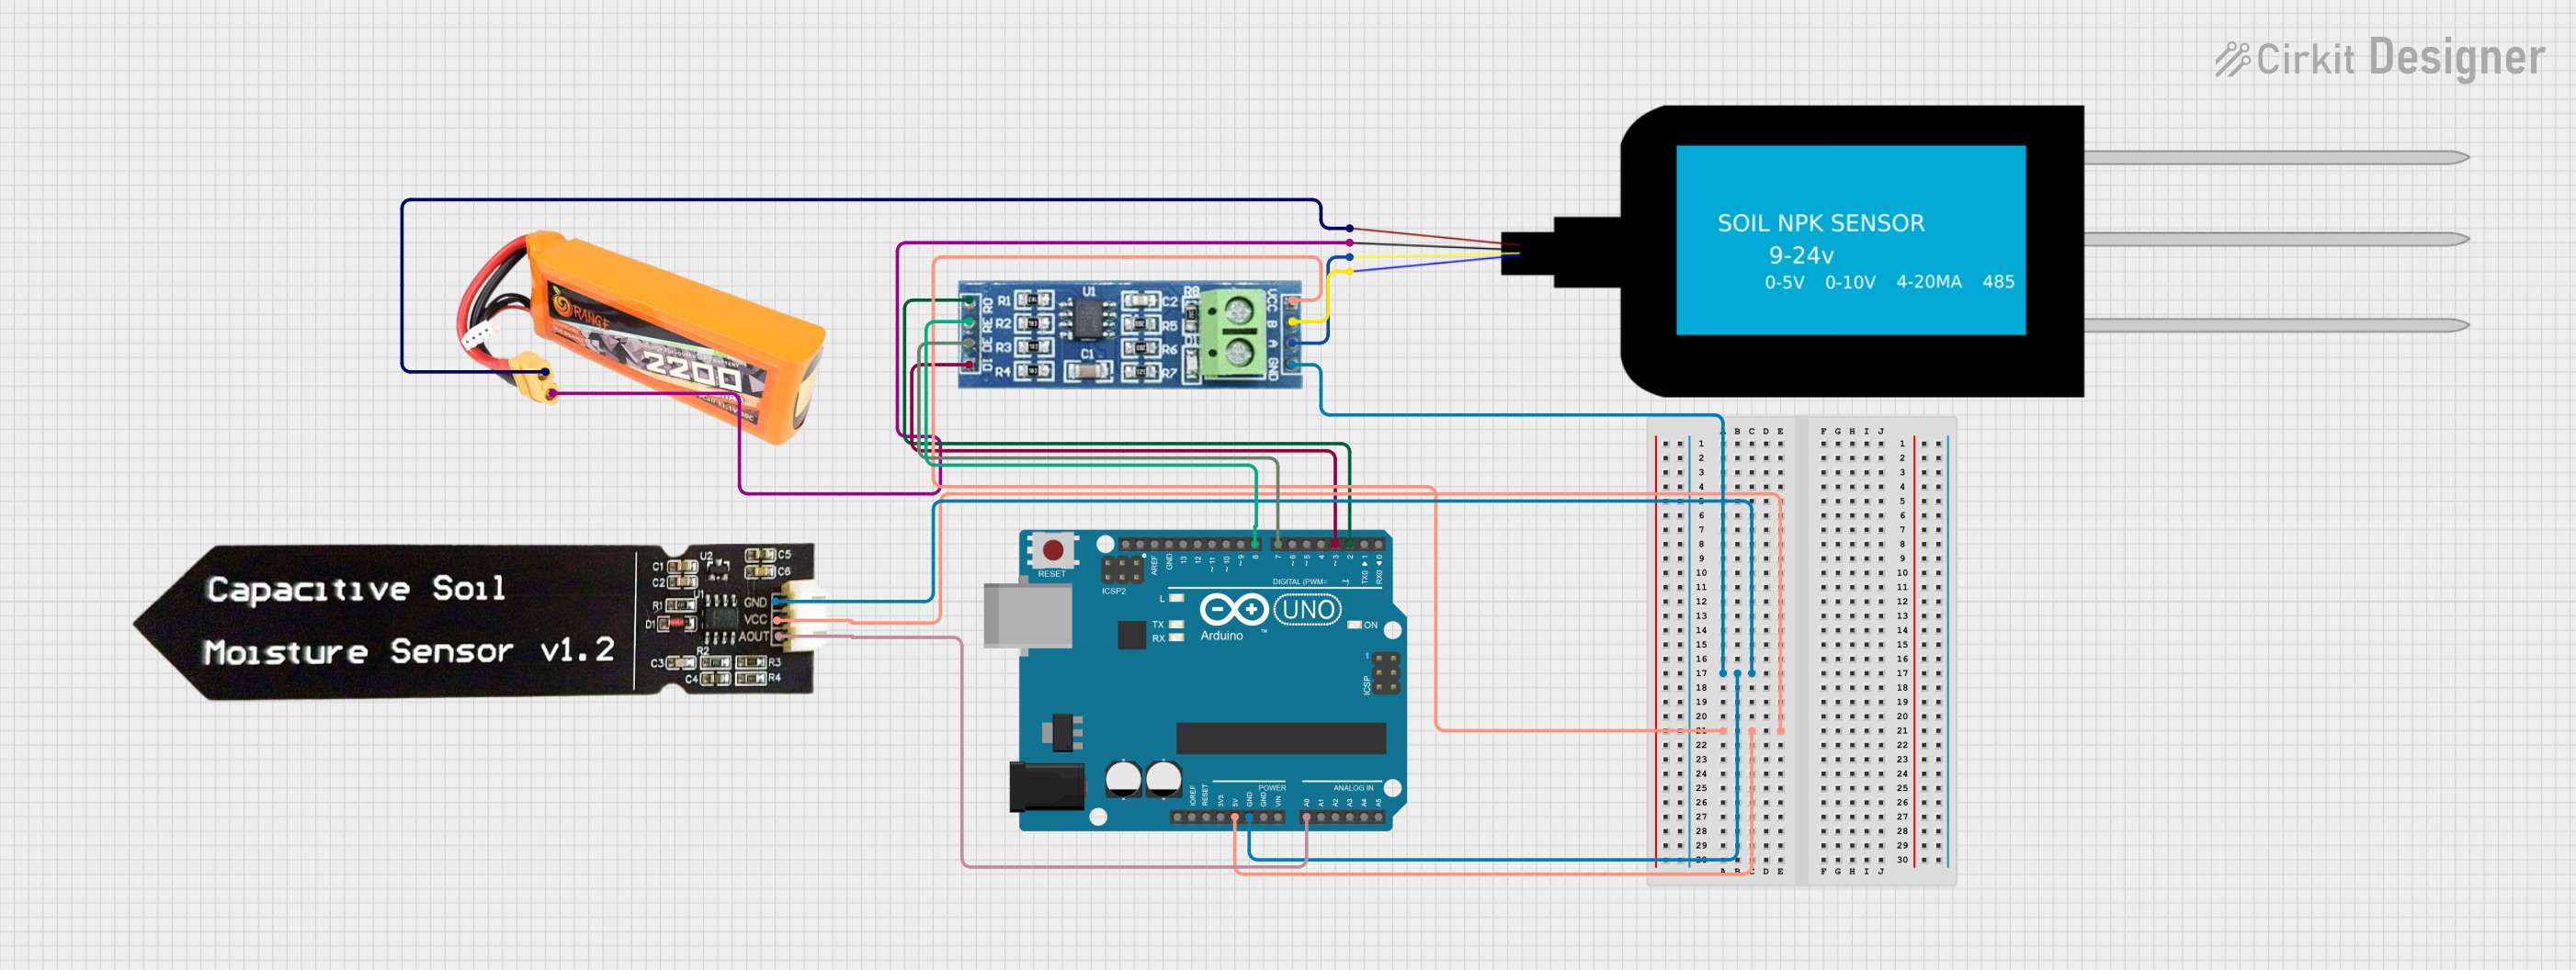
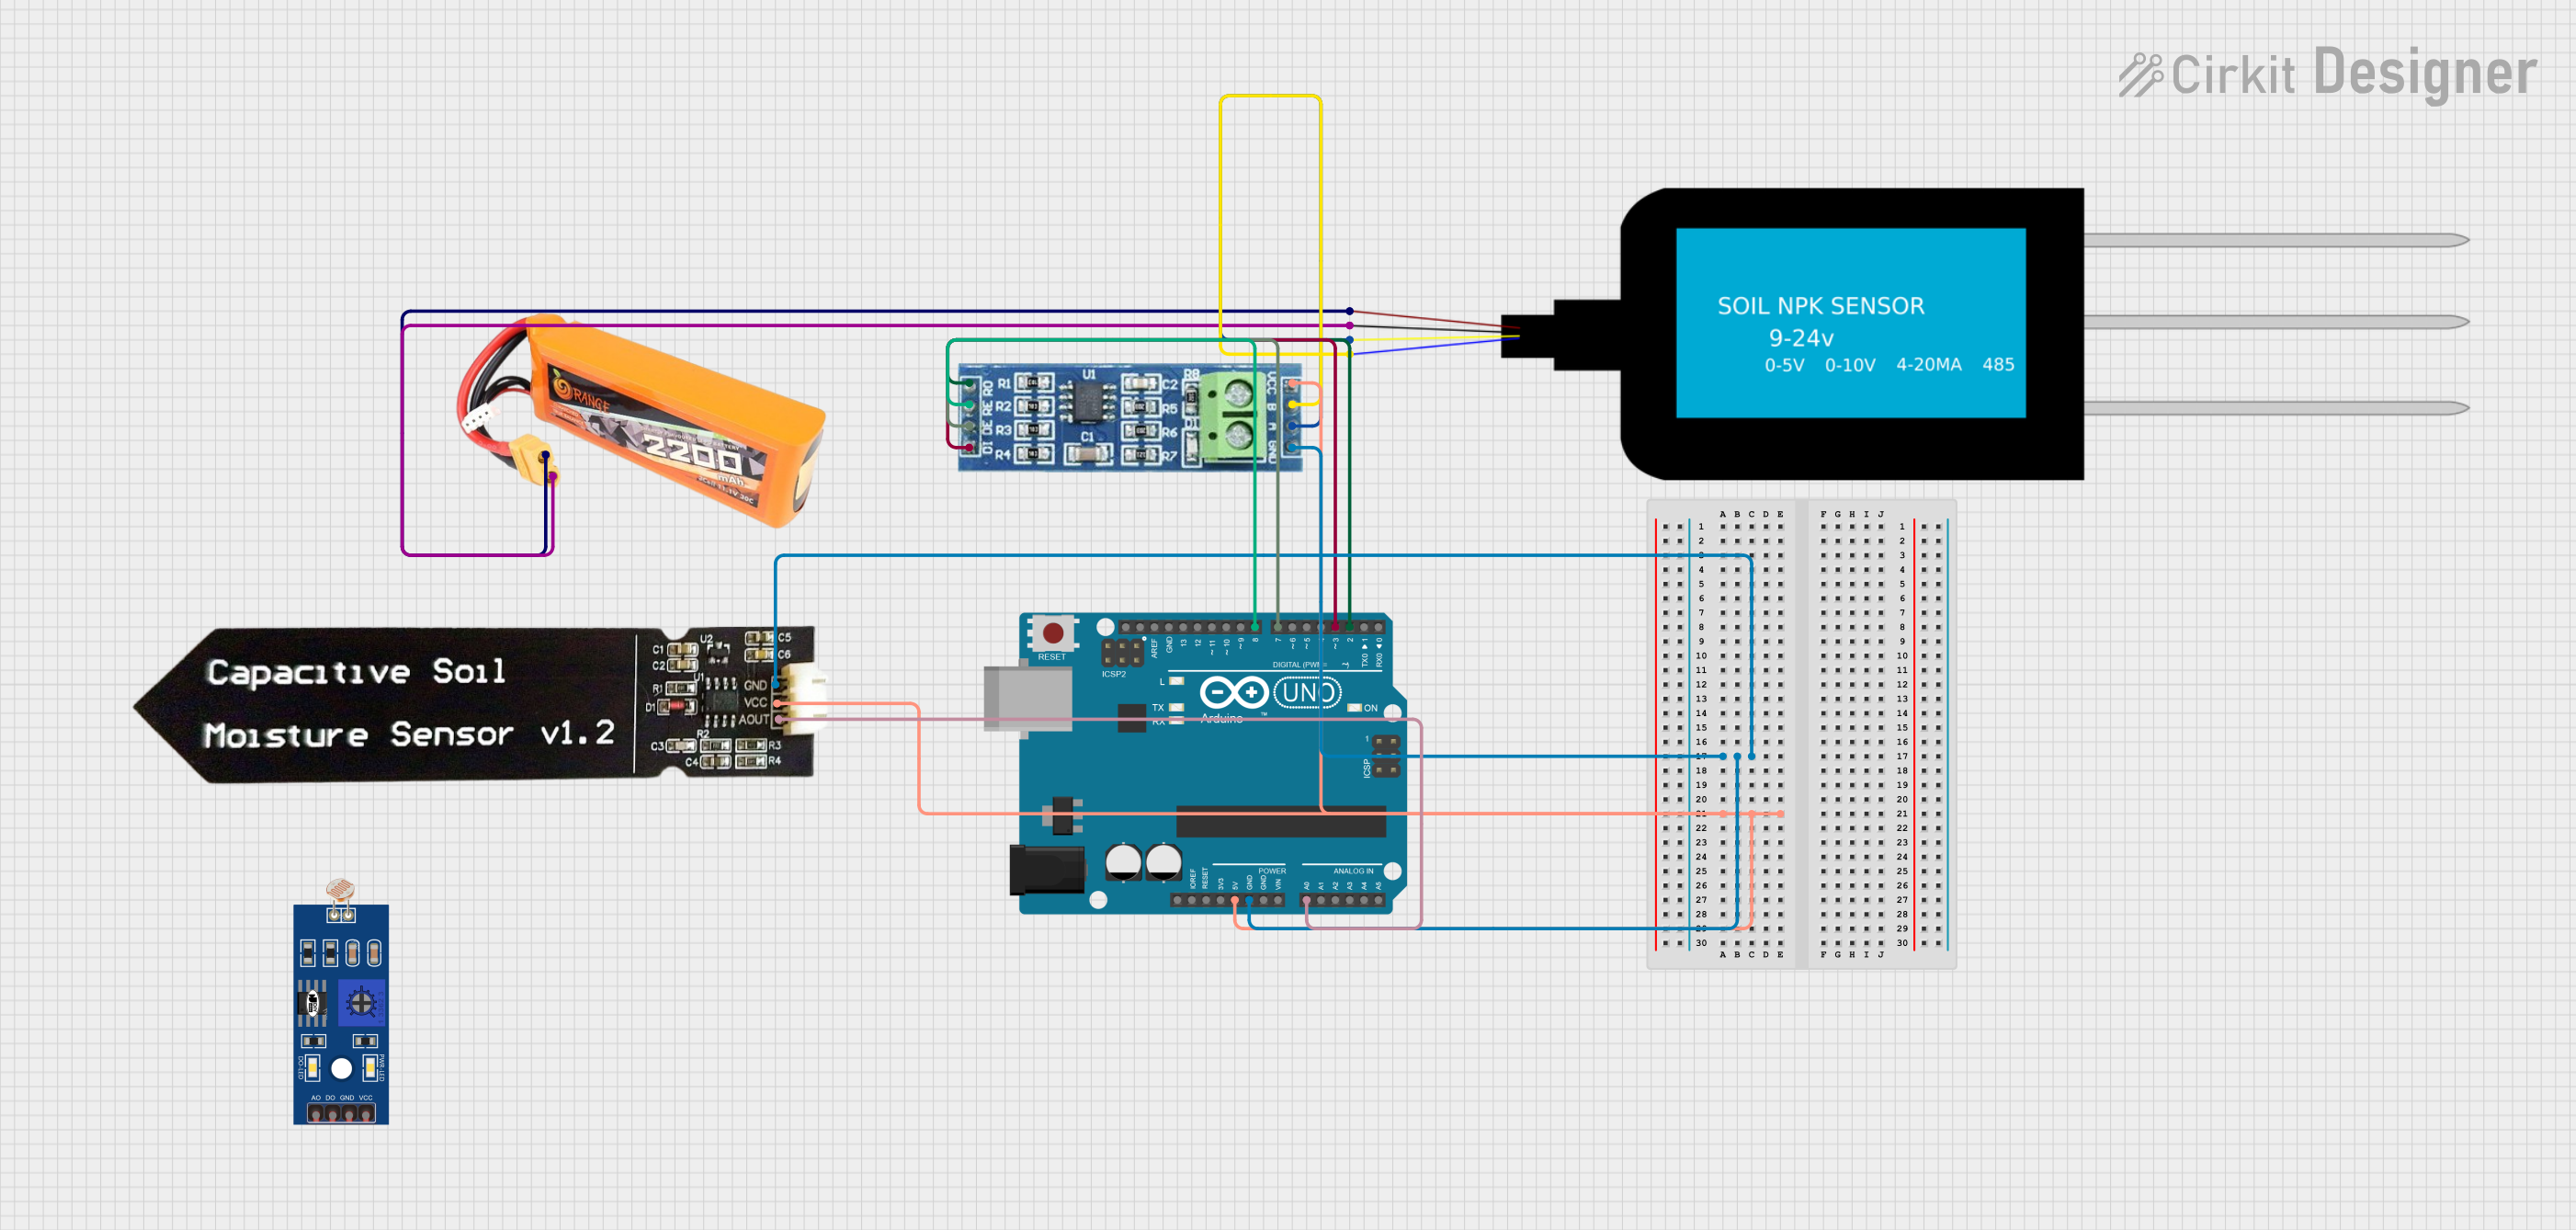
Integration with a Circuit

To use the NPK sensor with a microcontroller like the Arduino UNO, follow these steps:

  1. Connect the VCC pin to the 5V output on the Arduino.
  2. Connect the GND pin to one of the GND pins on the Arduino.
  3. Connect the Analog Output (AO) pin to an analog input on the Arduino (e.g., A0).
  4. (Optional) Connect the Digital Output (DO) to a digital pin if threshold-based detection is needed.
  5. (Optional) For serial communication, connect the Serial Data Output and Serial Clock Input to the appropriate pins on the Arduino.

Important Considerations and Best Practices

  • Ensure that the sensor is calibrated before use for accurate readings.
  • Avoid exposing the sensor to direct sunlight or high humidity environments.
  • Insert the sensor probes into the soil gently to avoid damage.
  • Allow the sensor to equilibrate in the soil for a few minutes before taking a reading.

Example Code for Arduino UNO

// NPK Sensor Reading Example for Arduino UNO

const int analogPin = A0; // Analog output from the NPK sensor

void setup() {
  Serial.begin(9600); // Start serial communication at 9600 baud rate
}

void loop() {
  int sensorValue = analogRead(analogPin); // Read the analog value from sensor
  float voltage = sensorValue * (5.0 / 1023.0); // Convert to voltage
  Serial.print("Sensor Voltage: ");
  Serial.print(voltage);
  Serial.println(" V");
  // Add conversion from voltage to NPK values after calibration
  delay(2000); // Wait for 2 seconds before the next read
}

Troubleshooting and FAQs

Common Issues

  • Inaccurate Readings: Ensure the sensor is properly calibrated. Follow the calibration procedure as per the manufacturer's instructions.
  • No Readings: Check all connections to the Arduino and ensure the sensor is powered.
  • Fluctuating Readings: Stabilize the sensor in the soil and wait for the readings to settle.

Solutions and Tips for Troubleshooting

  • If the sensor is not responding, verify that the power supply is within the specified range and all connections are secure.
  • For fluctuating readings, ensure that the sensor is fully inserted into the soil and there is no electrical interference from nearby equipment.
  • Regularly clean the sensor probes with distilled water to prevent residue build-up, which can affect readings.

FAQs

Q: Can the NPK sensor be left in the soil permanently? A: It is not recommended to leave the sensor in the soil permanently as prolonged exposure to moisture can damage the sensor.

Q: How often should the sensor be calibrated? A: Calibration frequency depends on usage, but it is generally recommended to calibrate the sensor before each critical use.

Q: Is the sensor waterproof? A: The sensor probes are typically water-resistant, but the electronic components are not waterproof. Care should be taken to prevent water from reaching the electronic parts.

Q: Can the sensor measure the NPK levels of liquid fertilizers? A: The sensor is designed for soil measurement. Using it with liquid fertilizers may require a different calibration method and is not typically recommended.