Cirkit Designer Logo
Cirkit Designer
Your all-in-one circuit design IDE
Home / 
Component Documentation

How to Use Piezo Speaker 2: Examples, Pinouts, and Specs

Image of Piezo Speaker 2
Cirkit Designer LogoDesign with Piezo Speaker 2 in Cirkit Designer

Introduction

A piezo speaker is a type of loudspeaker that uses the piezoelectric effect to produce sound. It converts electrical energy into mechanical energy, creating sound waves. These speakers are known for their compact size, low power consumption, and ability to produce a range of frequencies.

The Piezo Speaker 2 is a versatile component commonly used in various applications, including:

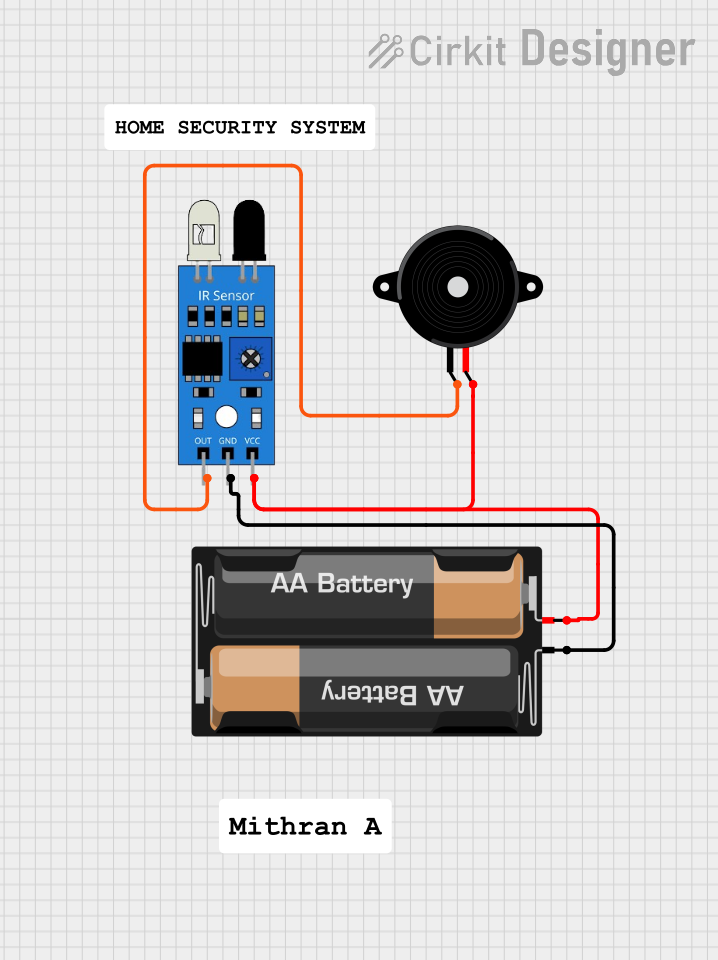
  • Alarm systems and buzzers
  • Timers and notifications
  • Musical tones in electronic devices
  • Sound effects in toys and gadgets

Its simplicity and efficiency make it a popular choice for hobbyists and professionals alike.

Explore Projects Built with Piezo Speaker 2

Use Cirkit Designer to design, explore, and prototype these projects online. Some projects support real-time simulation. Click "Open Project" to start designing instantly!
PAM8403 Amplified Piezo Speaker Array with ATTiny Control
Image of mamamo: A project utilizing Piezo Speaker 2 in a practical application
This circuit is an audio amplification system with multiple piezo speakers driven by a PAM8403 amplifier IC. It features an ATtiny microcontroller for potential audio control, powered by a 5V battery with capacitors for stabilization and a trimmer potentiometer for input level adjustment.
Cirkit Designer LogoOpen Project in Cirkit Designer
Battery-Powered Piezo Buzzer with Pushbutton Activation
Image of wallet: A project utilizing Piezo Speaker 2 in a practical application
This circuit appears to be a simple sound generation system controlled by a pushbutton. When the button is pressed, the battery powers the Piezo Speaker through a BC547 transistor, which likely acts as a switch to drive the speaker. A diode is connected to the base of the transistor, possibly for protection against reverse currents or to shape the input signal to the base.
Cirkit Designer LogoOpen Project in Cirkit Designer
IR Sensor-Triggered Piezo Alarm
Image of HOME SECURITY SYSTEM: A project utilizing Piezo Speaker 2 in a practical application
This circuit consists of an IR sensor powered by a 2 x AA battery mount, which, when triggered, activates a piezo speaker. The IR sensor's output is directly connected to the piezo speaker, suggesting that the speaker will sound when the IR sensor detects an object. There is no microcontroller in this circuit, indicating that the behavior is direct and not programmable.
Cirkit Designer LogoOpen Project in Cirkit Designer
Arduino UNO Melody Player with Piezo Speaker
Image of Arduino UNO With Piezo Buzzer - Play a Melody: A project utilizing Piezo Speaker 2 in a practical application
This circuit consists of an Arduino UNO microcontroller connected to a piezo speaker. The Arduino is programmed to play a predefined melody through the speaker upon startup, using digital pin 8 for the speaker signal and GND for the return path. The melody and its timing are defined in the embedded code, which utilizes an array of note frequencies and durations.
Cirkit Designer LogoOpen Project in Cirkit Designer

Explore Projects Built with Piezo Speaker 2

Use Cirkit Designer to design, explore, and prototype these projects online. Some projects support real-time simulation. Click "Open Project" to start designing instantly!
Image of mamamo: A project utilizing Piezo Speaker 2 in a practical application
PAM8403 Amplified Piezo Speaker Array with ATTiny Control
This circuit is an audio amplification system with multiple piezo speakers driven by a PAM8403 amplifier IC. It features an ATtiny microcontroller for potential audio control, powered by a 5V battery with capacitors for stabilization and a trimmer potentiometer for input level adjustment.
Cirkit Designer LogoOpen Project in Cirkit Designer
Image of wallet: A project utilizing Piezo Speaker 2 in a practical application
Battery-Powered Piezo Buzzer with Pushbutton Activation
This circuit appears to be a simple sound generation system controlled by a pushbutton. When the button is pressed, the battery powers the Piezo Speaker through a BC547 transistor, which likely acts as a switch to drive the speaker. A diode is connected to the base of the transistor, possibly for protection against reverse currents or to shape the input signal to the base.
Cirkit Designer LogoOpen Project in Cirkit Designer
Image of HOME SECURITY SYSTEM: A project utilizing Piezo Speaker 2 in a practical application
IR Sensor-Triggered Piezo Alarm
This circuit consists of an IR sensor powered by a 2 x AA battery mount, which, when triggered, activates a piezo speaker. The IR sensor's output is directly connected to the piezo speaker, suggesting that the speaker will sound when the IR sensor detects an object. There is no microcontroller in this circuit, indicating that the behavior is direct and not programmable.
Cirkit Designer LogoOpen Project in Cirkit Designer
Image of Arduino UNO With Piezo Buzzer - Play a Melody: A project utilizing Piezo Speaker 2 in a practical application
Arduino UNO Melody Player with Piezo Speaker
This circuit consists of an Arduino UNO microcontroller connected to a piezo speaker. The Arduino is programmed to play a predefined melody through the speaker upon startup, using digital pin 8 for the speaker signal and GND for the return path. The melody and its timing are defined in the embedded code, which utilizes an array of note frequencies and durations.
Cirkit Designer LogoOpen Project in Cirkit Designer

Technical Specifications

Below are the key technical details for the Piezo Speaker 2:

Parameter Value
Operating Voltage 3V to 12V
Operating Current < 20mA
Resonant Frequency 2 kHz to 4 kHz
Sound Pressure Level 85 dB (at 10 cm, 5V input)
Dimensions 20 mm diameter, 10 mm height
Weight ~5 grams

Pin Configuration

The Piezo Speaker 2 typically has two pins for connection:

Pin Description
Positive (+) Connect to the positive voltage supply or signal output.
Negative (-) Connect to ground (GND).

Usage Instructions

How to Use the Piezo Speaker 2 in a Circuit

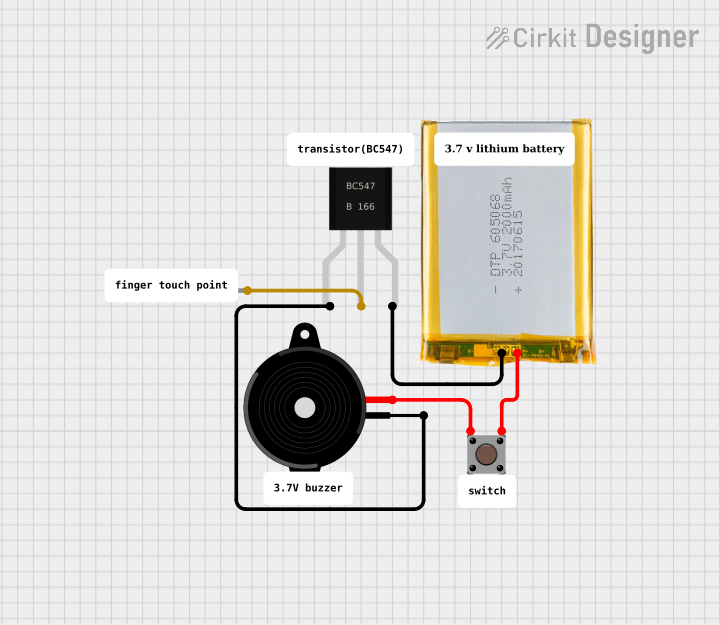
  1. Power Supply: Connect the positive pin of the piezo speaker to a signal source or a microcontroller pin capable of generating a PWM (Pulse Width Modulation) signal. Connect the negative pin to the ground (GND).
  2. Signal Generation: Use a microcontroller (e.g., Arduino UNO) or an oscillator circuit to generate a square wave signal. The frequency of the signal determines the pitch of the sound produced.
  3. Resistor (Optional): For safety, you can add a current-limiting resistor (e.g., 220Ω) in series with the positive pin to prevent excessive current flow.

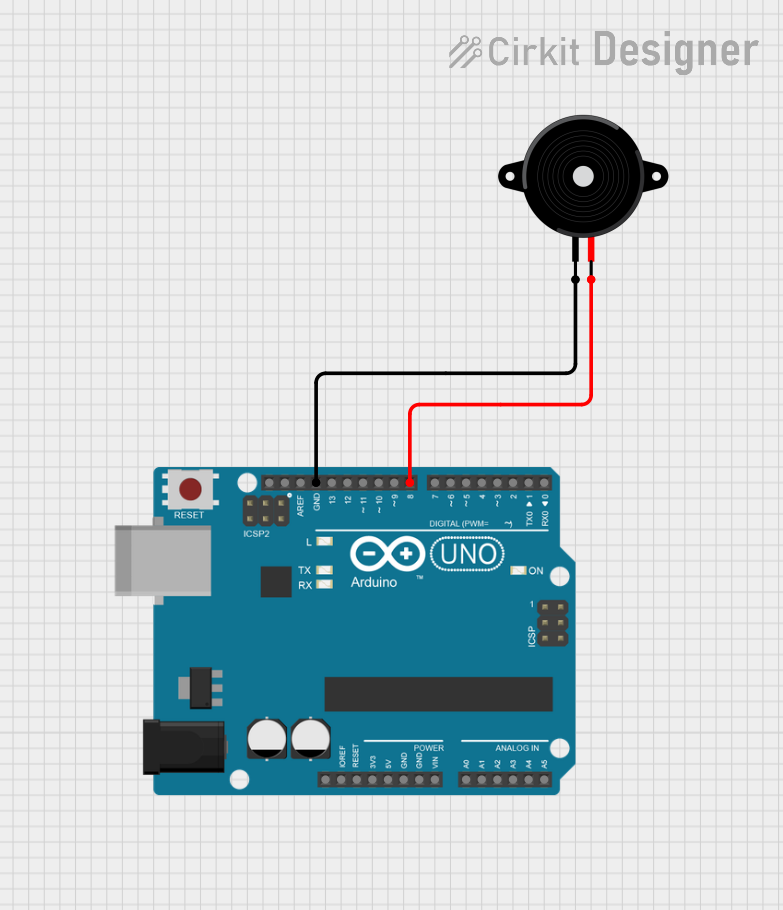
Example Circuit with Arduino UNO

Below is an example of how to connect and program the Piezo Speaker 2 with an Arduino UNO to produce a simple tone:

Circuit Diagram

  • Connect the positive pin of the piezo speaker to Arduino pin 9.
  • Connect the negative pin of the piezo speaker to GND.

Arduino Code

// Piezo Speaker Example with Arduino UNO
// This code generates a tone on pin 9 using the tone() function.

#define PIEZO_PIN 9  // Define the pin connected to the piezo speaker

void setup() {
  // No setup required for tone() function
}

void loop() {
  tone(PIEZO_PIN, 1000); // Generate a 1 kHz tone on the piezo speaker
  delay(500);            // Wait for 500 milliseconds
  noTone(PIEZO_PIN);     // Stop the tone
  delay(500);            // Wait for 500 milliseconds
}

Important Considerations and Best Practices

  • Voltage Range: Ensure the input voltage does not exceed the specified range (3V to 12V) to avoid damaging the speaker.
  • Frequency Range: Operate the speaker within its resonant frequency range (2 kHz to 4 kHz) for optimal sound output.
  • Mounting: Secure the speaker in place to prevent vibrations from affecting sound quality.
  • Avoid Continuous High Voltage: Prolonged exposure to high voltage may degrade the piezoelectric material.

Troubleshooting and FAQs

Common Issues and Solutions

  1. No Sound Output:

    • Cause: Incorrect wiring or insufficient voltage.
    • Solution: Verify the connections and ensure the input voltage is within the operating range.
  2. Distorted Sound:

    • Cause: Signal frequency is outside the resonant range.
    • Solution: Adjust the signal frequency to fall within 2 kHz to 4 kHz.
  3. Low Volume:

    • Cause: Insufficient input voltage or improper mounting.
    • Solution: Increase the input voltage (within the safe range) and ensure the speaker is securely mounted.
  4. Overheating:

    • Cause: Excessive current or prolonged high voltage.
    • Solution: Add a current-limiting resistor and avoid continuous high-voltage operation.

FAQs

Q: Can I use the Piezo Speaker 2 with a 3.3V microcontroller?
A: Yes, the Piezo Speaker 2 can operate at 3.3V, but the sound output may be quieter compared to 5V operation.

Q: How do I produce different tones?
A: Vary the frequency of the input signal. For example, in Arduino, you can use the tone() function with different frequency values.

Q: Can I use the Piezo Speaker 2 for playing music?
A: Yes, you can generate musical notes by programming a sequence of frequencies and durations.

Q: Is the Piezo Speaker 2 waterproof?
A: No, the Piezo Speaker 2 is not waterproof. Avoid exposing it to moisture or water.

By following this documentation, you can effectively integrate the Piezo Speaker 2 into your projects and troubleshoot any issues that arise.