How to Use ESP32 S3 CAM: Examples, Pinouts, and Specs
Introduction
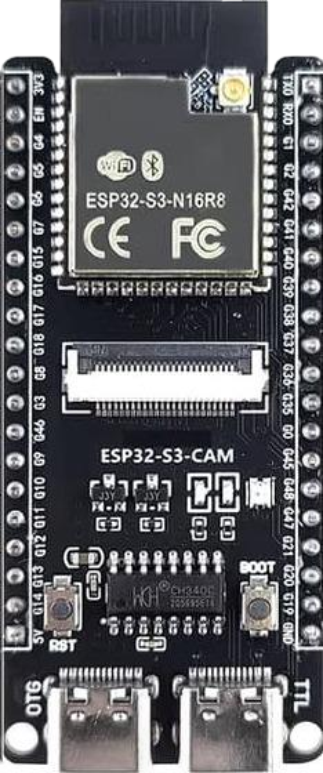
The ESP32 S3 CAM is a low-cost, low-power system on a chip (SoC) with integrated Wi-Fi and Bluetooth capabilities. It is specifically designed for Internet of Things (IoT) applications and features a built-in camera interface, making it ideal for projects involving image capture, video streaming, facial recognition, and other image-processing tasks. Its versatility and powerful processing capabilities make it a popular choice for developers working on smart home devices, security systems, and AI-based applications.
Explore Projects Built with ESP32 S3 CAM


Explore Projects Built with ESP32 S3 CAM
Common Applications and Use Cases
- Video streaming and surveillance systems
- Facial recognition and object detection
- Smart home automation with image-based triggers
- IoT devices requiring camera functionality
- AI-powered image processing and edge computing
Technical Specifications
The ESP32 S3 CAM is packed with features that make it a powerful and flexible component for IoT and image-processing projects. Below are its key technical specifications:
Key Technical Details
- Processor: Dual-core Xtensa LX7 CPU, up to 240 MHz
- Memory: 512 KB SRAM, support for external PSRAM
- Wireless Connectivity:
- Wi-Fi: 802.11 b/g/n (2.4 GHz)
- Bluetooth: BLE 5.0
- Camera Interface: Supports up to 12-bit parallel data and various camera modules
- GPIO Pins: Multiple GPIOs with support for PWM, ADC, I2C, SPI, UART, etc.
- Operating Voltage: 3.3V
- Power Consumption: Ultra-low power consumption in deep sleep mode
- Flash Storage: Up to 16 MB
- Dimensions: Compact form factor for embedded applications
Pin Configuration and Descriptions
The ESP32 S3 CAM module has several pins for interfacing with peripherals. Below is a table describing the key pins:
| Pin Name | Type | Description |
|---|---|---|
3V3 |
Power | 3.3V power input for the module. |
GND |
Ground | Ground connection. |
GPIO0 |
Input/Output | Used for boot mode selection or general-purpose I/O. |
GPIO1 |
Input/Output | General-purpose I/O or UART TX. |
GPIO2 |
Input/Output | General-purpose I/O or UART RX. |
GPIO12 |
Input/Output | Camera data pin (D0). |
GPIO13 |
Input/Output | Camera data pin (D1). |
GPIO14 |
Input/Output | Camera data pin (D2). |
GPIO15 |
Input/Output | Camera data pin (D3). |
GPIO16 |
Input/Output | Camera clock signal (XCLK). |
GPIO21 |
Input/Output | I2C SDA for camera configuration. |
GPIO22 |
Input/Output | I2C SCL for camera configuration. |
RESET |
Input | Reset pin for the module. |
Note: The exact pinout may vary depending on the specific ESP32 S3 CAM board model. Always refer to the datasheet of your specific board.
Usage Instructions
The ESP32 S3 CAM can be used in a variety of projects, from simple image capture to advanced AI-based image processing. Below are the steps to get started:
How to Use the ESP32 S3 CAM in a Circuit
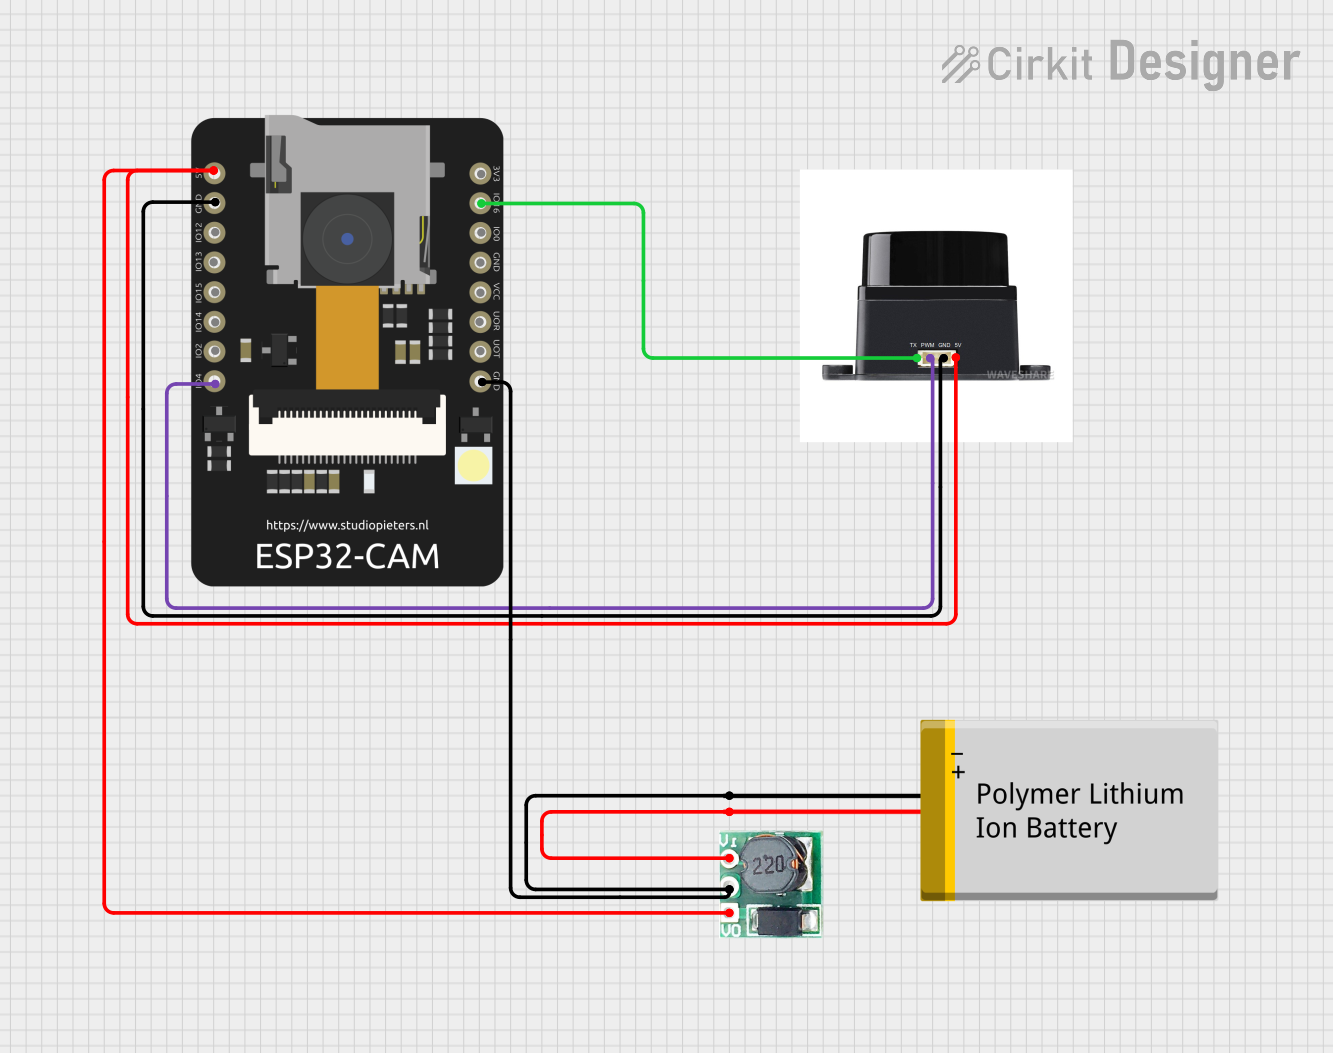
- Power the Module: Connect the
3V3pin to a 3.3V power source andGNDto ground. - Connect the Camera: Attach a compatible camera module to the camera interface pins (e.g., GPIO12–GPIO15 for data, GPIO16 for clock).
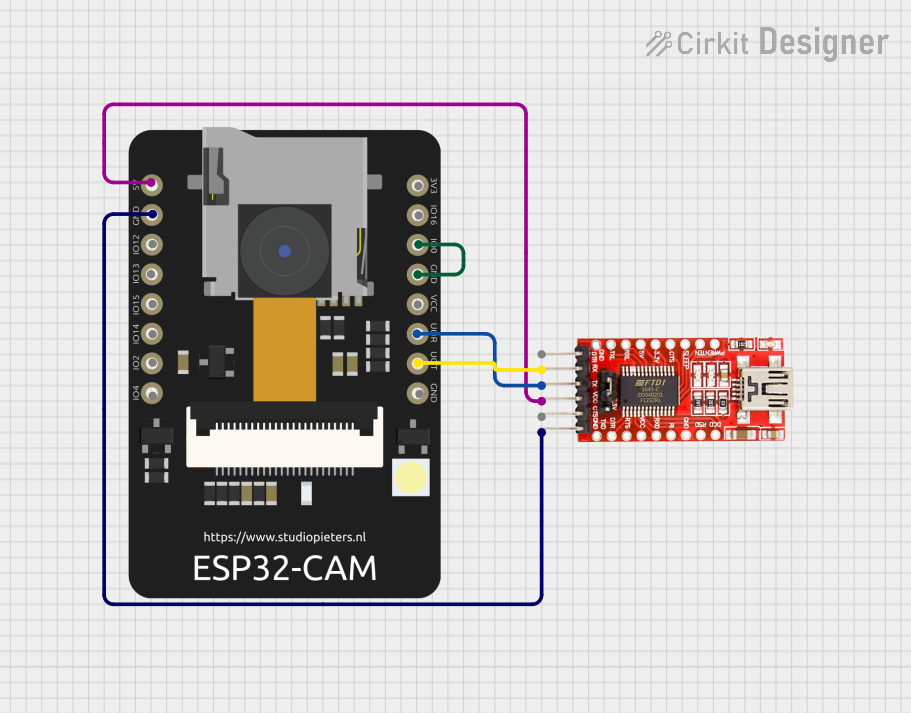
- Programming: Use a USB-to-serial adapter to connect the ESP32 S3 CAM to your computer. Ensure
GPIO0is pulled low during boot to enter programming mode. - Upload Code: Use the Arduino IDE or ESP-IDF to upload your code. Select the correct board and port in the IDE.
- Run the Program: After uploading, reset the module to run the program.
Important Considerations and Best Practices
- Power Supply: Ensure a stable 3.3V power supply to avoid instability during operation.
- Heat Management: The ESP32 S3 CAM can get warm during operation. Consider adding a heatsink for prolonged use.
- Camera Compatibility: Use a camera module that is compatible with the ESP32 S3 CAM's interface.
- Wi-Fi Signal: For projects requiring Wi-Fi, ensure the module is placed in an area with good signal strength.
Example Code for Arduino IDE
Below is an example code snippet to capture an image and serve it via a web server:
#include <WiFi.h>
#include <esp_camera.h>

// Replace with your network credentials
const char* ssid = "Your_SSID";
const char* password = "Your_PASSWORD";

// Camera configuration
#define PWDN_GPIO_NUM    -1
#define RESET_GPIO_NUM   -1
#define XCLK_GPIO_NUM    16
#define SIOD_GPIO_NUM    21
#define SIOC_GPIO_NUM    22
#define Y9_GPIO_NUM      12
#define Y8_GPIO_NUM      13
#define Y7_GPIO_NUM      14
#define Y6_GPIO_NUM      15

void startCameraServer();

void setup() {
  Serial.begin(115200);
  WiFi.begin(ssid, password);

  // Wait for Wi-Fi connection
  while (WiFi.status() != WL_CONNECTED) {
    delay(500);
    Serial.print(".");
  }
  Serial.println("\nWiFi connected");

  // Initialize the camera
  camera_config_t config;
  config.ledc_channel = LEDC_CHANNEL_0;
  config.ledc_timer = LEDC_TIMER_0;
  config.pin_d0 = Y9_GPIO_NUM;
  config.pin_d1 = Y8_GPIO_NUM;
  config.pin_d2 = Y7_GPIO_NUM;
  config.pin_d3 = Y6_GPIO_NUM;
  config.pin_xclk = XCLK_GPIO_NUM;
  config.pin_sscb_sda = SIOD_GPIO_NUM;
  config.pin_sscb_scl = SIOC_GPIO_NUM;
  config.xclk_freq_hz = 20000000;
  config.pixel_format = PIXFORMAT_JPEG;

  if (!esp_camera_init(&config)) {
    Serial.println("Camera init failed");
    return;
  }

  startCameraServer();
}

void loop() {
  // Main loop does nothing; camera server handles requests
}
Troubleshooting and FAQs
Common Issues and Solutions
Camera Initialization Failed:
- Ensure the camera module is properly connected to the ESP32 S3 CAM.
- Verify the camera configuration pins in your code match your hardware setup.
Wi-Fi Not Connecting:
- Double-check the SSID and password in your code.
- Ensure the ESP32 S3 CAM is within range of your Wi-Fi router.
Module Overheating:
- Use a heatsink or ensure proper ventilation to prevent overheating.
Code Upload Fails:
- Ensure
GPIO0is pulled low during boot to enter programming mode. - Check the USB-to-serial adapter connection and drivers.
- Ensure
FAQs
Can I use the ESP32 S3 CAM without a camera? Yes, the module can be used for other IoT applications without a camera.
What camera modules are compatible with the ESP32 S3 CAM? The module supports OV2640 and similar camera modules with a parallel interface.
How do I reset the module? Use the
RESETpin or press the reset button (if available on your board).
By following this documentation, you can effectively use the ESP32 S3 CAM in your projects and troubleshoot common issues.