How to Use MLX90640: Examples, Pinouts, and Specs
Introduction
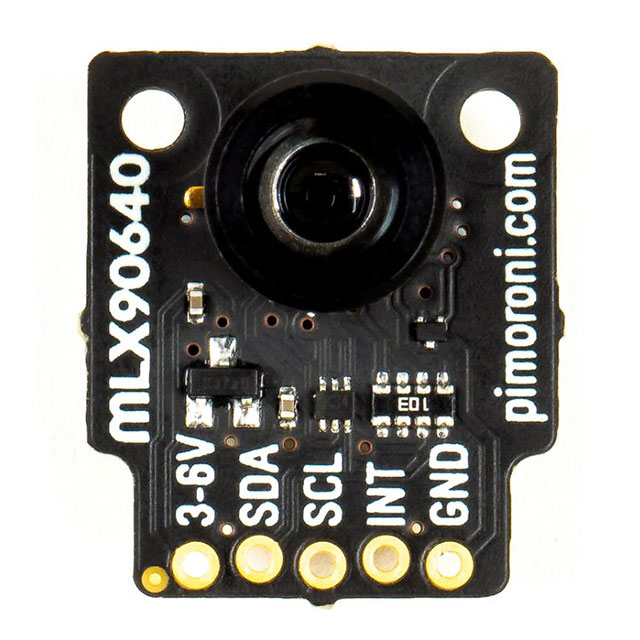
The MLX90640 is a 32x24 pixel thermal imaging sensor manufactured by Pimoroni Ltd (Part ID: PIM365). This advanced sensor provides non-contact temperature measurements by detecting infrared radiation. It is capable of measuring temperatures in the range of -40°C to 300°C, making it ideal for applications requiring precise thermal monitoring.
Explore Projects Built with MLX90640


Explore Projects Built with MLX90640
Common Applications
- Thermal imaging cameras
- HVAC (Heating, Ventilation, and Air Conditioning) systems
- Robotics and automation
- Fire detection and safety systems
- Medical diagnostics and monitoring
- Industrial process control
Technical Specifications
The following table outlines the key technical details of the MLX90640 sensor:
| Parameter | Value |
|---|---|
| Manufacturer | Pimoroni Ltd |
| Part ID | PIM365 |
| Resolution | 32x24 pixels |
| Temperature Range | -40°C to 300°C |
| Field of View (FoV) | 55° x 35° (standard version) |
| Spectral Response | 8-14 µm (infrared spectrum) |
| Refresh Rate | 0.5 Hz to 64 Hz |
| Operating Voltage | 3.3V |
| Communication Interface | I²C |
| Power Consumption | ~23 mA |
| Dimensions | 21mm x 20mm x 5mm |
Pin Configuration
The MLX90640 sensor uses a standard I²C interface for communication. Below is the pinout description:
| Pin | Name | Description |
|---|---|---|
| 1 | VCC | Power supply (3.3V) |
| 2 | GND | Ground |
| 3 | SDA | I²C data line |
| 4 | SCL | I²C clock line |
Usage Instructions
How to Use the MLX90640 in a Circuit
- Power Supply: Connect the VCC pin to a 3.3V power source and the GND pin to ground.
- I²C Communication: Connect the SDA and SCL pins to the corresponding I²C pins on your microcontroller (e.g., Arduino UNO).
- Pull-Up Resistors: Ensure that the SDA and SCL lines have pull-up resistors (typically 4.7kΩ) for proper I²C communication.
- Software Setup: Use a compatible library (e.g., Adafruit MLX90640 library) to interface with the sensor and retrieve temperature data.
Important Considerations
- Power Supply: The MLX90640 operates at 3.3V. Do not connect it directly to a 5V power source to avoid damage.
- I²C Address: The default I²C address of the MLX90640 is
0x33. Ensure no address conflicts if multiple I²C devices are connected. - Thermal Calibration: The sensor is factory-calibrated, but environmental factors (e.g., ambient temperature) may affect accuracy. Use software compensation if needed.
- Field of View: Ensure the sensor is positioned correctly to capture the desired area within its 55° x 35° field of view.
Example Code for Arduino UNO
Below is an example of how to use the MLX90640 with an Arduino UNO:
#include <Wire.h>
#include <Adafruit_MLX90640.h>

// Create an instance of the MLX90640 object
Adafruit_MLX90640 mlx;

// Define the frame buffer to store temperature data
float frame[768]; // 32x24 = 768 pixels

void setup() {
  Serial.begin(115200); // Initialize serial communication
  Wire.begin();         // Initialize I²C communication

  // Initialize the MLX90640 sensor
  if (!mlx.begin(0x33)) { // Default I²C address is 0x33
    Serial.println("MLX90640 not detected. Check wiring!");
    while (1); // Halt execution if sensor is not found
  }

  // Set the refresh rate to 8 Hz
  mlx.setMode(MLX90640_INTERLEAVED);
  mlx.setRefreshRate(MLX90640_8_HZ);

  Serial.println("MLX90640 initialized successfully!");
}

void loop() {
  // Read temperature data into the frame buffer
  if (mlx.getFrame(frame) != 0) {
    Serial.println("Failed to read frame data!");
    return; // Skip this iteration if reading fails
  }

  // Print the temperature data for each pixel
  for (int i = 0; i < 768; i++) {
    Serial.print(frame[i]);
    Serial.print(" ");
    if ((i + 1) % 32 == 0) { // Print a newline after every 32 pixels
      Serial.println();
    }
  }

  delay(125); // Delay to match the refresh rate (8 Hz = 125 ms)
}
Notes on the Code
- The
Adafruit_MLX90640library must be installed in your Arduino IDE. - Ensure the I²C pull-up resistors are properly connected for stable communication.
- The frame buffer stores temperature data for all 768 pixels, which can be processed or visualized as needed.
Troubleshooting and FAQs
Common Issues
Sensor Not Detected
- Cause: Incorrect wiring or I²C address mismatch.
- Solution: Verify the connections and ensure the correct I²C address (
0x33) is used in the code.
Inaccurate Temperature Readings
- Cause: Environmental factors or improper calibration.
- Solution: Use software compensation to account for ambient temperature variations.
I²C Communication Errors
- Cause: Missing or incorrect pull-up resistors on SDA/SCL lines.
- Solution: Add 4.7kΩ pull-up resistors to the SDA and SCL lines.
Overheating or Damage
- Cause: Exceeding the operating voltage (3.3V).
- Solution: Use a voltage regulator or level shifter if interfacing with a 5V system.
FAQs
Q: Can the MLX90640 detect objects through glass?
A: No, the MLX90640 cannot detect infrared radiation through glass, as glass blocks most IR wavelengths.
Q: What is the maximum distance for accurate temperature measurement?
A: The effective range depends on the size of the object and its emissivity. For small objects, the sensor should be placed closer for accurate readings.
Q: Can I use the MLX90640 with a Raspberry Pi?
A: Yes, the MLX90640 is compatible with Raspberry Pi. Use the appropriate Python libraries (e.g., adafruit-circuitpython-mlx90640) for integration.
Q: How do I visualize the thermal data?
A: You can use software tools or libraries to map the temperature data to a color gradient and display it as a thermal image.