Cirkit Designer Logo
Cirkit Designer
Your all-in-one circuit design IDE
Home / 
Component Documentation

How to Use Salinity Sensor: Examples, Pinouts, and Specs

Image of Salinity Sensor
Cirkit Designer LogoDesign with Salinity Sensor in Cirkit Designer

Introduction

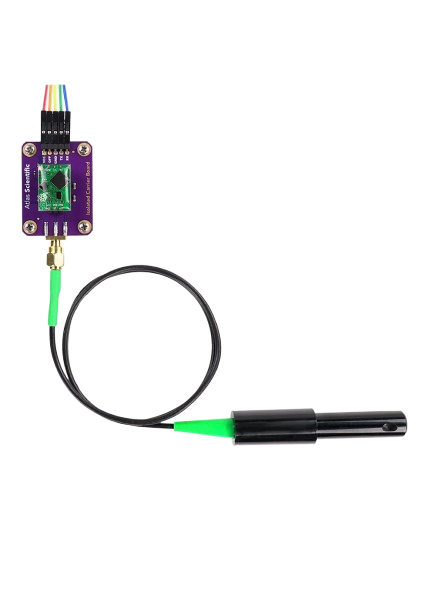
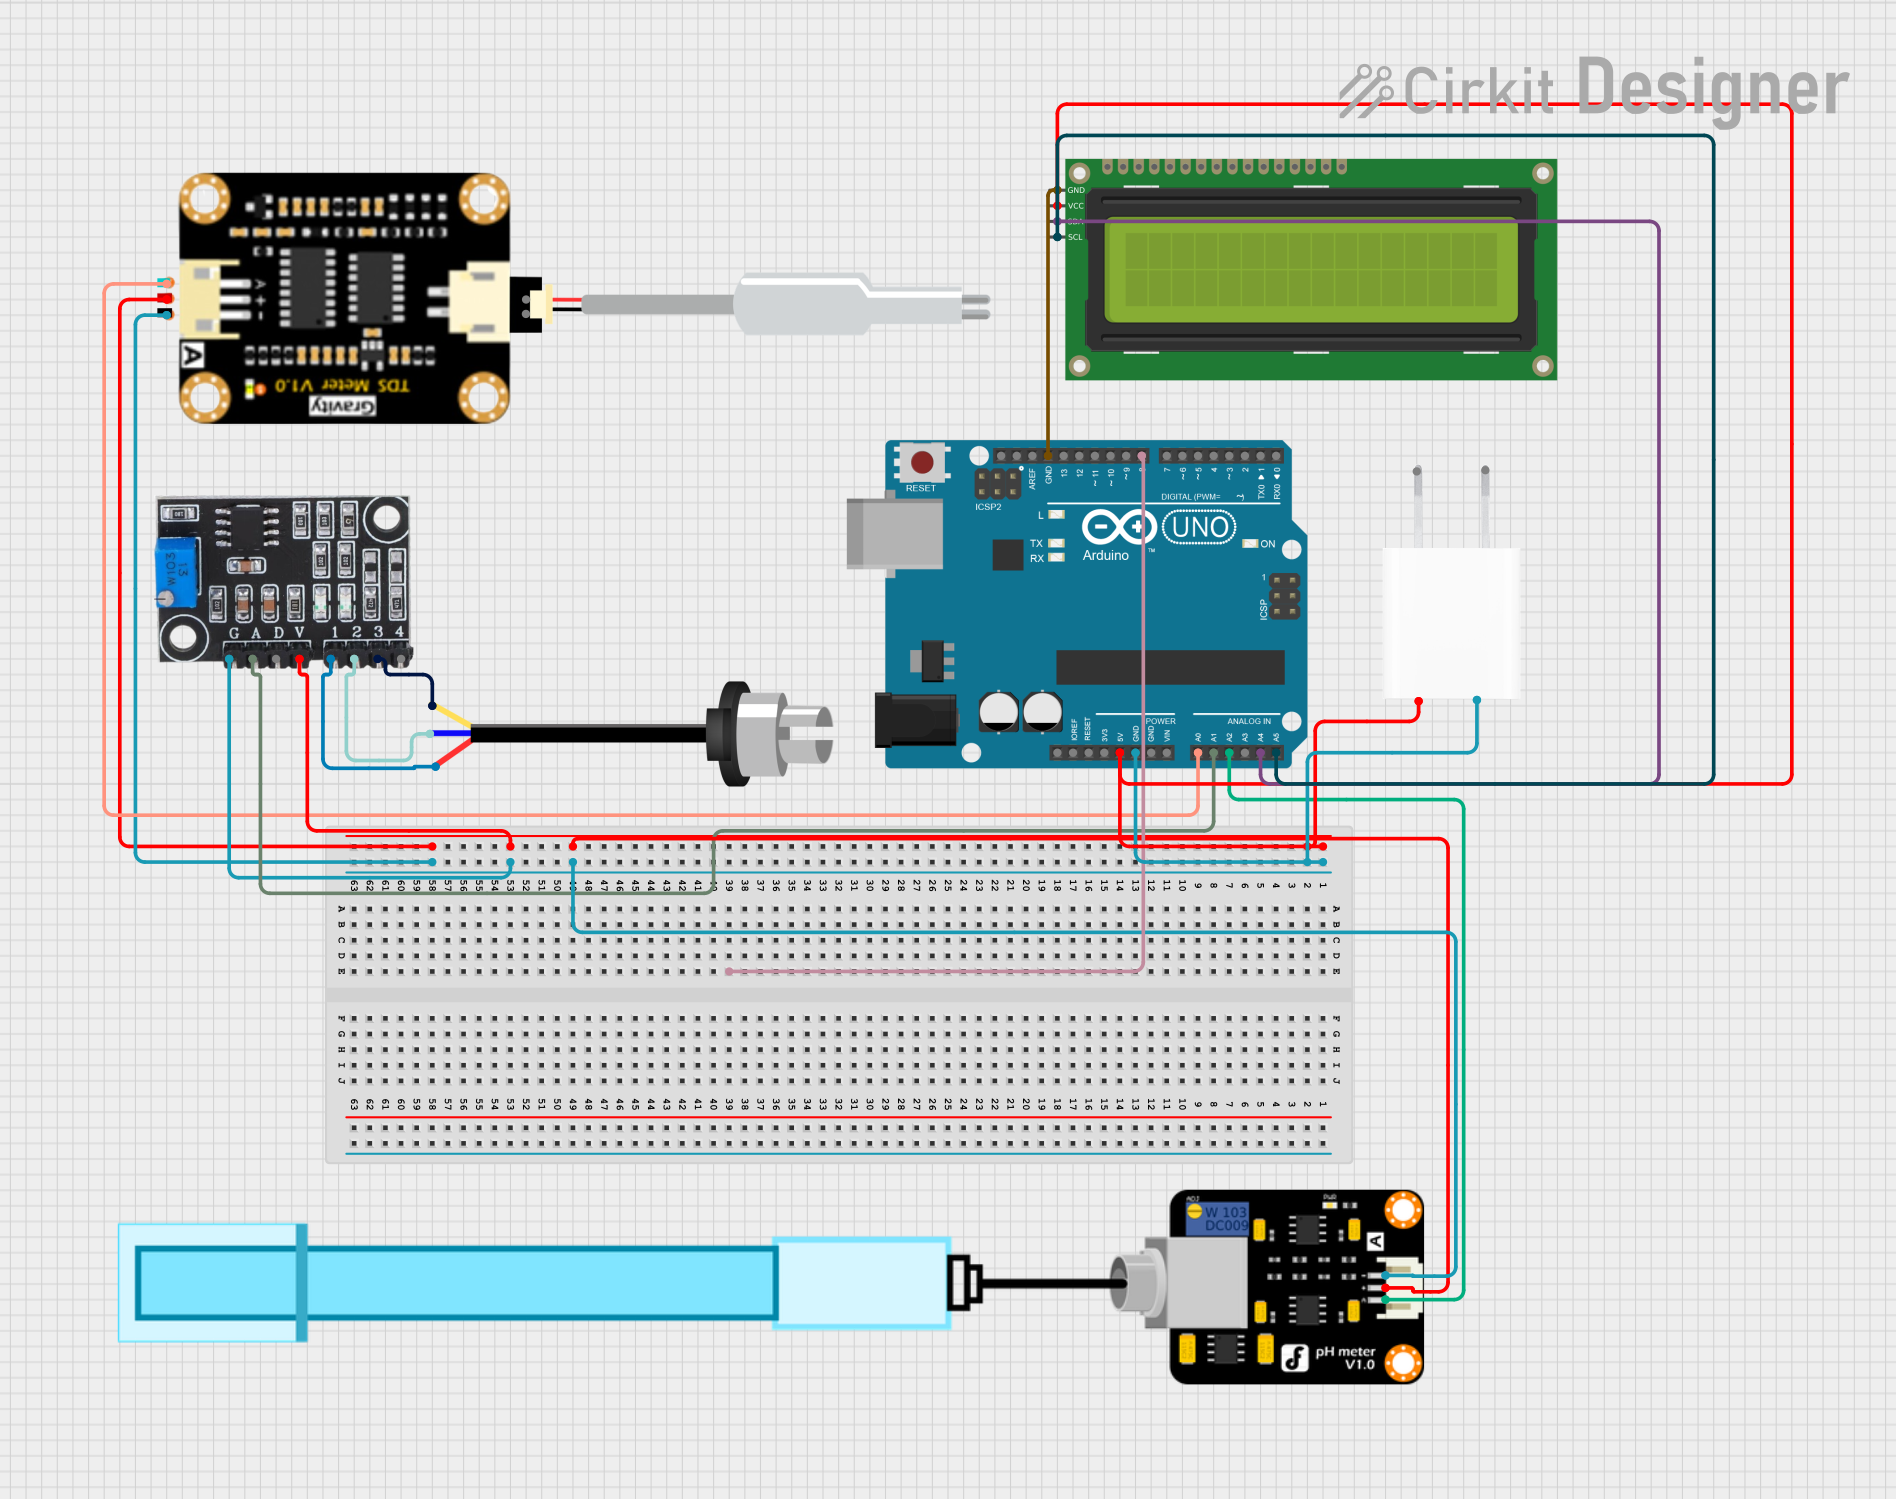
The Atlas Scientific Salinity Sensor is a high-precision device designed to measure the concentration of salt in water. It is widely used in applications such as aquaculture, environmental monitoring, and water quality assessment. This sensor provides reliable and accurate salinity readings, making it an essential tool for maintaining optimal water conditions in various industries.

The sensor operates by measuring the conductivity of the water and converting it into salinity values. It is compatible with microcontrollers like Arduino, Raspberry Pi, and other data acquisition systems, making it versatile for both hobbyists and professionals.

Explore Projects Built with Salinity Sensor

Use Cirkit Designer to design, explore, and prototype these projects online. Some projects support real-time simulation. Click "Open Project" to start designing instantly!
Arduino Mega 2560-Based Soil Nutrient Testing System with Bluetooth and LCD Display
Image of npk kit sensor: A project utilizing Salinity Sensor in a practical application
This circuit is an automated chemical testing system controlled by an Arduino Mega 2560. It uses various sensors, including a turbidity sensor and a color sensor, to measure water quality parameters, and it communicates results via an LCD display and Bluetooth module. The system also controls multiple relays to dispense chemicals for different tests.
Cirkit Designer LogoOpen Project in Cirkit Designer
Arduino Mega 2560-Based Water Quality Monitoring System with LCD Display
Image of Izzan: A project utilizing Salinity Sensor in a practical application
This circuit is designed for monitoring water quality parameters using an Arduino Mega 2560. It integrates sensors for measuring temperature, pH, turbidity, and TDS, and displays the data on an LCD screen via I2C communication.
Cirkit Designer LogoOpen Project in Cirkit Designer
Arduino Nano-Based Water Quality Monitoring System with GSM Alert
Image of HAB detector Project: A project utilizing Salinity Sensor in a practical application
This circuit is designed for environmental monitoring, specifically for detecting harmful algal blooms (HABs) by measuring pH, turbidity, and temperature. It uses an Arduino Nano interfaced with a pH meter, turbidity module, and DS18B20 temperature sensor to collect data, and a SIM900A GSM module to send SMS alerts when the readings exceed predefined thresholds. The circuit also includes an LCD screen for displaying the measurements and a resistor for the temperature sensor setup.
Cirkit Designer LogoOpen Project in Cirkit Designer
Arduino UNO-Based Water Quality Monitoring System with TDS, pH, and Turbidity Sensors
Image of PRI Kelompok 7: A project utilizing Salinity Sensor in a practical application
This circuit is designed to measure and display water quality parameters including TDS, turbidity, and pH levels using an Arduino UNO. The sensors for TDS, turbidity, and pH are connected to the Arduino's analog inputs, and the measured values are displayed on a 16x2 I2C LCD. Power is supplied through a 5V adapter, ensuring all components are adequately powered.
Cirkit Designer LogoOpen Project in Cirkit Designer

Explore Projects Built with Salinity Sensor

Use Cirkit Designer to design, explore, and prototype these projects online. Some projects support real-time simulation. Click "Open Project" to start designing instantly!
Image of npk kit sensor: A project utilizing Salinity Sensor in a practical application
Arduino Mega 2560-Based Soil Nutrient Testing System with Bluetooth and LCD Display
This circuit is an automated chemical testing system controlled by an Arduino Mega 2560. It uses various sensors, including a turbidity sensor and a color sensor, to measure water quality parameters, and it communicates results via an LCD display and Bluetooth module. The system also controls multiple relays to dispense chemicals for different tests.
Cirkit Designer LogoOpen Project in Cirkit Designer
Image of Izzan: A project utilizing Salinity Sensor in a practical application
Arduino Mega 2560-Based Water Quality Monitoring System with LCD Display
This circuit is designed for monitoring water quality parameters using an Arduino Mega 2560. It integrates sensors for measuring temperature, pH, turbidity, and TDS, and displays the data on an LCD screen via I2C communication.
Cirkit Designer LogoOpen Project in Cirkit Designer
Image of HAB detector Project: A project utilizing Salinity Sensor in a practical application
Arduino Nano-Based Water Quality Monitoring System with GSM Alert
This circuit is designed for environmental monitoring, specifically for detecting harmful algal blooms (HABs) by measuring pH, turbidity, and temperature. It uses an Arduino Nano interfaced with a pH meter, turbidity module, and DS18B20 temperature sensor to collect data, and a SIM900A GSM module to send SMS alerts when the readings exceed predefined thresholds. The circuit also includes an LCD screen for displaying the measurements and a resistor for the temperature sensor setup.
Cirkit Designer LogoOpen Project in Cirkit Designer
Image of PRI Kelompok 7: A project utilizing Salinity Sensor in a practical application
Arduino UNO-Based Water Quality Monitoring System with TDS, pH, and Turbidity Sensors
This circuit is designed to measure and display water quality parameters including TDS, turbidity, and pH levels using an Arduino UNO. The sensors for TDS, turbidity, and pH are connected to the Arduino's analog inputs, and the measured values are displayed on a 16x2 I2C LCD. Power is supplied through a 5V adapter, ensuring all components are adequately powered.
Cirkit Designer LogoOpen Project in Cirkit Designer

Technical Specifications

Below are the key technical details of the Atlas Scientific Salinity Sensor:

Parameter Specification
Measurement Range 0.07 PSU to 42 PSU
Accuracy ±0.1 PSU
Operating Voltage 3.3V to 5V DC
Operating Current 10mA
Communication Protocol UART or I2C
Temperature Compensation Automatic (via external temperature probe)
Operating Temperature 0°C to 50°C
Dimensions 12mm x 12mm x 100mm
Waterproof Rating IP68

Pin Configuration

The Atlas Scientific Salinity Sensor typically comes with a connector or breakout board for easy interfacing. Below is the pin configuration:

Pin Name Description
VCC Power supply input (3.3V to 5V DC)
GND Ground
TX UART Transmit pin (for serial communication)
RX UART Receive pin (for serial communication)
SDA I2C Data line (optional, for I2C communication)
SCL I2C Clock line (optional, for I2C communication)

Usage Instructions

Connecting the Sensor

  1. Power Supply: Connect the VCC pin to a 3.3V or 5V power source and the GND pin to ground.
  2. Communication: Choose between UART or I2C communication:
    • For UART: Connect the TX pin of the sensor to the RX pin of your microcontroller, and the RX pin of the sensor to the TX pin of your microcontroller.
    • For I2C: Connect the SDA and SCL pins to the corresponding I2C pins on your microcontroller.
  3. Temperature Probe: If using the external temperature probe for compensation, connect it to the designated port on the sensor.

Sample Arduino Code

Below is an example of how to interface the Atlas Scientific Salinity Sensor with an Arduino UNO using UART communication:

#include <SoftwareSerial.h>

// Define RX and TX pins for software serial communication
SoftwareSerial salinitySerial(10, 11); // RX = pin 10, TX = pin 11

void setup() {
  Serial.begin(9600); // Initialize hardware serial for debugging
  salinitySerial.begin(9600); // Initialize software serial for sensor communication

  Serial.println("Salinity Sensor Initialized");
}

void loop() {
  // Check if data is available from the sensor
  if (salinitySerial.available()) {
    String salinityData = ""; // Variable to store sensor data

    // Read data from the sensor
    while (salinitySerial.available()) {
      char c = salinitySerial.read();
      salinityData += c;
    }

    // Print the salinity data to the serial monitor
    Serial.println("Salinity Reading: " + salinityData);
  }

  delay(1000); // Wait for 1 second before the next reading
}

Best Practices

  • Ensure the sensor is fully submerged in the water sample for accurate readings.
  • Use the external temperature probe for automatic temperature compensation, especially in environments with fluctuating temperatures.
  • Calibrate the sensor periodically using standard salinity solutions to maintain accuracy.
  • Avoid exposing the sensor to extreme temperatures or corrosive chemicals.

Troubleshooting and FAQs

Common Issues and Solutions

  1. No Data Output:

    • Ensure the sensor is properly powered (check VCC and GND connections).
    • Verify the communication protocol (UART or I2C) and ensure the correct pins are connected.
    • Check the baud rate (default is 9600 for UART).
  2. Inaccurate Readings:

    • Calibrate the sensor using a standard salinity solution.
    • Ensure the temperature probe is connected for compensation.
    • Clean the sensor probe to remove any debris or buildup.
  3. Sensor Not Responding:

    • Check for loose or damaged wires.
    • Verify that the microcontroller's RX and TX pins are correctly connected to the sensor's TX and RX pins (for UART).

FAQs

Q: Can this sensor be used in seawater?
A: Yes, the Atlas Scientific Salinity Sensor is designed to measure salinity in a wide range of water types, including seawater.

Q: How often should I calibrate the sensor?
A: Calibration frequency depends on usage, but it is recommended to calibrate the sensor every 2-4 weeks for optimal accuracy.

Q: Is the sensor waterproof?
A: Yes, the sensor has an IP68 waterproof rating, making it suitable for continuous submersion in water.

Q: Can I use this sensor with a Raspberry Pi?
A: Yes, the sensor is compatible with Raspberry Pi via UART or I2C communication.

By following this documentation, you can effectively integrate and utilize the Atlas Scientific Salinity Sensor in your projects.