Cirkit Designer Logo
Cirkit Designer
Your all-in-one circuit design IDE
Home / 
Component Documentation

How to Use ph 4502c: Examples, Pinouts, and Specs

Image of ph 4502c
Cirkit Designer LogoDesign with ph 4502c in Cirkit Designer

Introduction

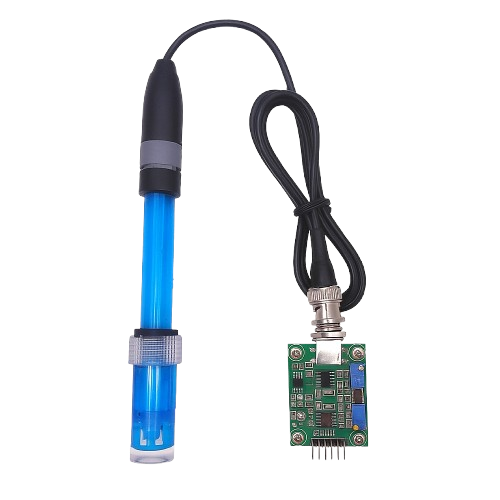
The PH 4502C is a pH sensor designed for measuring the acidity or alkalinity of a solution. It provides accurate and reliable pH readings, making it an essential tool for applications in laboratories, industrial processes, aquariums, hydroponics, and water quality monitoring. The sensor is easy to interface with microcontrollers, such as Arduino, and is suitable for both beginners and professionals.

Common applications include:

  • Monitoring pH levels in aquariums and hydroponic systems
  • Industrial chemical process control
  • Water treatment and quality analysis
  • Educational experiments in chemistry and biology

Explore Projects Built with ph 4502c

Use Cirkit Designer to design, explore, and prototype these projects online. Some projects support real-time simulation. Click "Open Project" to start designing instantly!
Arduino UNO pH Sensor Interface for Real-Time Monitoring
Image of PH SENSOR: A project utilizing ph 4502c in a practical application
This circuit interfaces a pH sensor module (ph4502c) with an Arduino UNO. The pH sensor is powered by the Arduino's 5V and GND pins, and its analog output (Po) is connected to the Arduino's A0 pin for pH level readings.
Cirkit Designer LogoOpen Project in Cirkit Designer
Arduino UNO Based Temperature Monitoring System with MAX6675 and RTC
Image of Labby Mark1: A project utilizing ph 4502c in a practical application
This circuit features an Arduino UNO microcontroller interfaced with a MAX6675 thermocouple module, a ph4502c sensor module, an Adafruit DS1307 real-time clock (RTC) module, and an I2C LCD 16x2 display. The Arduino reads temperature data from the MAX6675, pH and temperature from the ph4502c, and time from the RTC, displaying this information on the LCD. A pushbutton is connected to the Arduino for potential user input, and all modules are powered by the Arduino's 5V output.
Cirkit Designer LogoOpen Project in Cirkit Designer
Arduino 101 Based Water Quality Monitoring System with LCD Display
Image of FISH FARMING: A project utilizing ph 4502c in a practical application
This circuit features an Arduino 101 microcontroller connected to various sensors and an LCD display. The Arduino collects data from a temperature sensor and a TDS (Total Dissolved Solids) sensor, and it controls a pH sensor module (ph4502c). The collected data is likely displayed on the 16x2 LCD screen, which communicates with the Arduino via I2C. A buck converter steps down the voltage from a 12V power supply to power the Arduino and the sensors.
Cirkit Designer LogoOpen Project in Cirkit Designer
Arduino Nano-Based Water Quality Monitoring System with GSM Alert
Image of HAB detector Project: A project utilizing ph 4502c in a practical application
This circuit is designed for environmental monitoring, specifically for detecting harmful algal blooms (HABs) by measuring pH, turbidity, and temperature. It uses an Arduino Nano interfaced with a pH meter, turbidity module, and DS18B20 temperature sensor to collect data, and a SIM900A GSM module to send SMS alerts when the readings exceed predefined thresholds. The circuit also includes an LCD screen for displaying the measurements and a resistor for the temperature sensor setup.
Cirkit Designer LogoOpen Project in Cirkit Designer

Explore Projects Built with ph 4502c

Use Cirkit Designer to design, explore, and prototype these projects online. Some projects support real-time simulation. Click "Open Project" to start designing instantly!
Image of PH SENSOR: A project utilizing ph 4502c in a practical application
Arduino UNO pH Sensor Interface for Real-Time Monitoring
This circuit interfaces a pH sensor module (ph4502c) with an Arduino UNO. The pH sensor is powered by the Arduino's 5V and GND pins, and its analog output (Po) is connected to the Arduino's A0 pin for pH level readings.
Cirkit Designer LogoOpen Project in Cirkit Designer
Image of Labby Mark1: A project utilizing ph 4502c in a practical application
Arduino UNO Based Temperature Monitoring System with MAX6675 and RTC
This circuit features an Arduino UNO microcontroller interfaced with a MAX6675 thermocouple module, a ph4502c sensor module, an Adafruit DS1307 real-time clock (RTC) module, and an I2C LCD 16x2 display. The Arduino reads temperature data from the MAX6675, pH and temperature from the ph4502c, and time from the RTC, displaying this information on the LCD. A pushbutton is connected to the Arduino for potential user input, and all modules are powered by the Arduino's 5V output.
Cirkit Designer LogoOpen Project in Cirkit Designer
Image of FISH FARMING: A project utilizing ph 4502c in a practical application
Arduino 101 Based Water Quality Monitoring System with LCD Display
This circuit features an Arduino 101 microcontroller connected to various sensors and an LCD display. The Arduino collects data from a temperature sensor and a TDS (Total Dissolved Solids) sensor, and it controls a pH sensor module (ph4502c). The collected data is likely displayed on the 16x2 LCD screen, which communicates with the Arduino via I2C. A buck converter steps down the voltage from a 12V power supply to power the Arduino and the sensors.
Cirkit Designer LogoOpen Project in Cirkit Designer
Image of HAB detector Project: A project utilizing ph 4502c in a practical application
Arduino Nano-Based Water Quality Monitoring System with GSM Alert
This circuit is designed for environmental monitoring, specifically for detecting harmful algal blooms (HABs) by measuring pH, turbidity, and temperature. It uses an Arduino Nano interfaced with a pH meter, turbidity module, and DS18B20 temperature sensor to collect data, and a SIM900A GSM module to send SMS alerts when the readings exceed predefined thresholds. The circuit also includes an LCD screen for displaying the measurements and a resistor for the temperature sensor setup.
Cirkit Designer LogoOpen Project in Cirkit Designer

Technical Specifications

The PH 4502C sensor module consists of a pH probe and a signal conditioning circuit. Below are the key technical details:

General Specifications

Parameter Value
Operating Voltage 5V DC
Output Voltage Range 0V to 3V
pH Measurement Range 0 to 14 pH
Accuracy ±0.1 pH (at 25°C)
Temperature Range 0°C to 60°C
Response Time ≤1 minute
Probe Type Glass electrode
Calibration Two-point calibration (pH 4.0 and pH 7.0)

Pin Configuration

The PH 4502C module has a 4-pin interface for connecting to a microcontroller or other devices. The pin configuration is as follows:

Pin Name Description
VCC Power supply input (5V DC)
GND Ground
DO Digital output (not commonly used)
AO Analog output (pH signal)

Usage Instructions

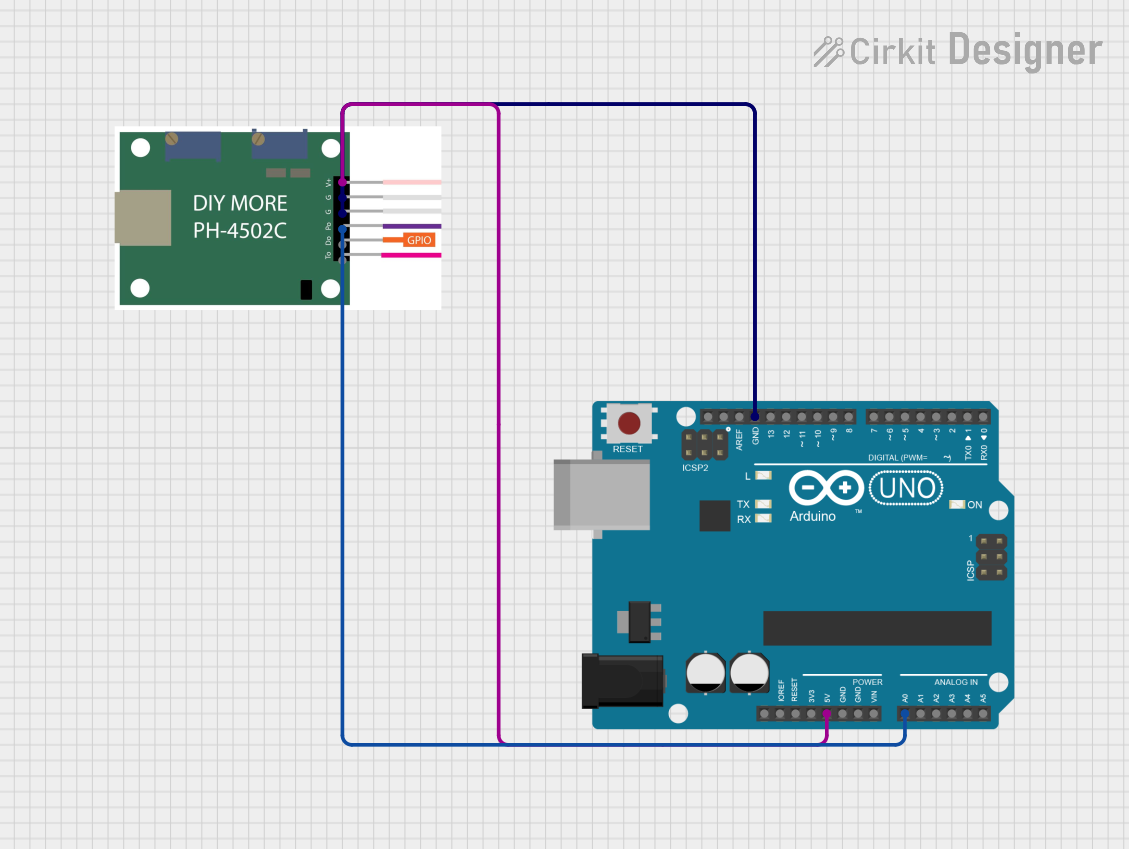
Connecting the PH 4502C to an Arduino UNO

To use the PH 4502C with an Arduino UNO, follow these steps:

  1. Connect the VCC pin of the module to the 5V pin on the Arduino.
  2. Connect the GND pin of the module to the GND pin on the Arduino.
  3. Connect the AO pin of the module to an analog input pin on the Arduino (e.g., A0).
  4. Immerse the pH probe in the solution to be measured, ensuring the glass bulb is fully submerged.

Calibration

  1. Prepare standard buffer solutions with pH values of 4.0 and 7.0.
  2. Immerse the probe in the pH 7.0 buffer solution and adjust the potentiometer on the module until the Arduino reads approximately 2.5V.
  3. Rinse the probe with distilled water and immerse it in the pH 4.0 buffer solution. Adjust the potentiometer again to match the expected voltage output.
  4. Repeat the process if necessary to ensure accurate calibration.

Sample Arduino Code

Below is an example of how to read pH values using the PH 4502C and an Arduino UNO:

// PH 4502C pH Sensor Example Code
// Connect AO to A0 on Arduino UNO

const int pH_pin = A0; // Analog pin connected to AO
float voltage;         // Variable to store sensor voltage
float pH_value;        // Variable to store calculated pH value

void setup() {
  Serial.begin(9600); // Initialize serial communication
}

void loop() {
  voltage = analogRead(pH_pin) * (5.0 / 1023.0); 
  // Convert analog reading to voltage (5V reference, 10-bit ADC)

  pH_value = 3.5 * voltage; 
  // Convert voltage to pH value (calibration factor may vary)

  Serial.print("Voltage: ");
  Serial.print(voltage, 2); // Print voltage with 2 decimal places
  Serial.print(" V, pH: ");
  Serial.println(pH_value, 2); // Print pH value with 2 decimal places

  delay(1000); // Wait 1 second before next reading
}

Best Practices

  • Always rinse the pH probe with distilled water before and after use to prevent contamination.
  • Store the probe in a pH storage solution when not in use to maintain accuracy and prolong its lifespan.
  • Avoid exposing the probe to extreme temperatures or harsh chemicals that may damage the glass electrode.

Troubleshooting and FAQs

Common Issues

  1. Inaccurate Readings

    • Ensure the probe is properly calibrated using standard buffer solutions.
    • Check for contamination or damage to the glass electrode.
  2. No Output or Fluctuating Values

    • Verify all connections between the module and the microcontroller.
    • Ensure the power supply voltage is stable and within the specified range.
  3. Slow Response Time

    • Clean the probe with a gentle cleaning solution to remove any buildup or residue.

FAQs

Q: How often should I calibrate the sensor?
A: For best results, calibrate the sensor before each use or at least once a week during regular operation.

Q: Can the sensor be used in high-temperature solutions?
A: The sensor is rated for temperatures up to 60°C. Avoid using it in solutions exceeding this limit.

Q: What should I do if the probe dries out?
A: Soak the probe in a pH storage solution for at least 24 hours before use to restore functionality.

Q: Can I use the digital output (DO) pin?
A: The digital output is not commonly used for pH measurement. It is typically used for threshold-based applications, which require additional configuration. For accurate pH readings, use the analog output (AO) pin.