How to Use LM386 10W Audio Amplifier Board Mono 3.5mm DC 3-12V Volume Control Mini AMP Module Adjustable Volume: Examples, Pinouts, and Specs
Introduction
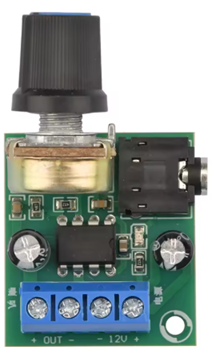
The LM386 10W Audio Amplifier Board is a compact and efficient audio amplifier module designed for mono audio applications. It is based on the LM386 amplifier IC and provides up to 10 watts of output power, making it ideal for driving small to medium-sized speakers. The module operates on a DC voltage range of 3-12V and features a 3.5mm audio input jack for easy integration with audio sources such as smartphones, MP3 players, or microcontrollers. Additionally, it includes an adjustable volume control knob for user convenience.
Explore Projects Built with LM386 10W Audio Amplifier Board Mono 3.5mm DC 3-12V Volume Control Mini AMP Module Adjustable Volume


Explore Projects Built with LM386 10W Audio Amplifier Board Mono 3.5mm DC 3-12V Volume Control Mini AMP Module Adjustable Volume
Common Applications and Use Cases
- Portable speaker systems
- DIY audio projects
- Interfacing with microcontrollers (e.g., Arduino, Raspberry Pi)
- Audio amplification for small home appliances
- Educational and prototyping purposes
Technical Specifications
Key Technical Details
| Parameter | Value |
|---|---|
| Manufacturer | * |
| Manufacturer Part ID | LM386 10W Audio Amplifier |
| Output Power | Up to 10W |
| Operating Voltage Range | 3V to 12V DC |
| Input Type | 3.5mm audio jack |
| Output Type | Mono speaker output |
| Volume Control | Adjustable potentiometer |
| Dimensions | Compact, varies by module |
| Operating Temperature | -40°C to +85°C |
Pin Configuration and Descriptions
The module typically has the following pin connections:
| Pin Name | Description |
|---|---|
| VCC | Positive DC power supply input (3V to 12V). |
| GND | Ground connection for the power supply and audio signal. |
| AUDIO IN | 3.5mm audio input jack for connecting audio sources. |
| SPEAKER OUT + | Positive terminal for connecting the mono speaker. |
| SPEAKER OUT - | Negative terminal for connecting the mono speaker. |
Usage Instructions
How to Use the Component in a Circuit
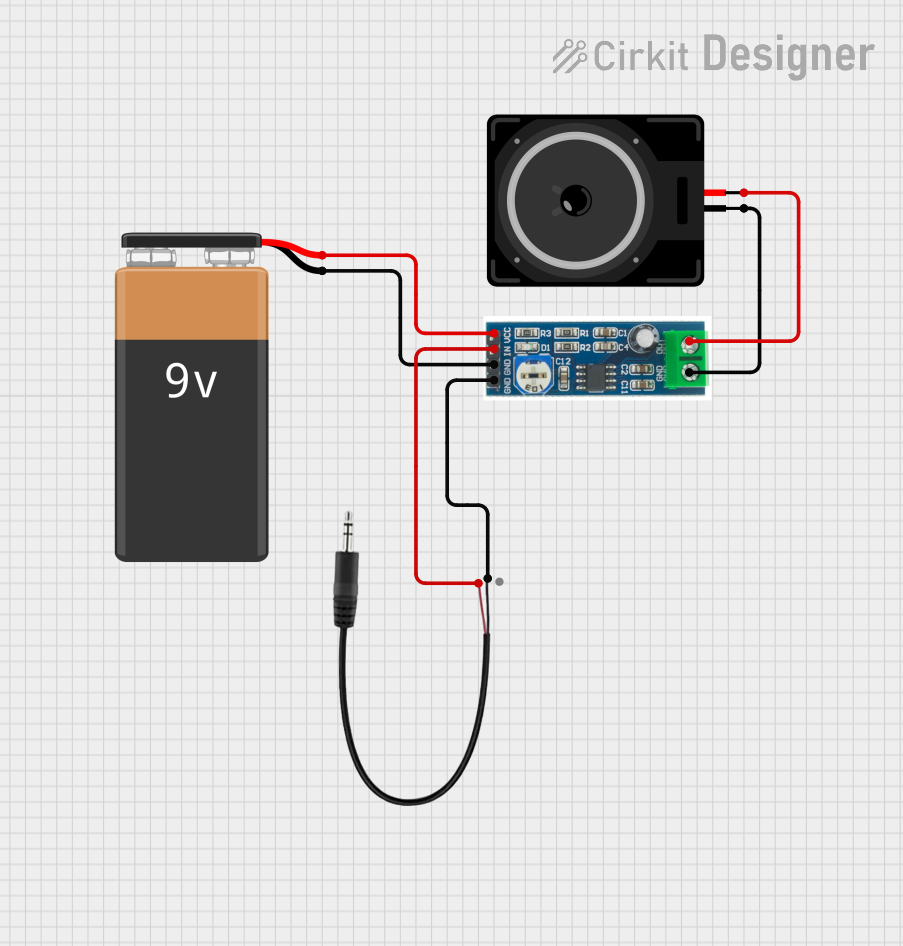
- Power Supply: Connect a DC power source (3V to 12V) to the
VCCandGNDpins. Ensure the power supply is stable and within the specified voltage range. - Audio Input: Plug an audio source (e.g., smartphone, MP3 player, or microcontroller) into the 3.5mm audio input jack.
- Speaker Connection: Connect a mono speaker to the
SPEAKER OUT +andSPEAKER OUT -terminals. Ensure the speaker's impedance matches the module's specifications (typically 4-8 ohms). - Volume Adjustment: Use the onboard potentiometer to adjust the output volume to the desired level.
- Testing: Power on the module and play an audio signal from the input source. Adjust the volume as needed.
Important Considerations and Best Practices
- Power Supply: Use a regulated DC power supply to avoid noise or damage to the module.
- Speaker Impedance: Ensure the connected speaker has an impedance of 4-8 ohms for optimal performance.
- Heat Dissipation: If operating at high power levels, ensure adequate ventilation or heat sinking to prevent overheating.
- Signal Quality: Use shielded cables for the audio input to minimize noise and interference.
- Polarity: Double-check the polarity of the power supply and speaker connections to avoid damage.
Example: Connecting to an Arduino UNO
The LM386 module can be used with an Arduino UNO to amplify audio signals generated by the microcontroller. Below is an example of how to generate a simple tone and amplify it using the LM386 module.
Circuit Diagram
- Connect the
VCCandGNDpins of the LM386 module to the Arduino's5VandGNDpins, respectively. - Connect the Arduino's
PWMpin (e.g., pin 9) to theAUDIO INpin of the LM386 module. - Connect a mono speaker to the
SPEAKER OUT +andSPEAKER OUT -terminals.
Arduino Code
// Simple Arduino code to generate a tone and amplify it using the LM386 module

int speakerPin = 9; // PWM pin connected to AUDIO IN of LM386 module

void setup() {
  pinMode(speakerPin, OUTPUT); // Set the speaker pin as an output
}

void loop() {
  // Generate a 1kHz tone for 500ms
  tone(speakerPin, 1000, 500);
  delay(1000); // Wait for 1 second before repeating
}
Troubleshooting and FAQs
Common Issues and Solutions
| Issue | Possible Cause | Solution |
|---|---|---|
| No sound from the speaker | Incorrect wiring or loose connections | Verify all connections and wiring. |
| Distorted audio output | Input signal too high or low voltage | Adjust input signal level or power supply. |
| Overheating of the module | High power operation without cooling | Ensure proper ventilation or add a heatsink. |
| Noise or interference in output | Poor grounding or unshielded cables | Use shielded cables and check grounding. |
FAQs
Can I use this module with a stereo audio source?
- Yes, but only one channel (left or right) can be connected to the module since it is a mono amplifier.
What is the maximum speaker size I can use?
- The module can drive speakers with an impedance of 4-8 ohms. Ensure the speaker's power rating matches the module's output power.
Can I power the module with a battery?
- Yes, the module can be powered with a 3-12V DC battery, such as a 9V battery or a Li-ion cell.
Why is the audio output weak?
- Check the input signal level and ensure the volume control is adjusted properly.
Can I use this module for a wireless audio project?
- Yes, you can pair it with a Bluetooth audio receiver module for wireless audio applications.
This documentation provides a comprehensive guide to using the LM386 10W Audio Amplifier Board effectively. For further assistance, refer to the manufacturer's datasheet or contact technical support.