How to Use Contacteur HC/HP: Examples, Pinouts, and Specs
Introduction
The Contacteur HC/HP (Manufacturer Part ID: 092701) by Legrand is a versatile contactor designed for controlling high and low power circuits. It is commonly used in heating and cooling systems, enabling the switching of electrical loads based on demand. This component is particularly useful in systems that require time-based or tariff-based switching, such as off-peak electricity usage (Heures Creuses/Heures Pleines in French).
Explore Projects Built with Contacteur HC/HP


Explore Projects Built with Contacteur HC/HP
Common Applications and Use Cases
- Electric water heaters with off-peak electricity tariffs
- HVAC systems for load management
- Industrial and residential automation systems
- Time-based switching of electrical loads
Technical Specifications
Key Technical Details
| Parameter | Value |
|---|---|
| Manufacturer | Legrand |
| Part ID | 092701 |
| Rated Voltage | 230V AC |
| Rated Current | 25A |
| Control Voltage | 230V AC |
| Frequency | 50/60 Hz |
| Number of Poles | 2P (Double Pole) |
| Mounting Type | DIN Rail |
| Operating Temperature | -5°C to +40°C |
| Dimensions (H x W x D) | 83 x 36 x 66 mm |
| Compliance Standards | IEC 60947-4-1, CE Marking |
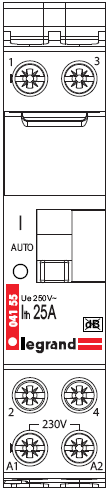
Pin Configuration and Descriptions
The Contacteur HC/HP has a straightforward terminal layout for both the load and control circuits. Below is the pin configuration:
Load Terminals
| Terminal Label | Description |
|---|---|
| 1 | Load Input (Phase) |
| 2 | Load Output (Phase) |
| 3 | Load Input (Neutral) |
| 4 | Load Output (Neutral) |
Control Terminals
| Terminal Label | Description |
|---|---|
| A1 | Control Input (Phase) |
| A2 | Control Input (Neutral) |
Usage Instructions
How to Use the Component in a Circuit
- Mounting: Secure the contactor onto a DIN rail in your electrical panel.
- Wiring the Load Circuit:
- Connect the power source (Phase and Neutral) to terminals
1and3. - Connect the load (e.g., water heater) to terminals
2and4.
- Connect the power source (Phase and Neutral) to terminals
- Wiring the Control Circuit:
- Connect the control signal (e.g., from a timer or relay) to terminals
A1(Phase) andA2(Neutral).
- Connect the control signal (e.g., from a timer or relay) to terminals
- Power On: Once all connections are secure, power on the system. The contactor will switch the load circuit based on the control signal applied to
A1andA2.
Important Considerations and Best Practices
- Ensure the contactor's rated current (25A) is not exceeded by the connected load.
- Use appropriate wire gauges for both the load and control circuits to prevent overheating.
- Install a circuit breaker or fuse upstream to protect the contactor and connected devices.
- Verify that the control signal matches the contactor's control voltage (230V AC).
- For time-based switching, pair the contactor with a compatible timer or programmable logic controller (PLC).
Example: Connecting to an Arduino UNO
While the Contacteur HC/HP is typically controlled by 230V AC signals, you can use an Arduino UNO to control it indirectly via a relay module. Below is an example:
Circuit Setup
- Connect the Arduino's digital output pin to the input of a 5V relay module.
- Wire the relay module's output to control the 230V AC signal for the contactor's
A1terminal. - Connect the
A2terminal to Neutral.
Arduino Code
// Example code to control the Contacteur HC/HP using an Arduino UNO
// via a relay module. The relay is connected to pin 7.

const int relayPin = 7; // Define the pin connected to the relay module

void setup() {
  pinMode(relayPin, OUTPUT); // Set the relay pin as an output
  digitalWrite(relayPin, LOW); // Ensure the relay is off at startup
}

void loop() {
  // Turn the relay (and contactor) ON
  digitalWrite(relayPin, HIGH);
  delay(60000); // Keep the contactor ON for 1 minute

  // Turn the relay (and contactor) OFF
  digitalWrite(relayPin, LOW);
  delay(60000); // Keep the contactor OFF for 1 minute
}
Notes:
- Ensure proper isolation between the Arduino and the high-voltage circuit.
- Use a relay module rated for 230V AC to safely control the contactor.
Troubleshooting and FAQs
Common Issues and Solutions
| Issue | Possible Cause | Solution |
|---|---|---|
| Contactor does not switch on | No control signal at A1 and A2 |
Verify the control circuit wiring and signal. |
| Contactor makes a buzzing noise | Insufficient control voltage | Check that the control voltage is 230V AC. |
| Load does not receive power | Incorrect load wiring | Ensure the load is connected to terminals 2 and 4. |
| Contactor overheats | Overloaded circuit | Verify the load current does not exceed 25A. |
FAQs
Can I use the Contacteur HC/HP with DC control signals?
- No, the contactor is designed for 230V AC control signals only.
What happens if the control signal is interrupted?
- The contactor will switch off, disconnecting the load from the power source.
Can I use this contactor for three-phase loads?
- No, this model is designed for single-phase loads only. For three-phase applications, use a three-pole contactor.
Is the contactor suitable for outdoor use?
- No, the contactor must be installed in a dry, indoor environment within an electrical panel.
By following this documentation, you can effectively integrate the Legrand Contacteur HC/HP (092701) into your electrical systems for reliable and efficient load control.