
How to Use Infineon TLE493D-P2B6 MS2GO 3D Magnetic Sensor 2GO Kit: Examples, Pinouts, and Specs
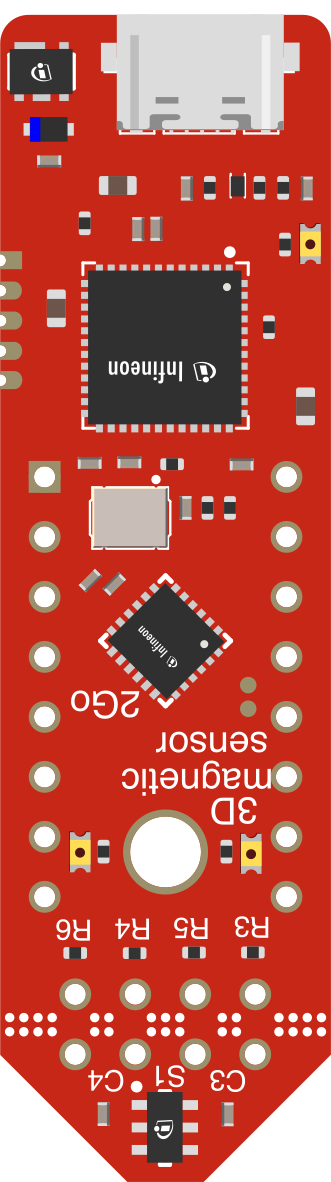
 Design with Infineon TLE493D-P2B6 MS2GO 3D Magnetic Sensor 2GO Kit in Cirkit Designer
Introduction
The Infineon TLE493D-P2B6 MS2GO 3D Magnetic Sensor 2GO Kit is a development kit designed to simplify the integration and prototyping of applications requiring precise 3D magnetic field measurements. At its core is the TLE493D-P2B6 sensor, which leverages Infineon's advanced Hall technology to provide highly accurate magnetic field sensing in three dimensions (X, Y, and Z axes). This kit is ideal for developers working on applications such as joystick controls, rotary encoders, linear position sensing, and contactless angle measurement.
Explore Projects Built with Infineon TLE493D-P2B6 MS2GO 3D Magnetic Sensor 2GO Kit
 Open Project in Cirkit Designer
 Open Project in Cirkit Designer
 Open Project in Cirkit Designer
 Open Project in Cirkit Designer
Explore Projects Built with Infineon TLE493D-P2B6 MS2GO 3D Magnetic Sensor 2GO Kit
Open Project in Cirkit DesignerOpen Project in Cirkit DesignerOpen Project in Cirkit DesignerOpen Project in Cirkit DesignerCommon Applications and Use Cases
- Industrial Automation: Position sensing for robotic arms and conveyor systems.
- Consumer Electronics: Joystick and gaming controller input.
- Automotive: Steering angle detection and gear shifters.
- IoT Devices: Contactless switches and smart home applications.
- Medical Devices: Precise motion tracking in diagnostic equipment.
Technical Specifications
Key Technical Details
| Parameter | Value |
|---|---|
| Sensor Type | 3D Magnetic Sensor |
| Measurement Axes | X, Y, Z |
| Supply Voltage Range | 2.7 V to 3.5 V |
| Current Consumption | 3.4 µA (low-power mode) |
| Magnetic Field Range | ±130 mT |
| Communication Interface | I²C |
| Operating Temperature Range | -40°C to +125°C |
| Package Type | PG-TSOP6-6 |
Pin Configuration and Descriptions
The TLE493D-P2B6 sensor is housed in a compact PG-TSOP6-6 package. Below is the pinout and description:
| Pin Number | Pin Name | Description |
|---|---|---|
| 1 | VDD | Power supply input (2.7 V to 3.5 V) |
| 2 | GND | Ground |
| 3 | SDA | I²C data line |
| 4 | SCL | I²C clock line |
| 5 | TEST | Test pin (leave unconnected in normal use) |
| 6 | VDDP | Power supply for I²C pull-up resistors |
Usage Instructions
How to Use the Component in a Circuit
- Power Supply: Connect the VDD pin to a 3.3 V power source and the GND pin to ground.
- I²C Communication: Connect the SDA and SCL pins to the corresponding I²C pins on your microcontroller. Ensure pull-up resistors (typically 4.7 kΩ) are connected to these lines.
- Bypass Capacitor: Place a 100 nF capacitor between VDD and GND for power supply decoupling.
- Test Pin: Leave the TEST pin unconnected during normal operation.
Important Considerations and Best Practices
- Magnetic Field Range: Ensure the magnetic field strength does not exceed ±130 mT to avoid sensor saturation.
- I²C Address: The default I²C address of the sensor is
0x1F. Verify this address in your microcontroller's code. - Temperature Range: Operate the sensor within the specified temperature range (-40°C to +125°C) for optimal performance.
- PCB Layout: Minimize noise by keeping the I²C lines short and using proper grounding techniques.
Example Code for Arduino UNO
Below is an example of how to interface the TLE493D-P2B6 sensor with an Arduino UNO using the I²C protocol:
#include <Wire.h>

// I²C address of the TLE493D-P2B6 sensor
#define TLE493D_ADDRESS 0x1F

void setup() {
  Wire.begin(); // Initialize I²C communication
  Serial.begin(9600); // Start serial communication for debugging

  // Initialize the sensor
  Wire.beginTransmission(TLE493D_ADDRESS);
  Wire.write(0x00); // Example: Write to a configuration register
  Wire.endTransmission();

  Serial.println("TLE493D-P2B6 initialized.");
}

void loop() {
  // Request 6 bytes of data from the sensor (X, Y, Z magnetic field values)
  Wire.beginTransmission(TLE493D_ADDRESS);
  Wire.write(0x00); // Example: Start reading from data register
  Wire.endTransmission();

  Wire.requestFrom(TLE493D_ADDRESS, 6);
  if (Wire.available() == 6) {
    int16_t x = (Wire.read() << 8) | Wire.read(); // X-axis data
    int16_t y = (Wire.read() << 8) | Wire.read(); // Y-axis data
    int16_t z = (Wire.read() << 8) | Wire.read(); // Z-axis data

    // Print the magnetic field values
    Serial.print("X: "); Serial.print(x);
    Serial.print(" Y: "); Serial.print(y);
    Serial.print(" Z: "); Serial.println(z);
  }

  delay(100); // Delay for stability
}
Troubleshooting and FAQs
Common Issues and Solutions
No Data from Sensor:
- Cause: Incorrect I²C address or wiring.
- Solution: Verify the I²C address (
0x1F) and ensure proper connections for SDA and SCL.
Unstable Readings:
- Cause: Noise on the power supply or I²C lines.
- Solution: Add a 100 nF decoupling capacitor between VDD and GND. Keep I²C lines short.
Sensor Not Detected:
- Cause: Missing pull-up resistors on SDA and SCL lines.
- Solution: Add 4.7 kΩ pull-up resistors to SDA and SCL.
Overheating:
- Cause: Exceeding the maximum supply voltage.
- Solution: Ensure the supply voltage is within the 2.7 V to 3.5 V range.
FAQs
Q: Can the sensor operate at 5 V?
A: No, the sensor operates within a supply voltage range of 2.7 V to 3.5 V. Use a voltage regulator if your system operates at 5 V.Q: What is the resolution of the magnetic field measurement?
A: The sensor provides a resolution of 12 bits for each axis (X, Y, Z).Q: Can I use this sensor for rotational angle measurement?
A: Yes, the sensor is well-suited for contactless angle measurement applications.Q: Is the sensor compatible with Raspberry Pi?
A: Yes, the sensor communicates via I²C, which is supported by Raspberry Pi.
This documentation provides a comprehensive guide to using the Infineon TLE493D-P2B6 MS2GO 3D Magnetic Sensor 2GO Kit effectively. For further details, refer to the official datasheet and application notes provided by Infineon Technologies.