Cirkit Designer Logo
Cirkit Designer
Your all-in-one circuit design IDE
Home / 
Component Documentation

How to Use Adafruit 0.56 inch 7-segment LED Backpack: Examples, Pinouts, and Specs

Image of Adafruit 0.56 inch 7-segment LED Backpack
Cirkit Designer LogoDesign with Adafruit 0.56 inch 7-segment LED Backpack in Cirkit Designer

Introduction

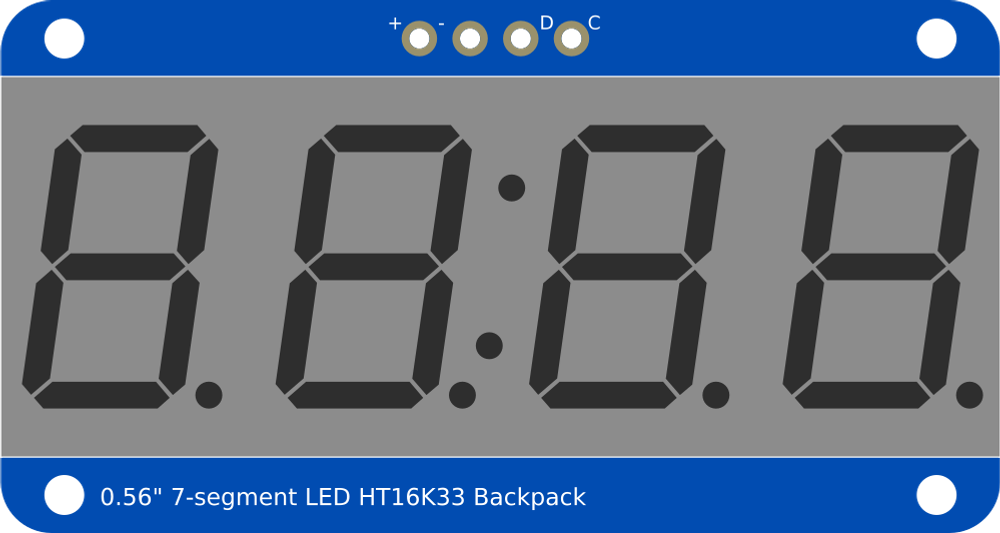
The Adafruit 0.56 inch 7-segment LED Backpack is a compact module designed to drive a 7-segment LED display. It simplifies the process of displaying numerical data by integrating an I2C interface, which reduces the number of pins required for connection. This module is ideal for applications where numerical data, such as sensor readings, time, or counters, needs to be displayed in a compact and efficient manner.

Explore Projects Built with Adafruit 0.56 inch 7-segment LED Backpack

Use Cirkit Designer to design, explore, and prototype these projects online. Some projects support real-time simulation. Click "Open Project" to start designing instantly!
Arduino-Based Real-Time Clock Display with Adafruit LED Backpack
Image of Clock Demo: A project utilizing Adafruit 0.56 inch 7-segment LED Backpack in a practical application
This circuit utilizes an Arduino UNO to read the current time from a DS1307 Real-Time Clock (RTC) module and display it on an Adafruit 0.56 inch 7-segment LED Backpack. The components communicate via I2C, allowing the Arduino to update the LED display with the time every second.
Cirkit Designer LogoOpen Project in Cirkit Designer
Arduino UNO Controlled Dual Seven Segment Display with Pushbutton Interaction and AHT10 Temperature Sensor
Image of enel290: A project utilizing Adafruit 0.56 inch 7-segment LED Backpack in a practical application
This circuit features an Arduino UNO microcontroller connected to two seven-segment displays, a pushbutton, a red LED with a 330-ohm resistor, and an AHT10 temperature and humidity sensor. The Arduino controls the segments of the displays via its digital pins and reads the pushbutton state. The LED is used as an indicator, and the AHT10 sensor interfaces with the Arduino over I2C to provide environmental data.
Cirkit Designer LogoOpen Project in Cirkit Designer
Battery-Powered Smart Light with Proximity Sensor and OLED Display using Adafruit QT Py RP2040
Image of lab: A project utilizing Adafruit 0.56 inch 7-segment LED Backpack in a practical application
This circuit is a portable, battery-powered system featuring an Adafruit QT Py RP2040 microcontroller that interfaces with an OLED display, a proximity sensor, an accelerometer, and an RGB LED strip. The system is powered by a lithium-ion battery with a step-up boost converter to provide 5V for the LED strip, and it includes a toggle switch for power control. The microcontroller communicates with the sensors and display via I2C.
Cirkit Designer LogoOpen Project in Cirkit Designer
Arduino Mega 2560 and UNO-Based Smart Wearable for Mountaineers with LoRa Communication
Image of mountaineer wearable: A project utilizing Adafruit 0.56 inch 7-segment LED Backpack in a practical application
This circuit is a smart wearable device for mountaineers that collects data from various sensors (temperature, pressure, heart rate, GPS, and motion) and displays it on an OLED screen. It uses an Arduino Mega 2560 to read sensor data and transmit it via LoRa to a receiver unit built with an Arduino UNO, which also displays the data on an OLED screen and handles SOS alerts with an LED and buzzer.
Cirkit Designer LogoOpen Project in Cirkit Designer

Explore Projects Built with Adafruit 0.56 inch 7-segment LED Backpack

Use Cirkit Designer to design, explore, and prototype these projects online. Some projects support real-time simulation. Click "Open Project" to start designing instantly!
Image of Clock Demo: A project utilizing Adafruit 0.56 inch 7-segment LED Backpack in a practical application
Arduino-Based Real-Time Clock Display with Adafruit LED Backpack
This circuit utilizes an Arduino UNO to read the current time from a DS1307 Real-Time Clock (RTC) module and display it on an Adafruit 0.56 inch 7-segment LED Backpack. The components communicate via I2C, allowing the Arduino to update the LED display with the time every second.
Cirkit Designer LogoOpen Project in Cirkit Designer
Image of enel290: A project utilizing Adafruit 0.56 inch 7-segment LED Backpack in a practical application
Arduino UNO Controlled Dual Seven Segment Display with Pushbutton Interaction and AHT10 Temperature Sensor
This circuit features an Arduino UNO microcontroller connected to two seven-segment displays, a pushbutton, a red LED with a 330-ohm resistor, and an AHT10 temperature and humidity sensor. The Arduino controls the segments of the displays via its digital pins and reads the pushbutton state. The LED is used as an indicator, and the AHT10 sensor interfaces with the Arduino over I2C to provide environmental data.
Cirkit Designer LogoOpen Project in Cirkit Designer
Image of lab: A project utilizing Adafruit 0.56 inch 7-segment LED Backpack in a practical application
Battery-Powered Smart Light with Proximity Sensor and OLED Display using Adafruit QT Py RP2040
This circuit is a portable, battery-powered system featuring an Adafruit QT Py RP2040 microcontroller that interfaces with an OLED display, a proximity sensor, an accelerometer, and an RGB LED strip. The system is powered by a lithium-ion battery with a step-up boost converter to provide 5V for the LED strip, and it includes a toggle switch for power control. The microcontroller communicates with the sensors and display via I2C.
Cirkit Designer LogoOpen Project in Cirkit Designer
Image of mountaineer wearable: A project utilizing Adafruit 0.56 inch 7-segment LED Backpack in a practical application
Arduino Mega 2560 and UNO-Based Smart Wearable for Mountaineers with LoRa Communication
This circuit is a smart wearable device for mountaineers that collects data from various sensors (temperature, pressure, heart rate, GPS, and motion) and displays it on an OLED screen. It uses an Arduino Mega 2560 to read sensor data and transmit it via LoRa to a receiver unit built with an Arduino UNO, which also displays the data on an OLED screen and handles SOS alerts with an LED and buzzer.
Cirkit Designer LogoOpen Project in Cirkit Designer

Common Applications and Use Cases

  • Digital clocks and timers
  • Sensor data displays
  • Counters for projects or experiments
  • Compact numerical readouts in embedded systems
  • Arduino-based projects requiring minimal wiring

Technical Specifications

Key Technical Details

  • Display Type: 4-digit 7-segment LED display
  • Interface: I2C (2-wire communication)
  • Operating Voltage: 3.3V to 5V DC
  • Current Consumption: ~10mA (varies with brightness and number of segments lit)
  • Driver Chip: HT16K33
  • Dimensions: 50mm x 26mm x 6.5mm
  • Brightness Control: Adjustable via software
  • Addressing: Configurable I2C address (up to 8 displays on the same I2C bus)

Pin Configuration and Descriptions

The Adafruit 0.56 inch 7-segment LED Backpack has 4 main pins for connection:

Pin Name Description Notes
VIN Power supply input (3.3V to 5V) Connect to the 3.3V or 5V pin of your microcontroller.
GND Ground Connect to the ground pin of your microcontroller.
SDA I2C data line Connect to the SDA pin of your microcontroller.
SCL I2C clock line Connect to the SCL pin of your microcontroller.

Usage Instructions

How to Use the Component in a Circuit

  1. Wiring the Module:

    • Connect the VIN pin to the 3.3V or 5V power supply of your microcontroller.
    • Connect the GND pin to the ground of your microcontroller.
    • Connect the SDA pin to the I2C data line (e.g., A4 on Arduino UNO).
    • Connect the SCL pin to the I2C clock line (e.g., A5 on Arduino UNO).
  2. Install Required Libraries:

    • Download and install the Adafruit LED Backpack library and Adafruit GFX library from the Arduino Library Manager.
  3. Upload Example Code:

    • Use the example code below to display numbers on the 7-segment display.

Example Code for Arduino UNO

#include <Wire.h>
#include <Adafruit_GFX.h>
#include <Adafruit_LED_Backpack.h>

// Create an instance of the 7-segment display
Adafruit_7segment display = Adafruit_7segment();

void setup() {
  // Initialize the display
  display.begin(0x70); // Default I2C address is 0x70
}

void loop() {
  // Display a number (e.g., 1234)
  display.print(1234); // Print the number to the display
  display.writeDisplay(); // Update the display with the new data
  delay(1000); // Wait for 1 second

  // Clear the display
  display.clear();
  display.writeDisplay();
  delay(500); // Wait for 0.5 seconds
}

Important Considerations and Best Practices

  • I2C Address Configuration: The default I2C address is 0x70. If you need to use multiple displays, you can change the address by soldering the address jumpers on the back of the module.
  • Power Supply: Ensure that the power supply voltage matches the requirements of the module (3.3V or 5V).
  • Brightness Control: Use the Adafruit library functions to adjust the brightness of the display to suit your application.
  • Pull-up Resistors: If your microcontroller does not have built-in pull-up resistors on the I2C lines, you may need to add external pull-up resistors (4.7kΩ to 10kΩ) to the SDA and SCL lines.

Troubleshooting and FAQs

Common Issues and Solutions

  1. Display Not Lighting Up:

    • Verify that the VIN and GND pins are properly connected to the power supply.
    • Check the I2C connections (SDA and SCL) for proper wiring.
    • Ensure the I2C address in the code matches the address of the module.
  2. Incorrect or Garbled Display:

    • Check for loose or incorrect wiring.
    • Ensure that the correct libraries are installed and included in your code.
    • Verify that the I2C address is correctly set in the code.
  3. Multiple Displays Not Working:

    • Ensure each display has a unique I2C address by configuring the address jumpers.
    • Check for sufficient power supply to drive multiple displays.

FAQs

Q: Can I use this module with a 3.3V microcontroller like the Raspberry Pi?
A: Yes, the module is compatible with both 3.3V and 5V logic levels, making it suitable for use with microcontrollers like the Raspberry Pi, ESP32, and Arduino.

Q: How many displays can I connect to a single I2C bus?
A: You can connect up to 8 displays by configuring unique I2C addresses for each module.

Q: Can I display letters or symbols on the 7-segment display?
A: While the display is primarily designed for numbers, some letters and symbols can be displayed using the Adafruit library.

Q: Do I need external resistors for the LEDs?
A: No, the module includes all necessary resistors and components for driving the LEDs.

Q: How do I adjust the brightness of the display?
A: Use the setBrightness() function in the Adafruit library to adjust the brightness level programmatically.