
Cirkit Designer
Your all-in-one circuit design IDE
Home /
Component Documentation
How to Use AC MCB (Blue): Examples, Pinouts, and Specs
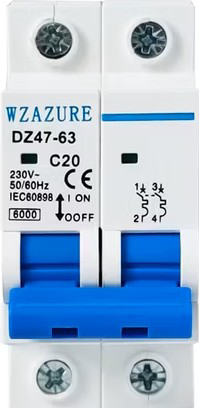
 Design with AC MCB (Blue) in Cirkit Designer
Introduction
- An AC Miniature Circuit Breaker (MCB) is a compact, electromechanical safety device designed to protect electrical circuits from damage caused by overloads or short circuits. It automatically disconnects the circuit when it detects excessive current flow, preventing potential hazards such as fires or equipment damage.
- The blue color of the AC MCB typically signifies a specific current rating or application, often used in residential, commercial, or industrial electrical systems.
- Common applications include:
- Protecting household appliances and wiring.
- Safeguarding industrial machinery.
- Ensuring safe operation of lighting circuits and HVAC systems.
Explore Projects Built with AC MCB (Blue)
Flush Switch Controlled Lamp Circuit with AC Power Supply and MCB Protection
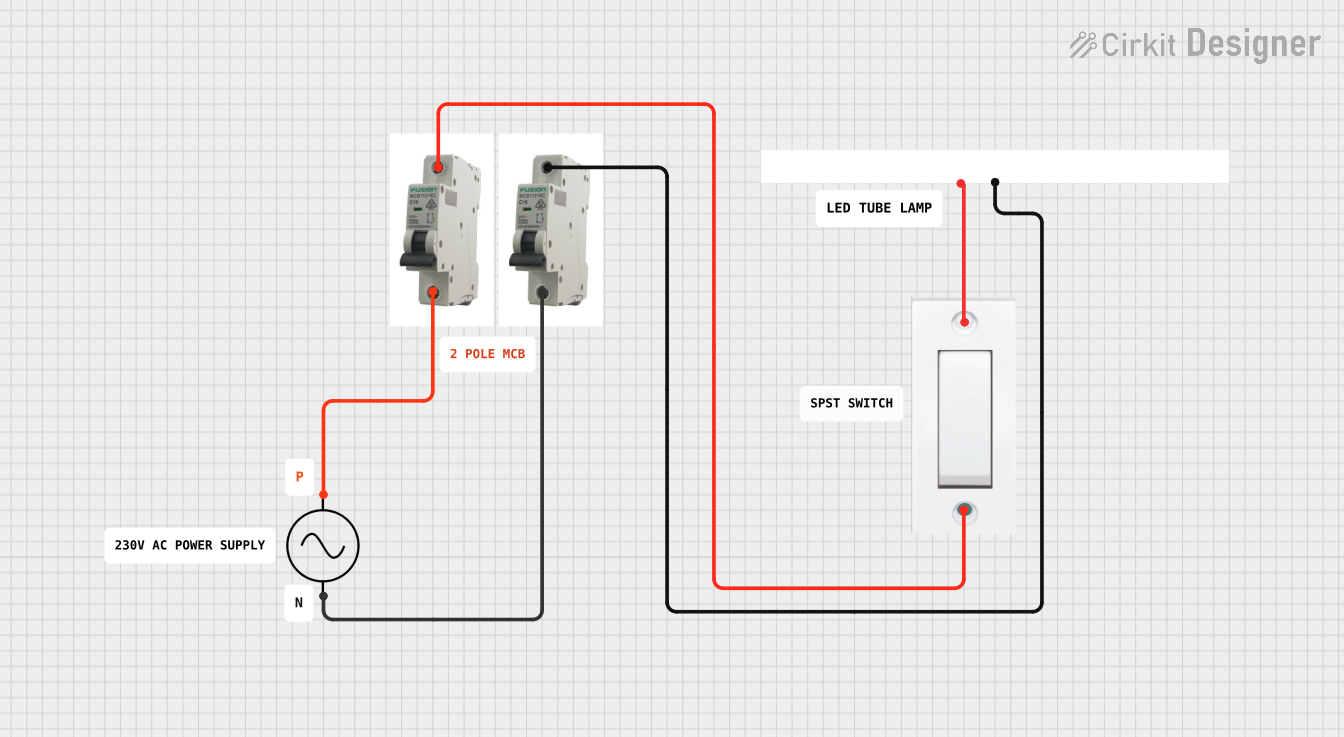
This circuit is designed to control a lamp using a flush switch and is protected by two MCBs (Miniature Circuit Breakers). The AC supply is connected to the input of the first MCB, whose output is connected to the flush switch. The flush switch then controls the power to the lamp, with the second MCB placed in the neutral line for additional safety.
Open Project in Cirkit DesignerAC Bulb Control Circuit with Flush Switch and MCB Protection
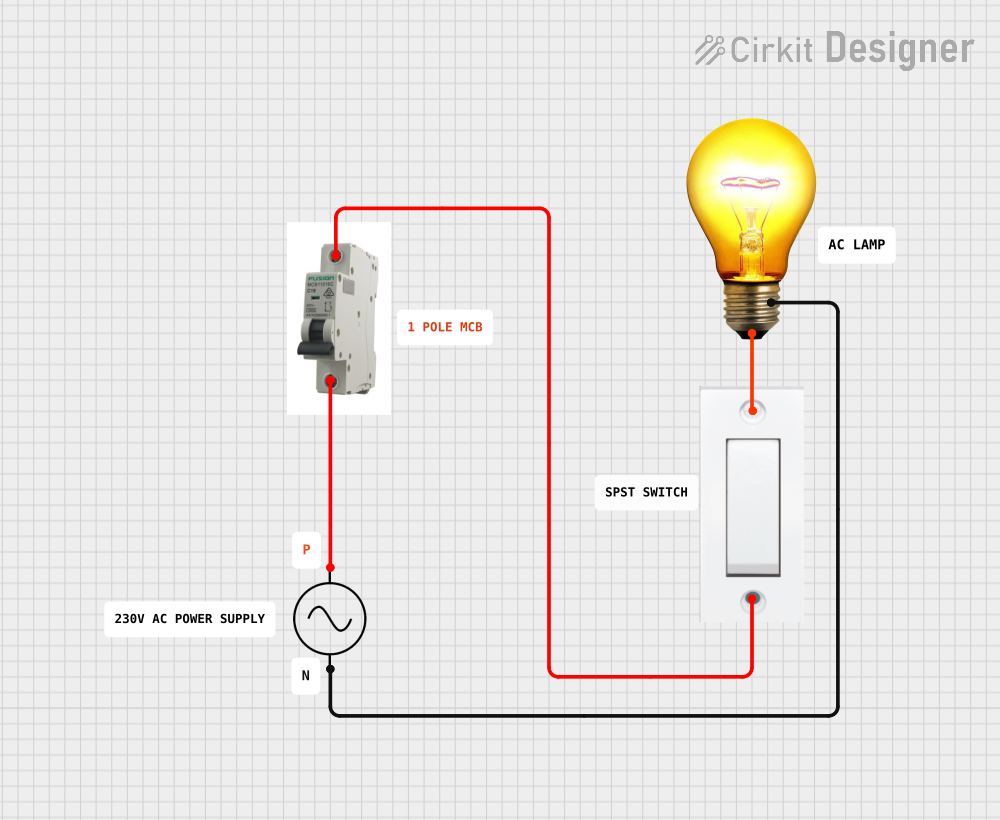
This circuit is designed to control an AC bulb using a flush switch. The AC power supply is connected through an MCB (Miniature Circuit Breaker) for protection, and the flush switch acts as an on/off control for the bulb. There is no microcontroller or embedded code involved in this simple power control circuit.
Open Project in Cirkit DesignerSolar-Powered Home Energy System with Automatic Transfer Switch and Battery Backup
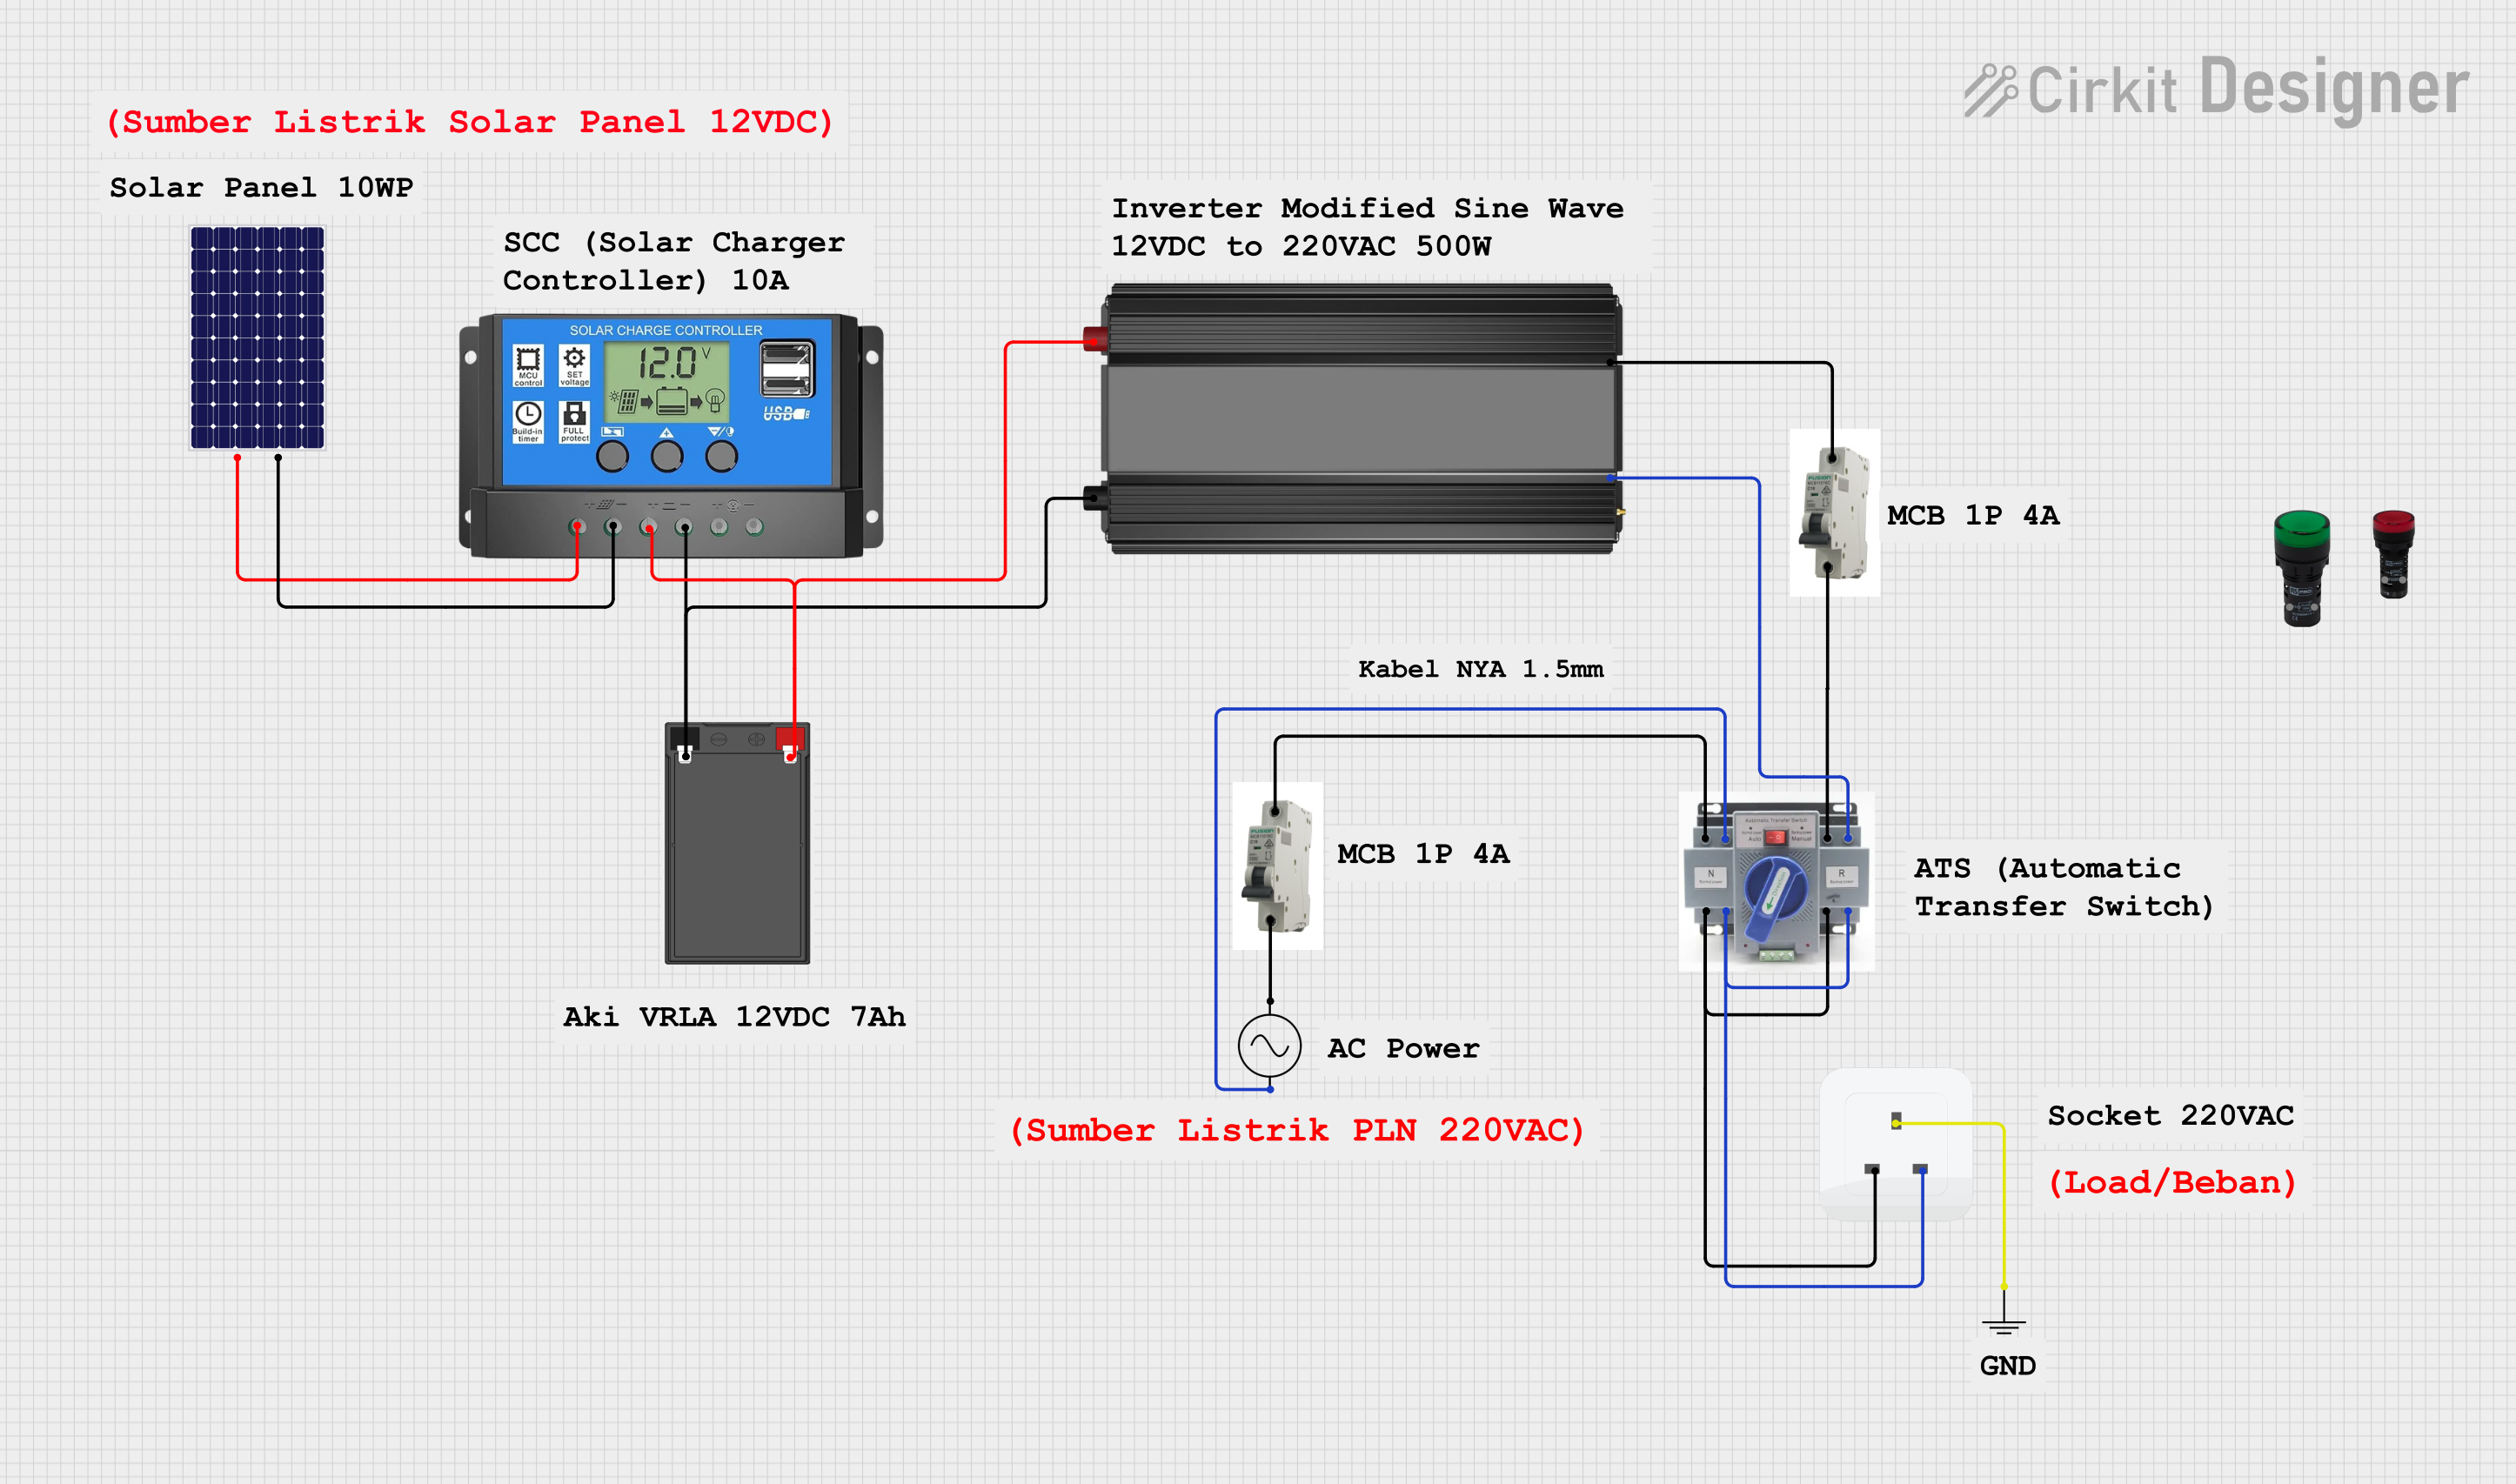
This circuit is a solar power system with an automatic transfer switch (ATS) that manages power from both a solar panel and an AC supply. The solar panel charges a battery through a solar charge controller, and the power inverter converts the stored DC power to AC, which is then distributed through an MCB to a socket. The ATS ensures seamless switching between solar and AC power sources.
Open Project in Cirkit DesignerLED Indicator System with Power Stabilizer and Measurement Meters
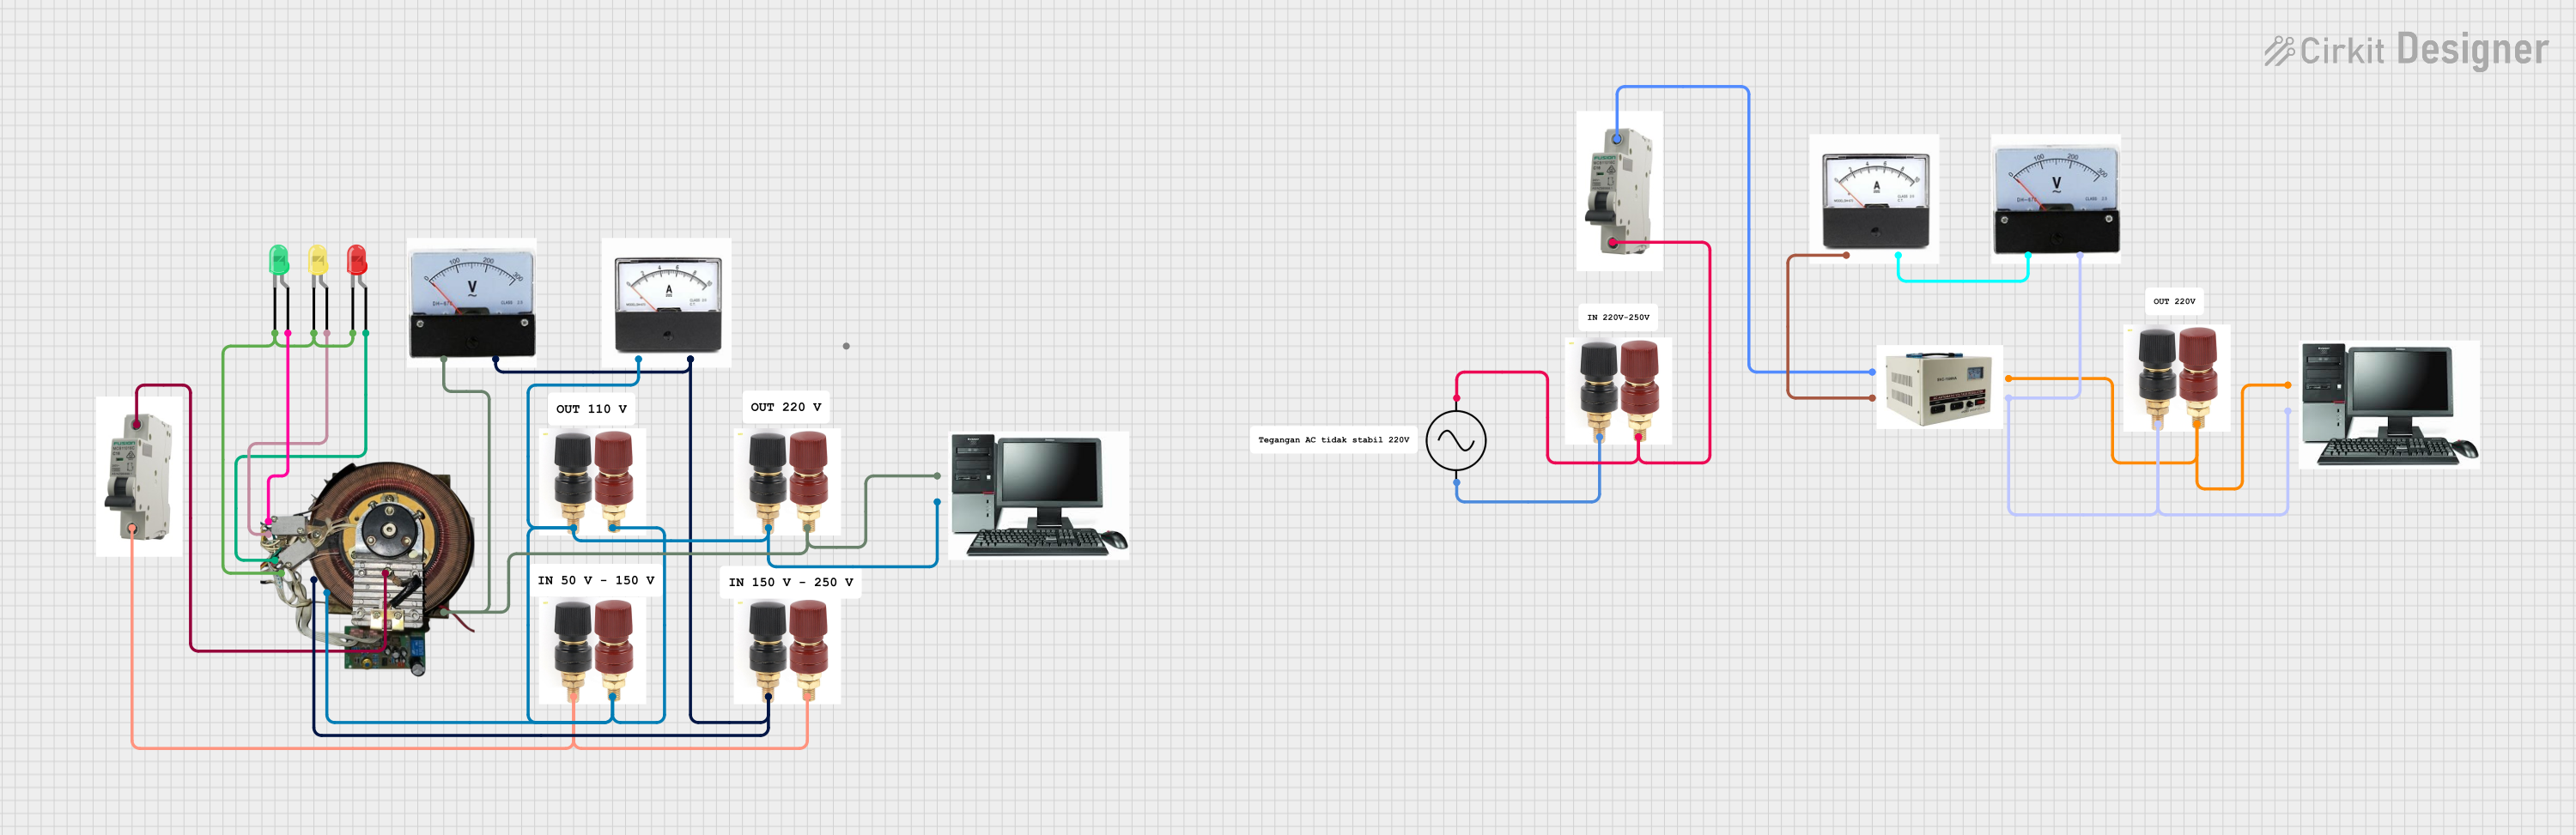
This circuit is a power distribution and monitoring system that includes multiple LEDs for status indication, a stabilizer module, and measurement instruments such as voltmeters and ammeters. It is designed to supply power to a computer and monitor the power quality and current flow, with protection provided by MCBs (Miniature Circuit Breakers).
Open Project in Cirkit DesignerExplore Projects Built with AC MCB (Blue)
Flush Switch Controlled Lamp Circuit with AC Power Supply and MCB Protection
This circuit is designed to control a lamp using a flush switch and is protected by two MCBs (Miniature Circuit Breakers). The AC supply is connected to the input of the first MCB, whose output is connected to the flush switch. The flush switch then controls the power to the lamp, with the second MCB placed in the neutral line for additional safety.
Open Project in Cirkit DesignerAC Bulb Control Circuit with Flush Switch and MCB Protection
This circuit is designed to control an AC bulb using a flush switch. The AC power supply is connected through an MCB (Miniature Circuit Breaker) for protection, and the flush switch acts as an on/off control for the bulb. There is no microcontroller or embedded code involved in this simple power control circuit.
Open Project in Cirkit DesignerSolar-Powered Home Energy System with Automatic Transfer Switch and Battery Backup
This circuit is a solar power system with an automatic transfer switch (ATS) that manages power from both a solar panel and an AC supply. The solar panel charges a battery through a solar charge controller, and the power inverter converts the stored DC power to AC, which is then distributed through an MCB to a socket. The ATS ensures seamless switching between solar and AC power sources.
Open Project in Cirkit DesignerLED Indicator System with Power Stabilizer and Measurement Meters
This circuit is a power distribution and monitoring system that includes multiple LEDs for status indication, a stabilizer module, and measurement instruments such as voltmeters and ammeters. It is designed to supply power to a computer and monitor the power quality and current flow, with protection provided by MCBs (Miniature Circuit Breakers).
Open Project in Cirkit DesignerTechnical Specifications
- Type: AC Miniature Circuit Breaker (MCB)
- Rated Voltage: 230V AC (single-phase) or 400V AC (three-phase)
- Rated Current: Typically 6A, 10A, 16A, 20A, or 32A (blue color often indicates 16A)
- Breaking Capacity: 6kA or 10kA (depending on model)
- Tripping Curve: Type B, C, or D (Type C is common for blue MCBs)
- Frequency: 50/60 Hz
- Mounting: DIN rail (35mm standard)
- Number of Poles: 1P (single-pole) or 2P (double-pole)
- Operating Temperature: -5°C to +40°C
- Standards Compliance: IEC 60898-1
Pin Configuration and Descriptions
The AC MCB does not have traditional "pins" like electronic components but instead features terminals for wiring. Below is a description of the terminals:
| Terminal Name | Description | Connection Type |
|---|---|---|
| Line (Input) | Connects to the incoming live wire | Screw terminal |
| Load (Output) | Connects to the outgoing live wire | Screw terminal |
| Neutral | (For 2P models) Connects to neutral | Screw terminal (optional) |
Usage Instructions
How to Use the AC MCB in a Circuit
- Determine the Current Rating: Select an MCB with a current rating suitable for your circuit. For example, a 16A blue MCB is commonly used for lighting or small appliances.
- Mount the MCB: Install the MCB onto a standard 35mm DIN rail in the distribution box.
- Connect the Wires:
- Connect the incoming live wire to the Line (Input) terminal.
- Connect the outgoing live wire to the Load (Output) terminal.
- For 2P models, connect the neutral wire to the Neutral terminal.
- Secure the Connections: Tighten the screw terminals to ensure a secure connection. Avoid overtightening, which may damage the wires or terminals.
- Power On: Switch on the MCB to energize the circuit. The lever should remain in the "ON" position during normal operation.
Important Considerations and Best Practices
- Select the Correct Tripping Curve: Use Type B for residential circuits, Type C for commercial loads, and Type D for industrial applications with high inrush currents.
- Avoid Overloading: Ensure the total load on the circuit does not exceed the MCB's rated current.
- Regular Maintenance: Periodically inspect the MCB for signs of wear, overheating, or loose connections.
- Safety First: Always turn off the main power supply before installing or servicing the MCB.
Example: Connecting an AC MCB to an Arduino-Controlled Circuit
While MCBs are not directly controlled by microcontrollers like Arduino, they can be used to protect circuits powered by an Arduino. Below is an example of how to integrate an MCB into a simple Arduino-controlled lighting circuit:
/*
  Example: Arduino-controlled lighting circuit with MCB protection.
  - The MCB protects the circuit from overload or short circuit.
  - The Arduino controls a relay to switch the light on/off.
*/

const int relayPin = 7; // Pin connected to the relay module

void setup() {
  pinMode(relayPin, OUTPUT); // Set relay pin as output
  digitalWrite(relayPin, LOW); // Ensure relay is off at startup
}

void loop() {
  // Turn the light on
  digitalWrite(relayPin, HIGH);
  delay(5000); // Keep the light on for 5 seconds

  // Turn the light off
  digitalWrite(relayPin, LOW);
  delay(5000); // Keep the light off for 5 seconds
}
Note: The MCB is installed between the power source and the relay module to protect the entire circuit.
Troubleshooting and FAQs
Common Issues
MCB Trips Frequently:
- Cause: Overloaded circuit or short circuit.
- Solution: Reduce the load on the circuit or check for wiring faults.
MCB Does Not Trip During Overload:
- Cause: Faulty MCB or incorrect current rating.
- Solution: Replace the MCB with a properly rated one.
Loose Connections:
- Cause: Improperly tightened terminals.
- Solution: Re-tighten the terminals securely.
MCB Lever Stuck in "OFF" Position:
- Cause: Internal damage or persistent fault in the circuit.
- Solution: Inspect the circuit for faults and replace the MCB if necessary.
FAQs
Q: Can I use a blue MCB for any circuit?
- A: No, the blue color typically indicates a specific current rating (e.g., 16A). Ensure the MCB's rating matches your circuit's requirements.
Q: How do I know if my MCB is faulty?
- A: If the MCB fails to trip during an overload or trips without any apparent reason, it may be faulty and should be replaced.
Q: Can I reset the MCB after it trips?
- A: Yes, but only after identifying and resolving the cause of the trip. Simply switch the lever back to the "ON" position.
Q: Is it safe to install an MCB myself?
- A: If you are not experienced with electrical systems, it is recommended to hire a licensed electrician for installation.