How to Use Heater 300 Watt: Examples, Pinouts, and Specs
Introduction
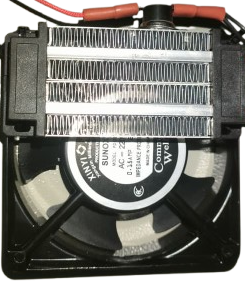
The Heater 300 Watt is an electric heating device manufactured by Arduino, designed to convert electrical energy into heat. With a maximum power output of 300 watts, this component is ideal for applications requiring controlled heating. It is compact, efficient, and easy to integrate into various systems.
Explore Projects Built with Heater 300 Watt

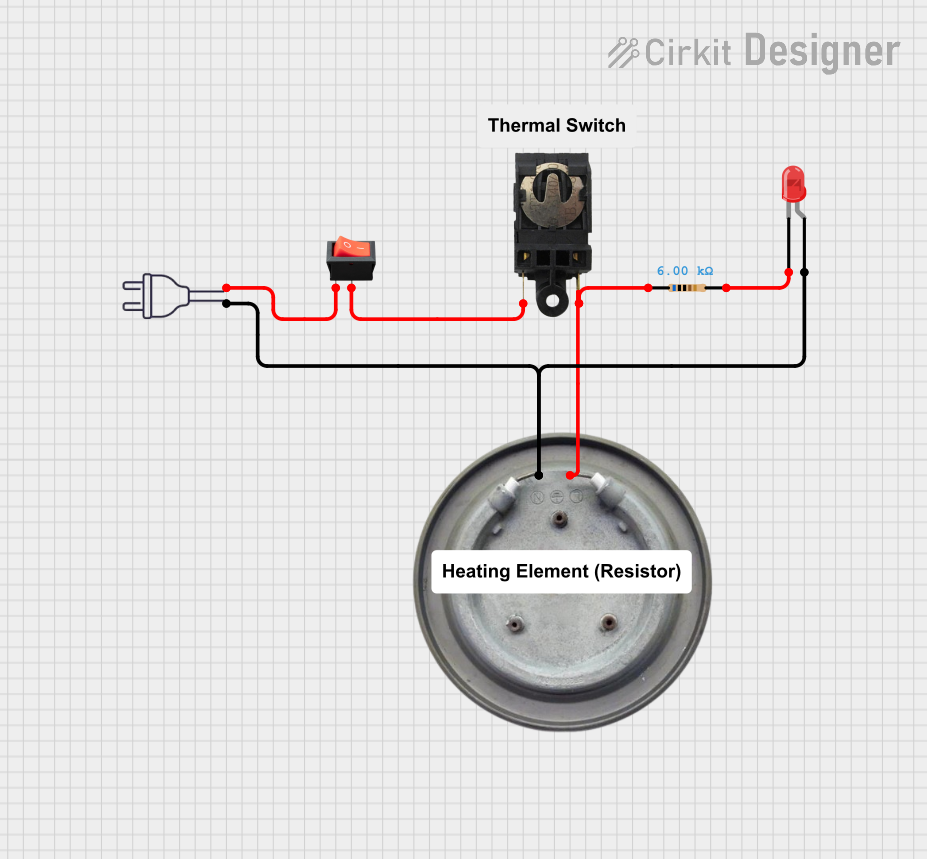

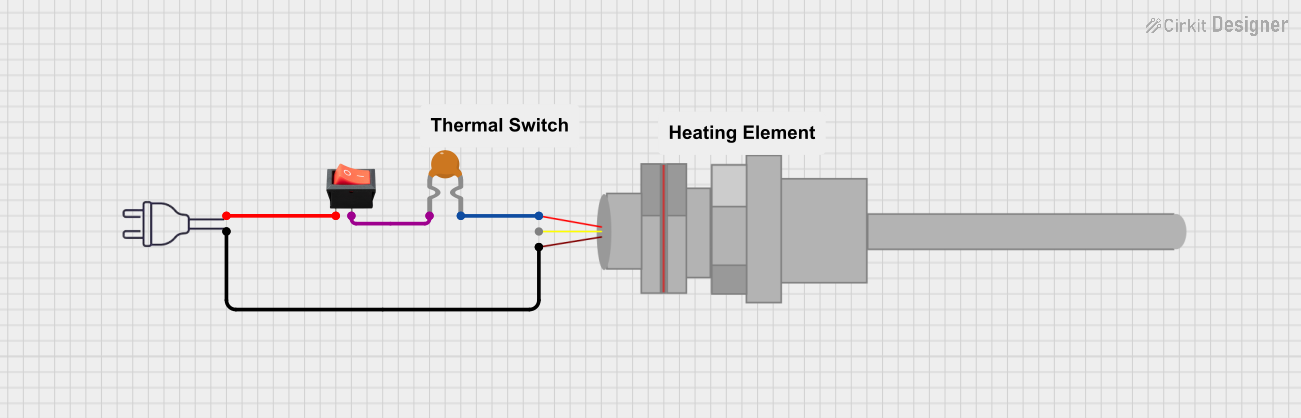
Explore Projects Built with Heater 300 Watt
Common Applications and Use Cases
- Space heating in small enclosures or devices
- Temperature regulation in DIY projects
- Preheating materials in industrial or laboratory setups
- Integration into smart home systems for localized heating
- Use in Arduino-based temperature-controlled projects
Technical Specifications
The following table outlines the key technical details of the Heater 300 Watt:
| Parameter | Value |
|---|---|
| Manufacturer | Arduino |
| Part ID | Heater 300 Watt |
| Power Rating | 300 Watts |
| Operating Voltage | 12V DC |
| Operating Current | 25A |
| Heating Element Type | Resistive |
| Dimensions | 100mm x 50mm x 20mm |
| Maximum Surface Temp. | 200°C |
| Connector Type | Screw Terminals |
| Weight | 150g |
Pin Configuration and Descriptions
The Heater 300 Watt has two screw terminal connections for power input. The table below describes the terminals:
| Terminal | Description |
|---|---|
| Terminal 1 | Positive (+) DC input (12V) |
| Terminal 2 | Negative (-) DC input (Ground) |
Usage Instructions
How to Use the Heater 300 Watt in a Circuit
- Power Supply: Ensure you have a 12V DC power supply capable of delivering at least 25A to power the heater safely.
- Wiring: Connect the positive terminal of the power supply to Terminal 1 (+) and the negative terminal to Terminal 2 (-).
- Control: For temperature control, use a relay or MOSFET module to switch the heater on and off. A temperature sensor (e.g., thermistor or DS18B20) can be used to monitor the temperature.
- Safety: Always include a fuse rated for 25A in series with the heater to protect against overcurrent conditions.
Important Considerations and Best Practices
- Ventilation: Ensure proper ventilation around the heater to prevent overheating.
- Mounting: Secure the heater to a heat-resistant surface using screws or clamps.
- Temperature Control: Use a thermostat or Arduino-based control system to avoid overheating.
- Power Supply: Verify that your power supply can handle the required current without voltage drops.
- Insulation: Avoid direct contact with flammable materials or surfaces.
Example: Using the Heater 300 Watt with Arduino UNO
Below is an example of how to control the Heater 300 Watt using an Arduino UNO and a relay module:
// Example code to control the Heater 300 Watt using Arduino UNO
// The heater is connected to a relay module, which is controlled by pin 7
// A temperature sensor (e.g., DS18B20) is used to monitor the temperature

#include <OneWire.h>
#include <DallasTemperature.h>

// Pin configuration
#define RELAY_PIN 7       // Relay module connected to pin 7
#define TEMP_SENSOR_PIN 2 // DS18B20 data pin connected to pin 2

// Initialize OneWire and DallasTemperature libraries
OneWire oneWire(TEMP_SENSOR_PIN);
DallasTemperature sensors(&oneWire);

void setup() {
  pinMode(RELAY_PIN, OUTPUT); // Set relay pin as output
  digitalWrite(RELAY_PIN, LOW); // Ensure relay is off initially
  sensors.begin(); // Start the temperature sensor
  Serial.begin(9600); // Initialize serial communication
}

void loop() {
  sensors.requestTemperatures(); // Request temperature readings
  float temperature = sensors.getTempCByIndex(0); // Get temperature in Celsius

  Serial.print("Current Temperature: ");
  Serial.println(temperature);

  // Turn on the heater if temperature is below 30°C
  if (temperature < 30.0) {
    digitalWrite(RELAY_PIN, HIGH); // Turn on the relay
    Serial.println("Heater ON");
  } else {
    digitalWrite(RELAY_PIN, LOW); // Turn off the relay
    Serial.println("Heater OFF");
  }

  delay(1000); // Wait for 1 second before the next reading
}
Notes:
- Replace the DS18B20 sensor with any other compatible temperature sensor if needed.
- Ensure the relay module can handle the current required by the heater (25A).
Troubleshooting and FAQs
Common Issues and Solutions
Heater Not Turning On
- Cause: Insufficient power supply.
- Solution: Verify that the power supply provides 12V DC and at least 25A.
Overheating
- Cause: Lack of temperature control or poor ventilation.
- Solution: Use a thermostat or Arduino-based control system and ensure proper airflow.
Burnt Smell or Smoke
- Cause: Incorrect wiring or contact with flammable materials.
- Solution: Double-check wiring and ensure the heater is mounted on a heat-resistant surface.
Relay Not Switching
- Cause: Incompatible relay module or incorrect wiring.
- Solution: Use a relay module rated for at least 25A and verify connections.
FAQs
Can I use a 24V power supply with this heater?
- No, the Heater 300 Watt is designed for 12V DC operation only. Using a higher voltage may damage the heater.
What is the maximum temperature the heater can reach?
- The heater's surface can reach up to 200°C under optimal conditions.
Can I control the heater without an Arduino?
- Yes, you can use a standalone thermostat or a manual switch to control the heater.
Is the heater waterproof?
- No, the Heater 300 Watt is not waterproof. Avoid exposing it to moisture or liquids.
By following this documentation, you can safely and effectively integrate the Heater 300 Watt into your projects.