The PM2.5 Air Quality Sensor with Breadboard Adapter Kit (Adafruit Part ID: 3686) is an advanced sensor designed to measure fine particulate matter in the air, specifically particles that have a diameter of less than 2.5 micrometers (PM2.5). These particles are considered hazardous as they can penetrate deep into the human respiratory system and cause health issues. The PMS5003 sensor is commonly used in air quality monitoring devices, environmental monitoring stations, and HVAC systems to ensure air quality is within safe limits.
Explore Projects Built with PM2.5 Air Quality Sensor and Breadboard Adapter Kit - PMS5003
Use Cirkit Designer to design, explore, and prototype these projects online. Some projects support real-time simulation. Click "Open Project" to start designing instantly!
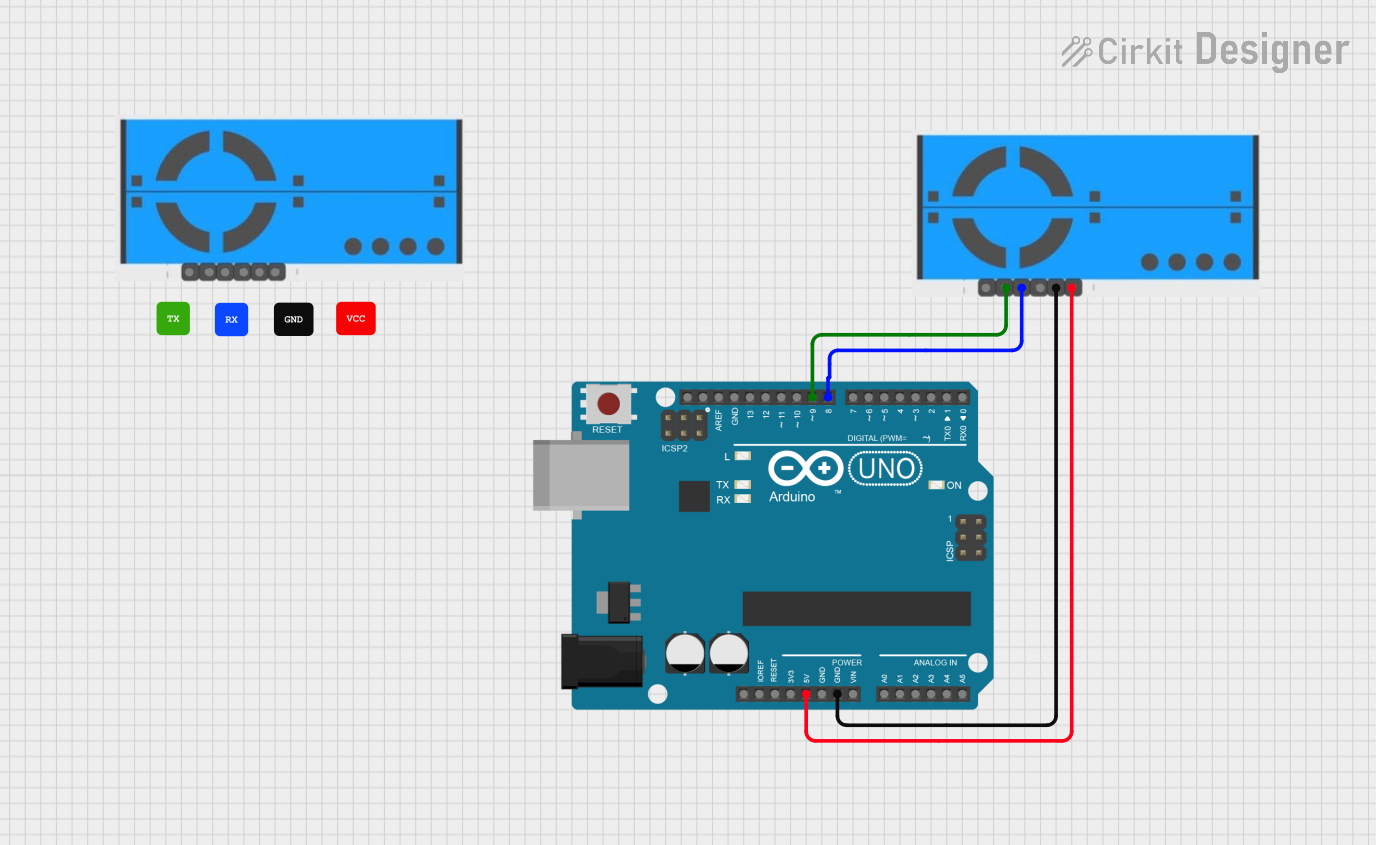
This circuit connects a PM2.5 Air Quality Sensor (PMS5003) to an Arduino UNO for air quality monitoring. The sensor's VCC and GND pins are powered by the Arduino's 5V and GND pins, respectively. The sensor's RX and TX pins are connected to the Arduino's digital pins D8 and D9 for serial communication, allowing the Arduino to read and process the air quality data from the sensor.
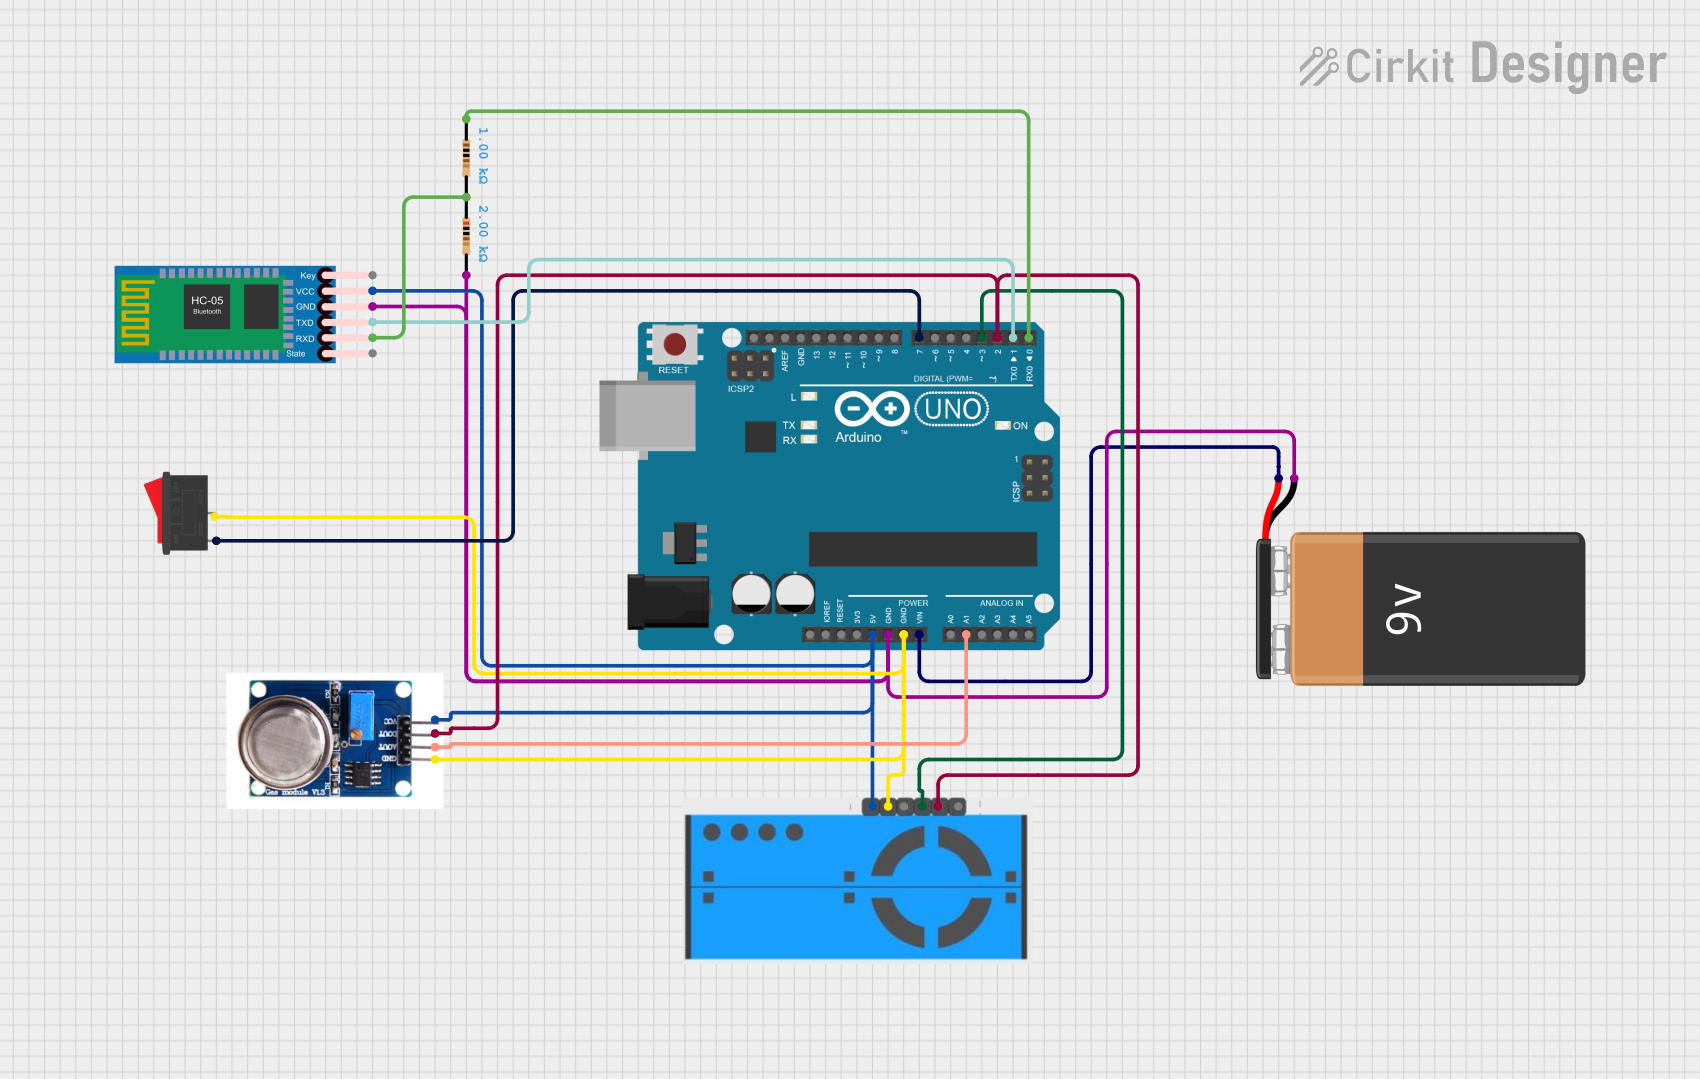
This circuit is an air quality monitoring system that uses an Arduino UNO to collect data from a PM2.5 air quality sensor (PMS5003) and an ozone sensor (MQ131). The collected data is then transmitted via an HC-05 Bluetooth module for remote monitoring, with a rocker switch used to control the power supply.
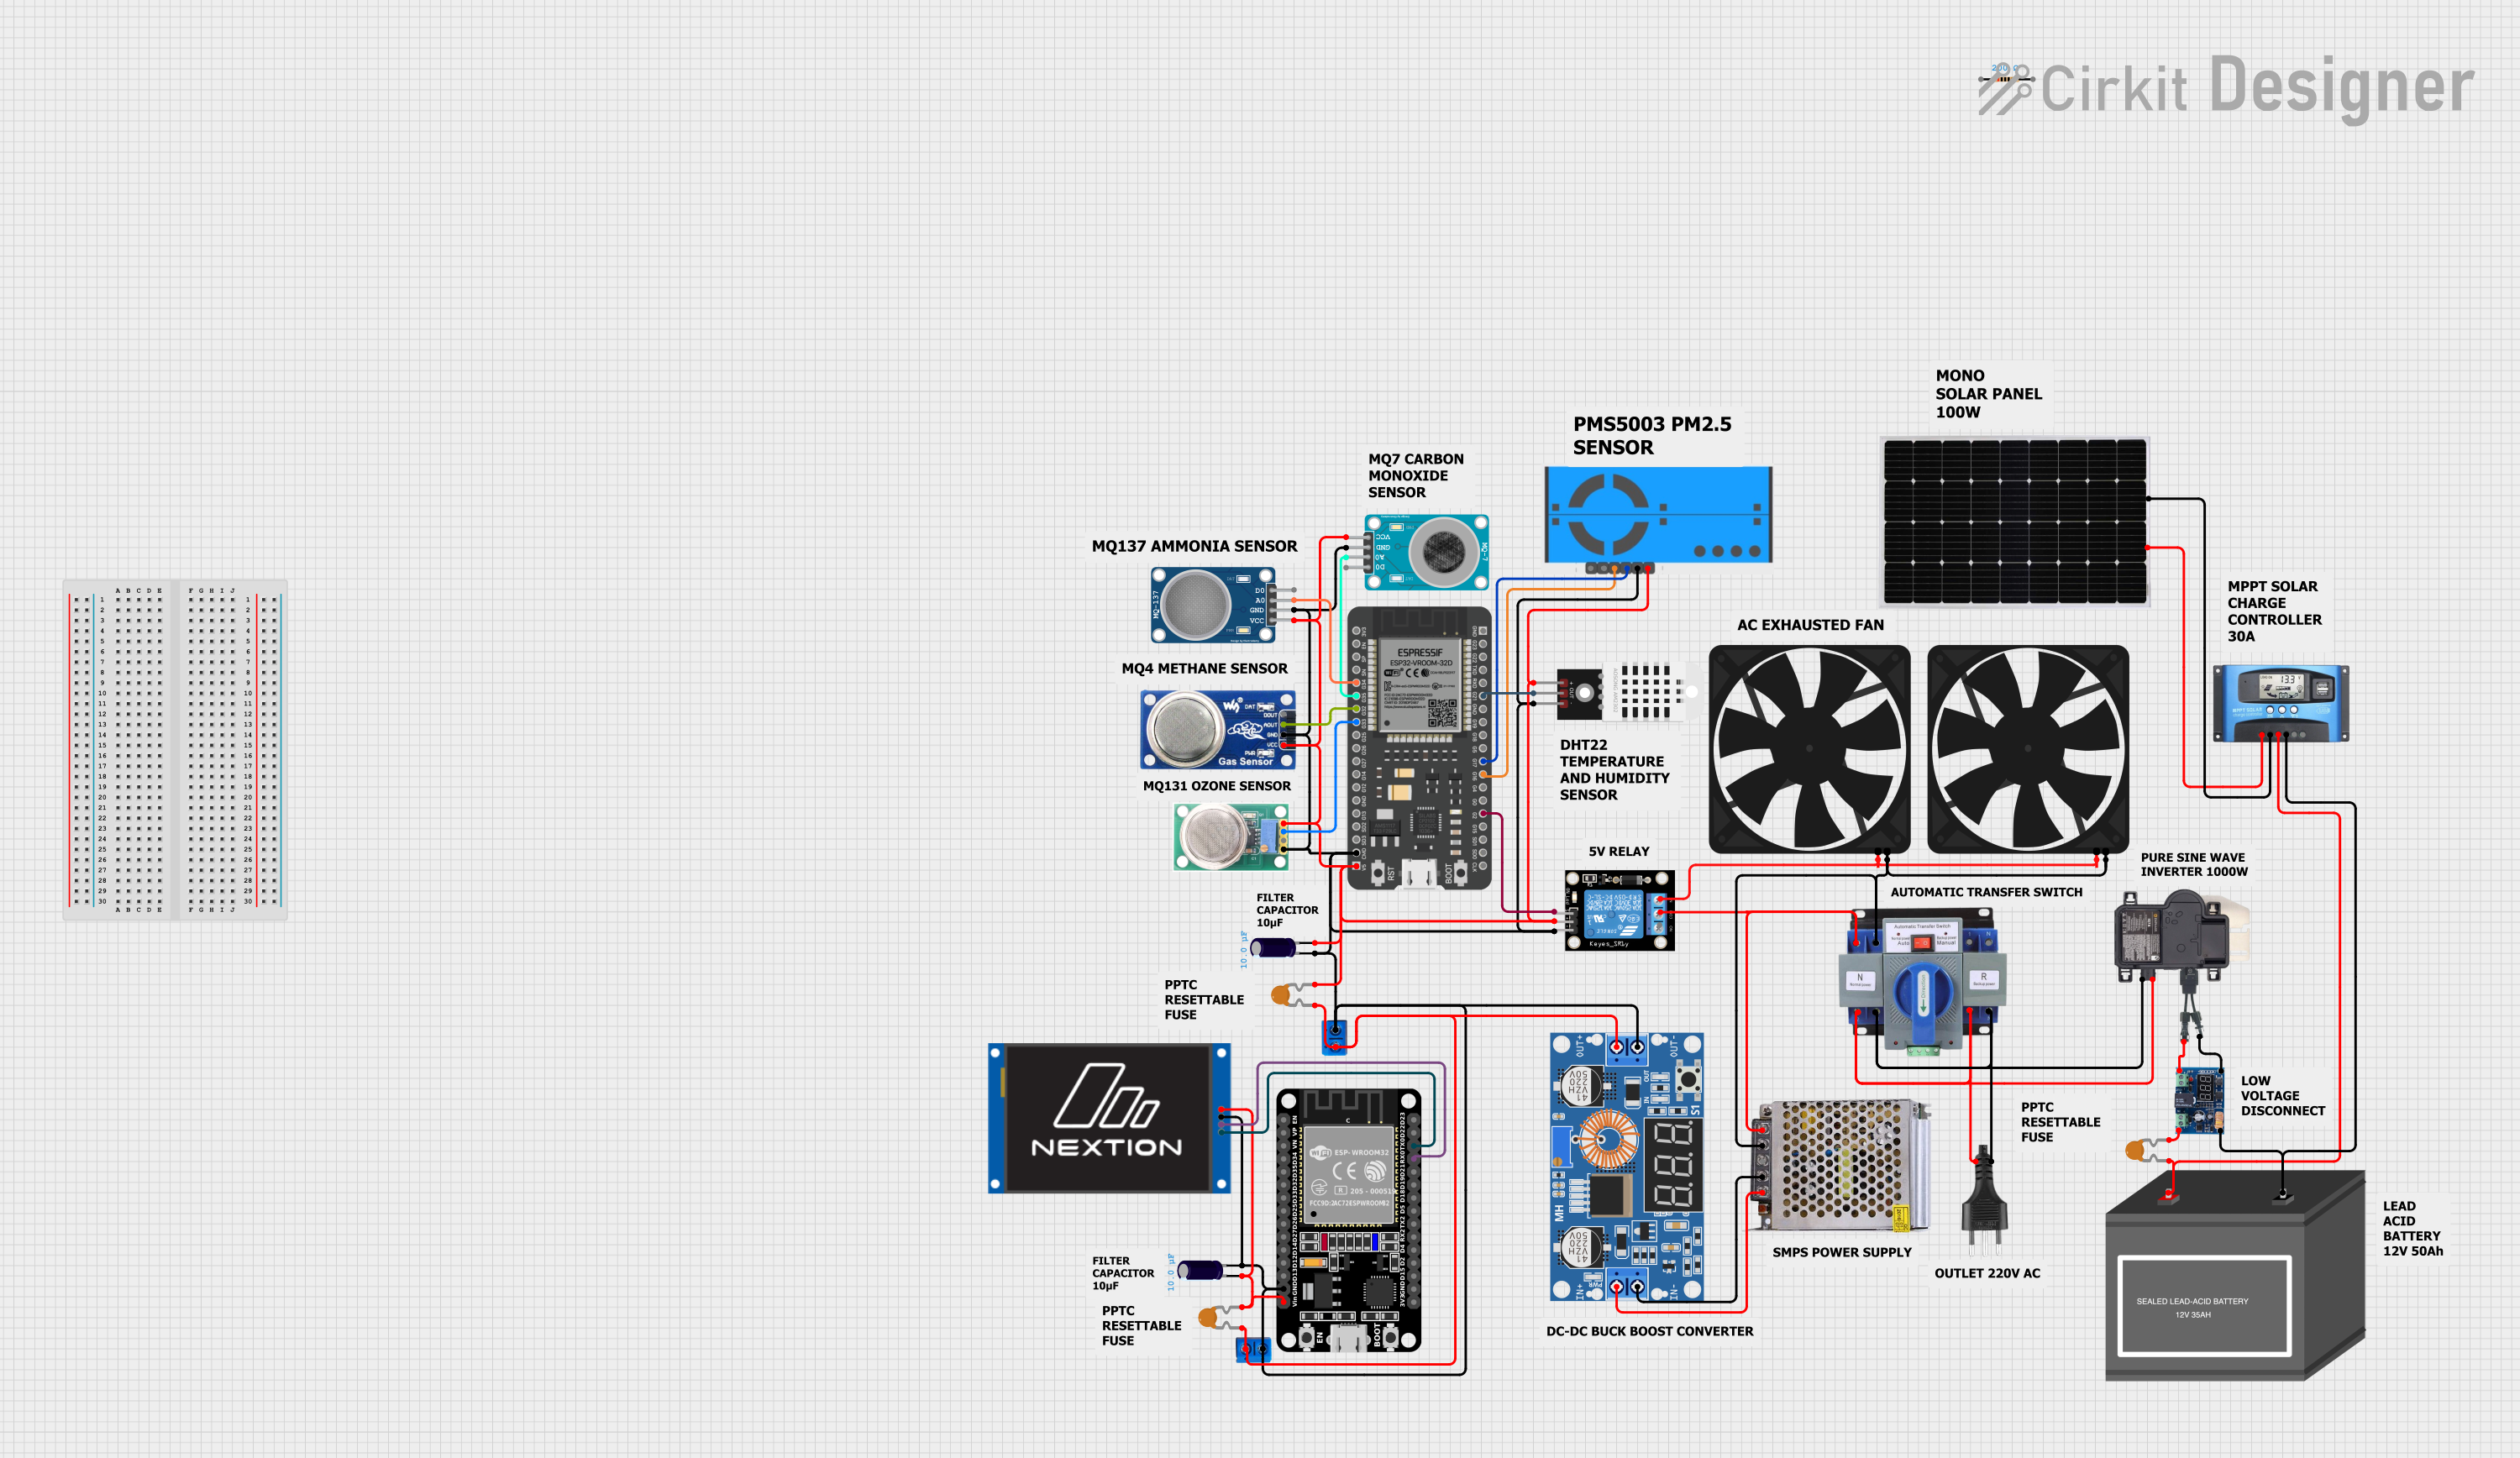
This circuit is designed to monitor various gas levels and air quality using a set of sensors (MQ-136, MQ-6, MQ-137, MQ-7, and PMS5003) interfaced with an ESP32 microcontroller. The ESP32 collects sensor data and can control a relay module potentially for activating systems like fans or alarms based on the sensor readings. Additional components include a DHT22 for temperature and humidity readings, a power supply with a step-down converter, and safety features like resettable fuses and an LVD (Low Voltage Disconnect) to protect the battery and circuit.
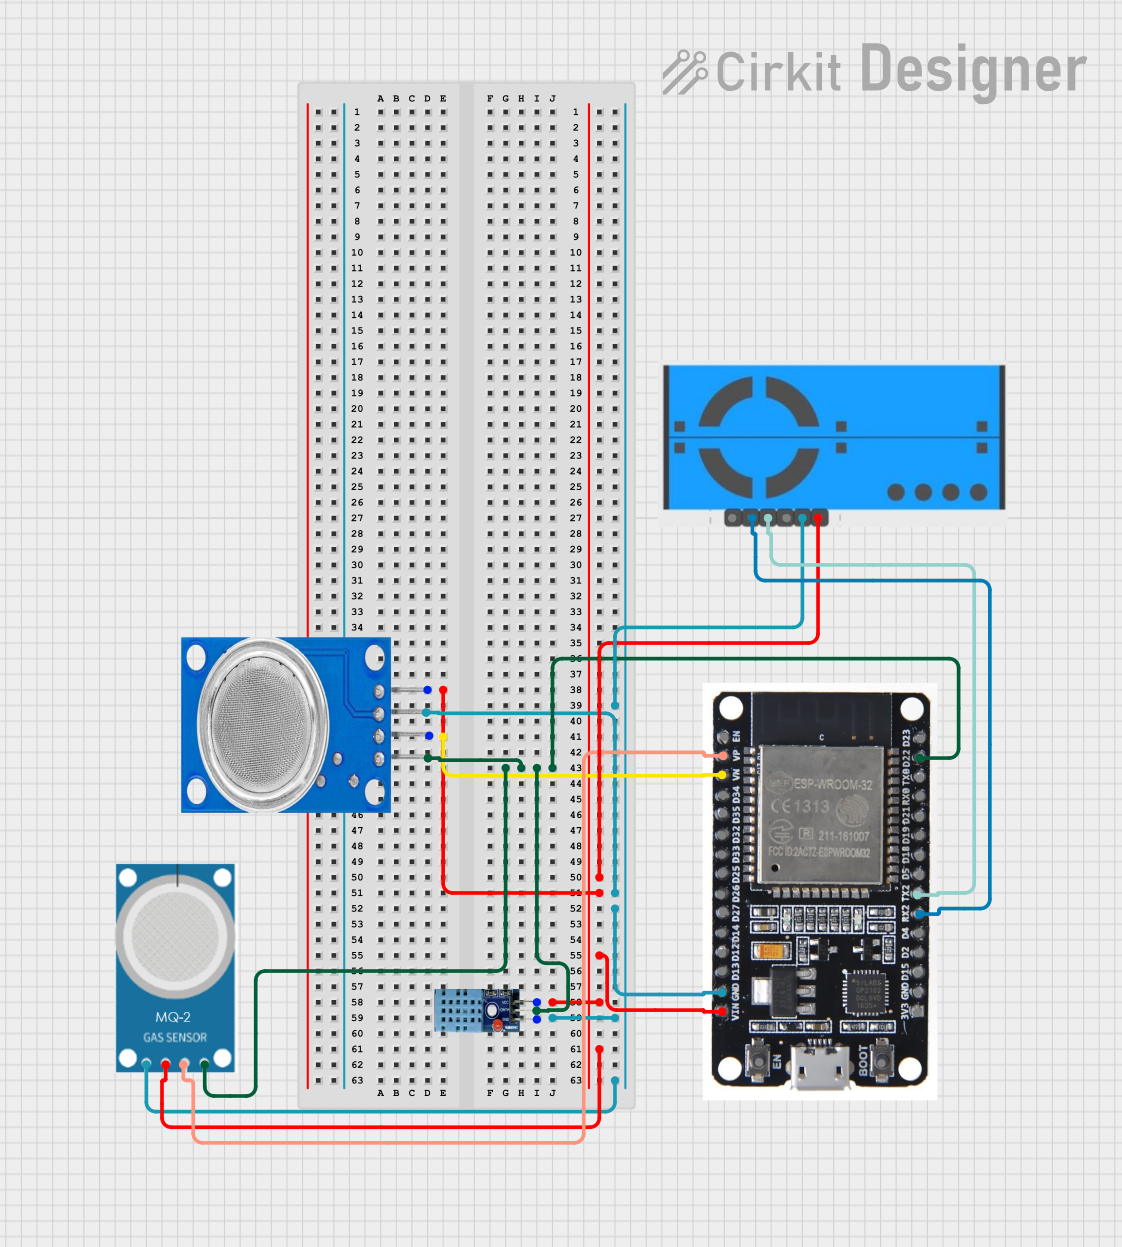
This circuit is an air quality monitoring system that uses an ESP32 microcontroller to collect data from various sensors, including the MQ135 and MQ-2 gas sensors, a DHT11 temperature and humidity sensor, and a PMS5003 PM2.5 air quality sensor. The ESP32 processes the sensor data and can potentially transmit it for further analysis or display.
To use the PMS5003 sensor with a development board like the Arduino UNO, follow these steps:
Connect the VCC pin to the 5V output on the Arduino.
Connect the GND pin to one of the GND pins on the Arduino.
Connect the TX pin of the sensor to a digital pin on the Arduino configured as RX (for software serial communication).
Connect the RX pin of the sensor to a digital pin on the Arduino configured as TX (for software serial communication).
The SET and RESET pins can be left unconnected if you wish the sensor to run continuously.
Important Considerations and Best Practices
Ensure that the power supply is stable and within the specified voltage range.
Avoid exposing the sensor to high concentrations of organic solvents, corrosive gases, or dust.
Allow the sensor to preheat for at least 30 seconds to stabilize readings.
Use a software serial library to communicate with the sensor if the hardware UART is unavailable.
Example Code for Arduino UNO
#include <SoftwareSerial.h>

SoftwareSerial pmsSerial(10, 11); // RX, TX

void setup() {
  Serial.begin(9600);
  pmsSerial.begin(9600);
}

void loop() {
  if (pmsSerial.available()) {
    // Read data from the sensor
    uint8_t buffer[32];
    int index = 0;
    while (pmsSerial.available() && index < 32) {
      buffer[index++] = pmsSerial.read();
    }

    // Process the data (assuming the data starts with 0x42 0x4d)
    if (index == 32 && buffer[0] == 0x42 && buffer[1] == 0x4D) {
      int pm25 = (buffer[12] << 8) + buffer[13];
      Serial.print("PM2.5: ");
      Serial.print(pm25);
      Serial.println(" ug/m3");
    }
  }
}
Troubleshooting and FAQs
Common Issues
Inaccurate Readings: Ensure the sensor has preheated and is not exposed to volatile organic compounds or other pollutants that could affect the readings.
No Data: Check the wiring, especially the RX and TX connections. Ensure the sensor is powered correctly.
Sensor Not Responding: Try resetting the sensor or checking the SET pin if connected.
Solutions and Tips for Troubleshooting
Preheating: Allow the sensor to preheat for at least 30 seconds before taking readings.
Wiring Check: Double-check the wiring against the pin configuration table.
Serial Communication: Ensure that the baud rate for serial communication matches the sensor's default rate (9600 bps).
FAQs
Q: Can the sensor be used outdoors?
A: Yes, but it should be protected from direct sunlight, rain, and condensation.
Q: How often should the sensor be calibrated?
A: The PMS5003 sensor is factory-calibrated and typically does not require additional calibration.
Q: What is the lifespan of the sensor?
A: The sensor has a lifespan of approximately 3 years when used as recommended.
Q: Can I use multiple PMS5003 sensors with one Arduino?
A: Yes, but each sensor will require a separate software serial port, or you can use a multiplexer for the UART lines.


 Open Project in Cirkit Designer