Cirkit Designer Logo
Cirkit Designer
Your all-in-one circuit design IDE
Home / 
Component Documentation

How to Use dust sensor: Examples, Pinouts, and Specs

Image of dust sensor
Cirkit Designer LogoDesign with dust sensor in Cirkit Designer

Introduction

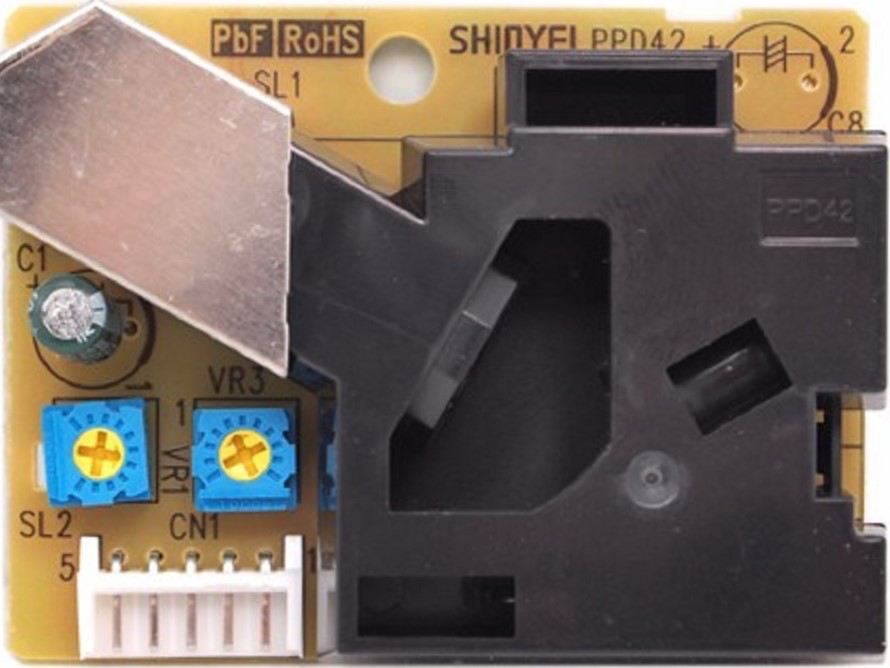
A dust sensor is an electronic device designed to detect and measure the presence of dust particles in the air. This sensor is commonly used in air quality monitoring systems, environmental monitoring, HVAC systems, and applications where particulate matter (PM) levels are of concern. The Arduino-compatible dust sensor provides a simple way for hobbyists, researchers, and developers to integrate air quality sensing into their projects.

Explore Projects Built with dust sensor

Use Cirkit Designer to design, explore, and prototype these projects online. Some projects support real-time simulation. Click "Open Project" to start designing instantly!
ESP8266 Smart Dustbin with Ultrasonic and IR Sensors
Image of Smart Dustbin: A project utilizing dust sensor in a practical application
This circuit is a smart dustbin system that uses an ESP8266 microcontroller to control an ultrasonic sensor for measuring the dustbin level, an IR sensor for obstacle detection, and a servo motor to open and close the dustbin lid. The system is powered via a USB power source and operates by opening the lid when an obstacle is detected and measuring the distance to determine the fill level of the dustbin.
Cirkit Designer LogoOpen Project in Cirkit Designer
Arduino UNO-Based Environmental Monitoring System with Multiple Sensors
Image of satu lagi: A project utilizing dust sensor in a practical application
This circuit is an environmental monitoring system using an Arduino UNO, which collects data from various sensors including a dust sensor (GP2Y1010AU0F), gas sensors (MQ135 and MQ-136), a rain sensor, and a temperature and humidity sensor (DHT22). The sensors are powered by the Arduino and their outputs are read through the analog and digital pins for further processing.
Cirkit Designer LogoOpen Project in Cirkit Designer
Arduino UNO-Based Air Quality Monitoring System with OLED Display and Multi-Color LED Indicators
Image of AQI: A project utilizing dust sensor in a practical application
This circuit is an air quality monitoring system using an Arduino UNO, which integrates sensors for dust (GP2Y1010AU0F), gas (MQ135), and temperature/humidity (DHT22). The system displays real-time data on an OLED screen and uses LEDs and a buzzer to indicate air quality levels.
Cirkit Designer LogoOpen Project in Cirkit Designer
Arduino UNO Based Air Quality Monitor with GP2Y1010AU0F Dust Sensor
Image of Dust: A project utilizing dust sensor in a practical application
This circuit connects a GP2Y1010AU0F dust sensor to an Arduino UNO for dust level measurement. The sensor's VCC and V-LED pins are powered through a 150 Ohm resistor, and its output (Vout) is connected to the Arduino's analog input A0 for reading dust density values. The sensor's LED pin is controlled by the Arduino's digital pin D12, and a capacitor is used to stabilize the LED power supply.
Cirkit Designer LogoOpen Project in Cirkit Designer

Explore Projects Built with dust sensor

Use Cirkit Designer to design, explore, and prototype these projects online. Some projects support real-time simulation. Click "Open Project" to start designing instantly!
Image of Smart Dustbin: A project utilizing dust sensor in a practical application
ESP8266 Smart Dustbin with Ultrasonic and IR Sensors
This circuit is a smart dustbin system that uses an ESP8266 microcontroller to control an ultrasonic sensor for measuring the dustbin level, an IR sensor for obstacle detection, and a servo motor to open and close the dustbin lid. The system is powered via a USB power source and operates by opening the lid when an obstacle is detected and measuring the distance to determine the fill level of the dustbin.
Cirkit Designer LogoOpen Project in Cirkit Designer
Image of satu lagi: A project utilizing dust sensor in a practical application
Arduino UNO-Based Environmental Monitoring System with Multiple Sensors
This circuit is an environmental monitoring system using an Arduino UNO, which collects data from various sensors including a dust sensor (GP2Y1010AU0F), gas sensors (MQ135 and MQ-136), a rain sensor, and a temperature and humidity sensor (DHT22). The sensors are powered by the Arduino and their outputs are read through the analog and digital pins for further processing.
Cirkit Designer LogoOpen Project in Cirkit Designer
Image of AQI: A project utilizing dust sensor in a practical application
Arduino UNO-Based Air Quality Monitoring System with OLED Display and Multi-Color LED Indicators
This circuit is an air quality monitoring system using an Arduino UNO, which integrates sensors for dust (GP2Y1010AU0F), gas (MQ135), and temperature/humidity (DHT22). The system displays real-time data on an OLED screen and uses LEDs and a buzzer to indicate air quality levels.
Cirkit Designer LogoOpen Project in Cirkit Designer
Image of Dust: A project utilizing dust sensor in a practical application
Arduino UNO Based Air Quality Monitor with GP2Y1010AU0F Dust Sensor
This circuit connects a GP2Y1010AU0F dust sensor to an Arduino UNO for dust level measurement. The sensor's VCC and V-LED pins are powered through a 150 Ohm resistor, and its output (Vout) is connected to the Arduino's analog input A0 for reading dust density values. The sensor's LED pin is controlled by the Arduino's digital pin D12, and a capacitor is used to stabilize the LED power supply.
Cirkit Designer LogoOpen Project in Cirkit Designer

Technical Specifications

Key Technical Details

  • Operating Voltage: 5V DC
  • Measurement Range: Typically 0.1 to 10 micrometers (PM2.5 to PM10)
  • Output: Analog voltage corresponding to dust density
  • Current Consumption: 20mA (max)
  • Operating Temperature: -10°C to +65°C

Pin Configuration and Descriptions

Pin Number Name Description
1 VCC Power supply (5V DC)
2 GND Ground connection
3 AOUT Analog output voltage
4 IOUT Digital pulse output (optional)

Usage Instructions

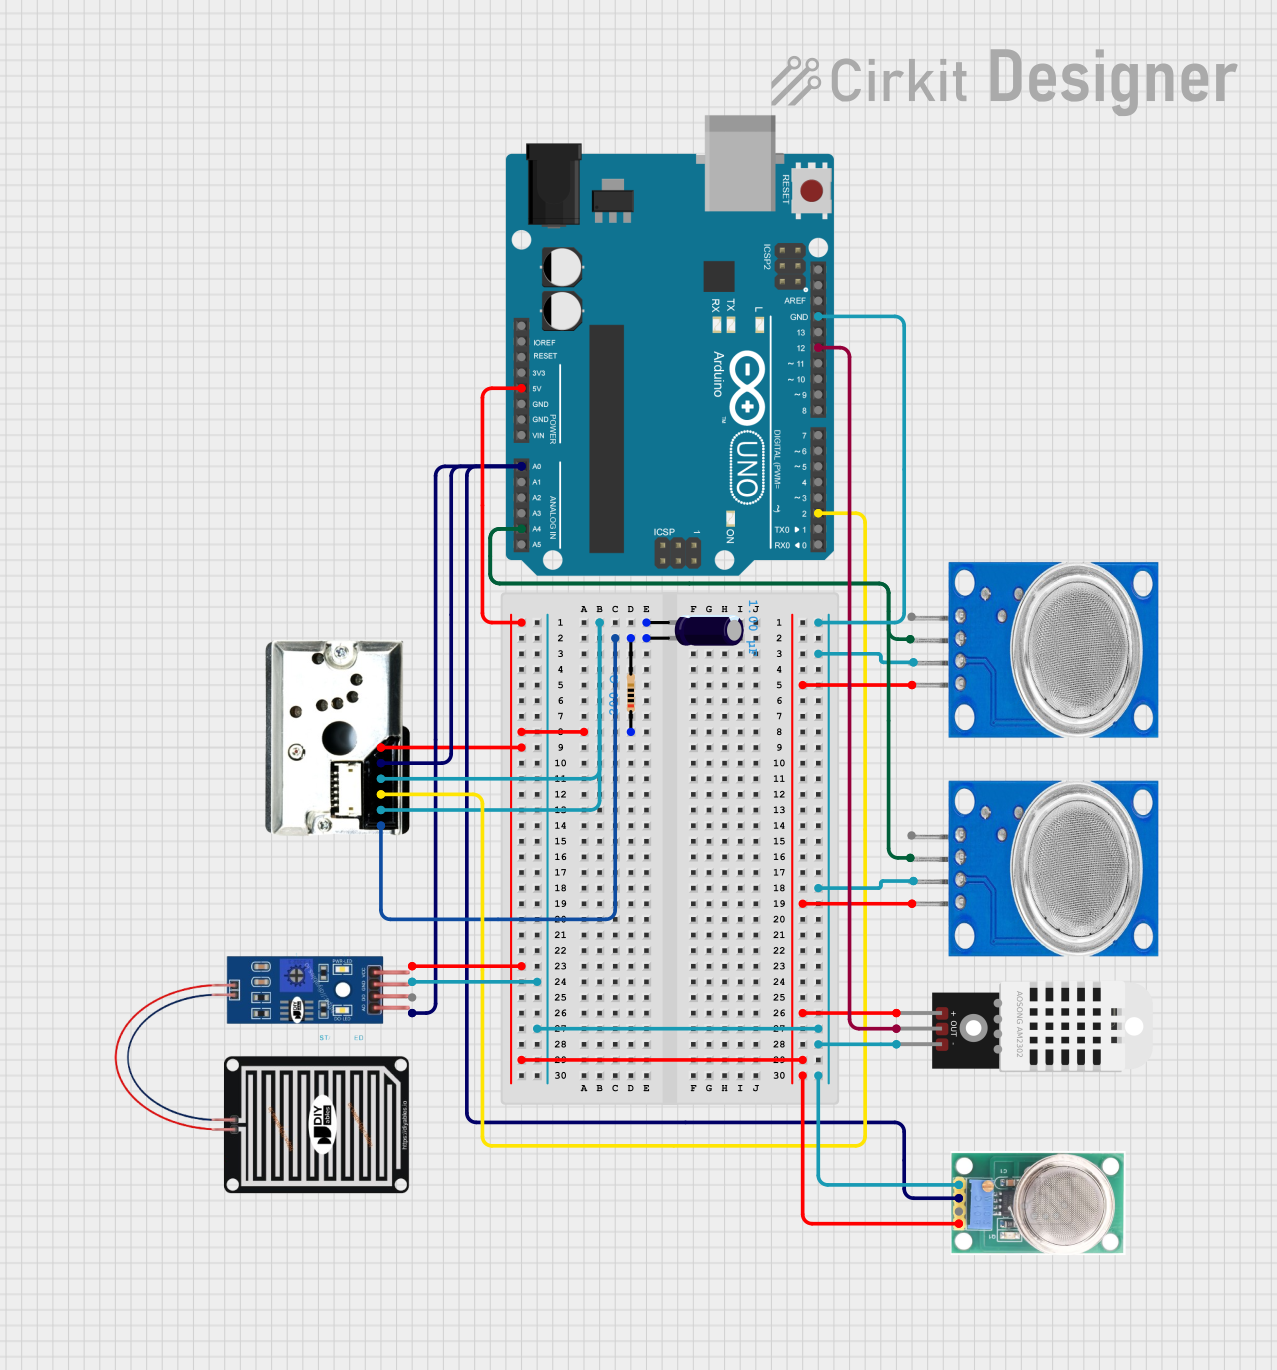
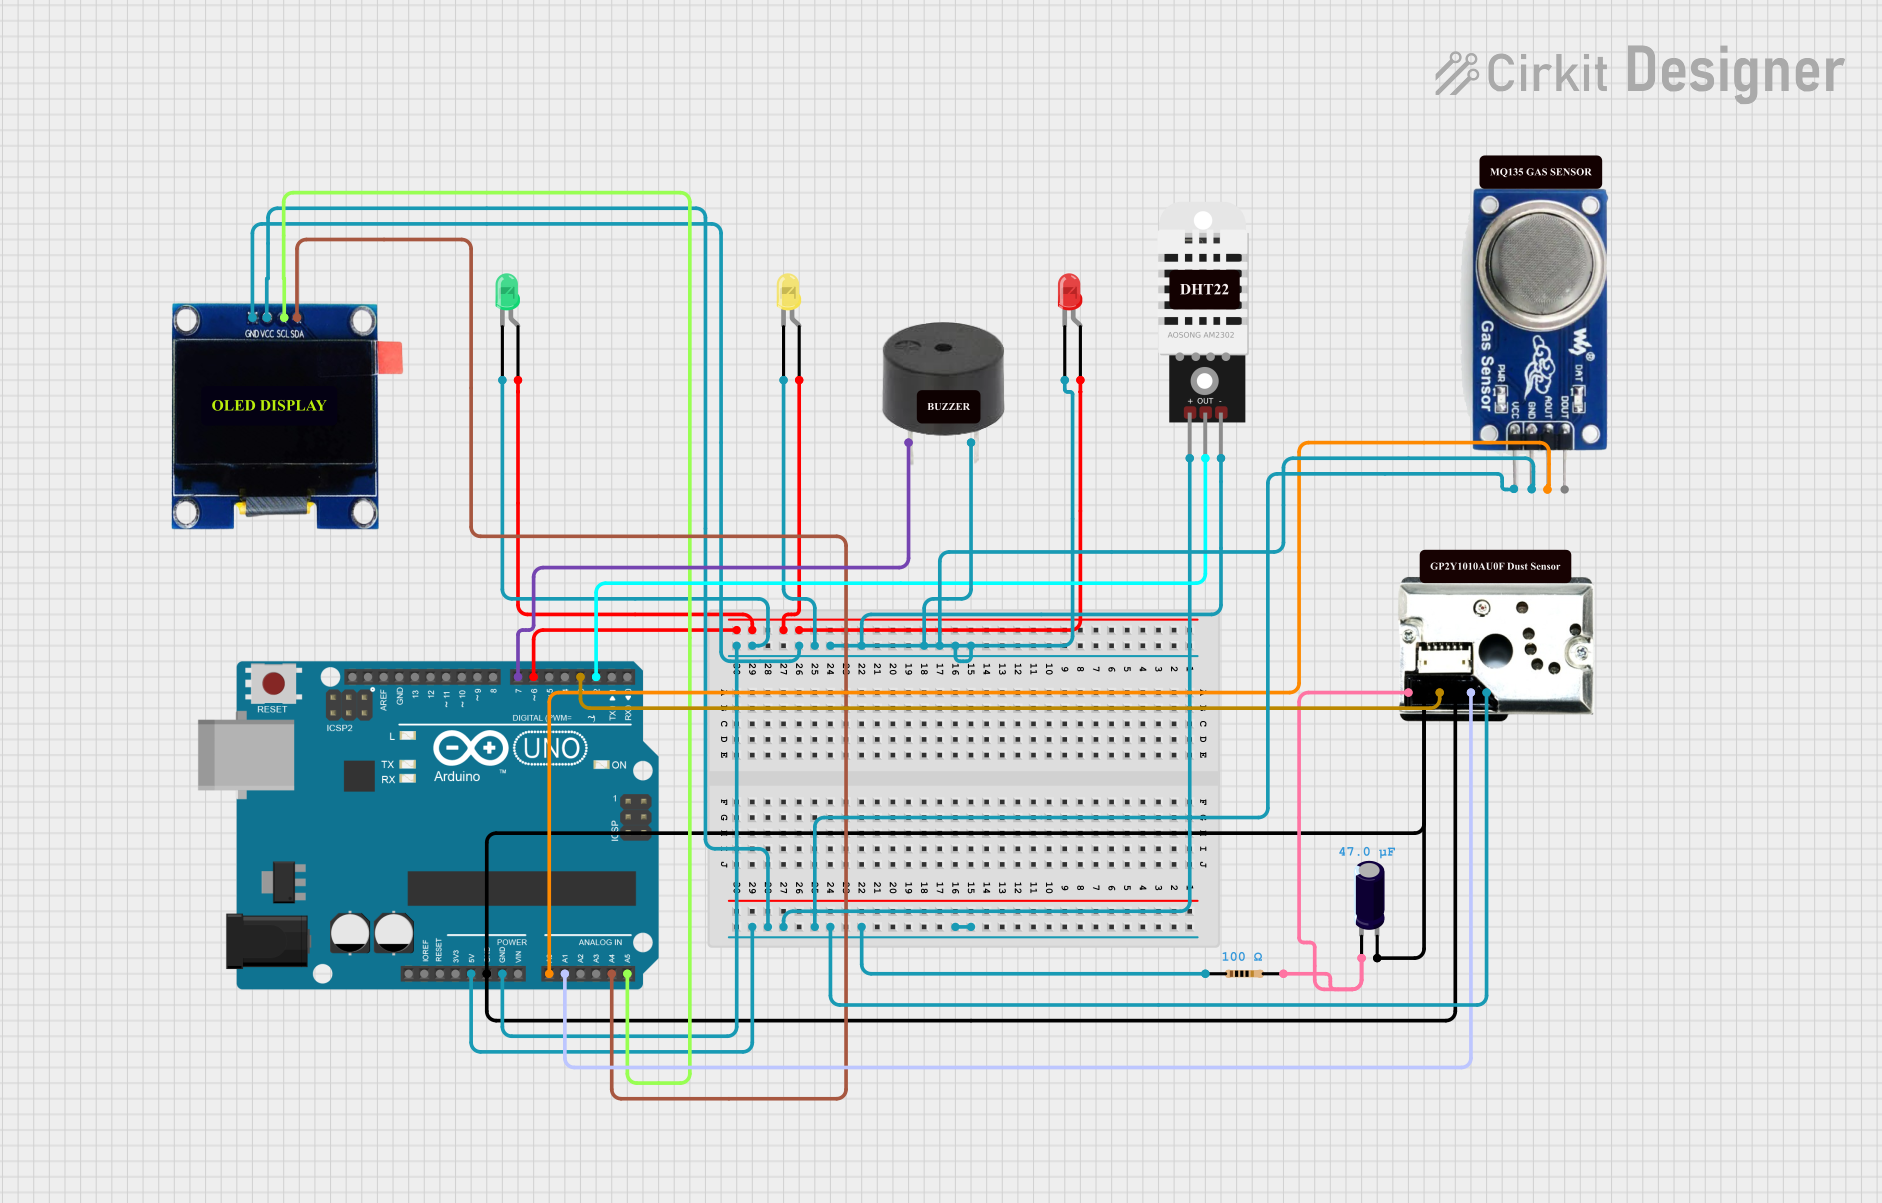
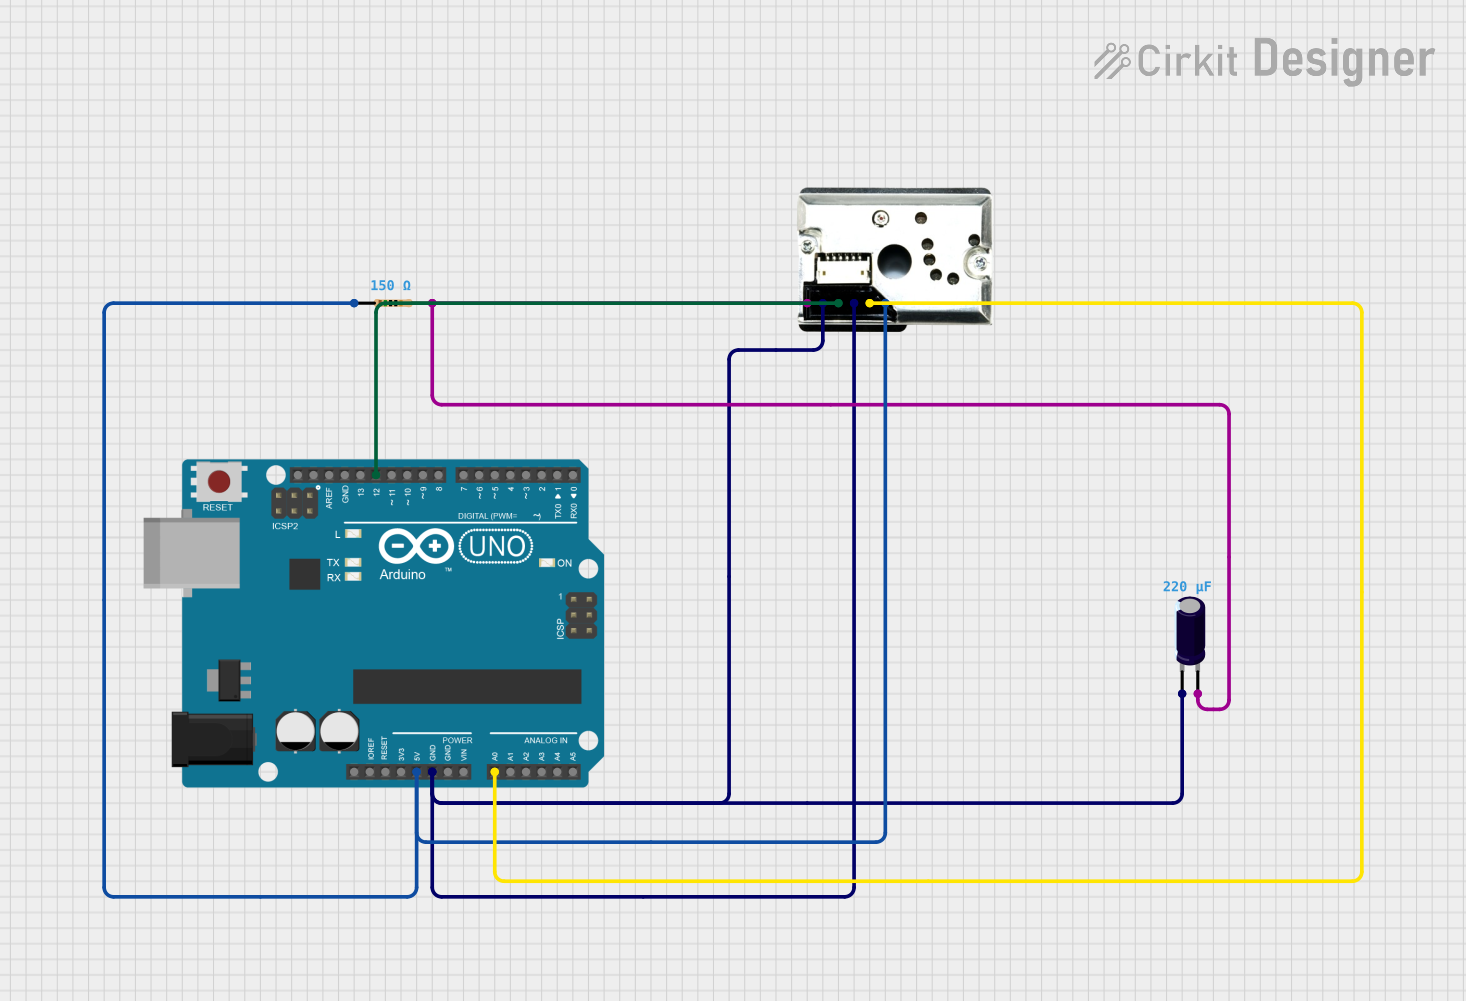
Integrating with a Circuit

  1. Connect the VCC pin to the 5V output on the Arduino UNO.
  2. Connect the GND pin to one of the GND pins on the Arduino UNO.
  3. Connect the AOUT pin to an analog input on the Arduino UNO (e.g., A0).
  4. (Optional) Connect the IOUT pin to a digital input if pulse output is needed.

Important Considerations and Best Practices

  • Ensure that the sensor is positioned in a way that allows for unobstructed air flow.
  • Avoid exposing the sensor to high concentrations of corrosive gases, as this may damage the sensor.
  • Calibrate the sensor according to the manufacturer's instructions to ensure accurate readings.
  • Implement a proper filtering algorithm to smooth out the analog signal if necessary.

Example Arduino Code

// Define the analog pin connected to the sensor's output
const int dustSensorPin = A0;

void setup() {
  // Initialize serial communication at 9600 baud rate
  Serial.begin(9600);
}

void loop() {
  // Read the analog value from the dust sensor
  int dustValue = analogRead(dustSensorPin);
  
  // Convert the analog value to a voltage level
  float voltage = dustValue * (5.0 / 1023.0);
  
  // Print the voltage level to the serial monitor
  Serial.print("Dust Voltage: ");
  Serial.println(voltage);
  
  // Wait for a second before taking the next reading
  delay(1000);
}

Troubleshooting and FAQs

Common Issues

  • Inaccurate Readings: Ensure the sensor is calibrated correctly. Avoid placing the sensor near sources of dust generation without proper airflow.
  • No Output Signal: Check all connections, especially the VCC and GND pins, and ensure the Arduino is supplying power.
  • Erratic Readings: Implement a software filter or average multiple readings to obtain a stable output.

Solutions and Tips for Troubleshooting

  • Calibration: Follow the manufacturer's calibration procedure to adjust the sensor for accurate readings.
  • Cleaning: Regularly clean the sensor's exterior to prevent dust accumulation that can affect readings.
  • Code Debugging: Use serial print statements to debug and verify that the sensor readings are being received by the Arduino.

FAQs

Q: Can the dust sensor detect specific types of particles? A: The dust sensor is generally not specific to particle types; it measures particulate matter of certain sizes.

Q: How often should the sensor be calibrated? A: Calibration frequency depends on usage, but it is recommended to calibrate the sensor at least once every six months.

Q: Is the sensor waterproof? A: No, the dust sensor is not waterproof. Protect it from moisture and water exposure.

Q: Can I use multiple dust sensors with one Arduino? A: Yes, you can connect multiple sensors to an Arduino, provided you have enough analog input pins and you manage the power distribution appropriately.