Cirkit Designer
Your all-in-one circuit design IDE
Home /
Component Documentation
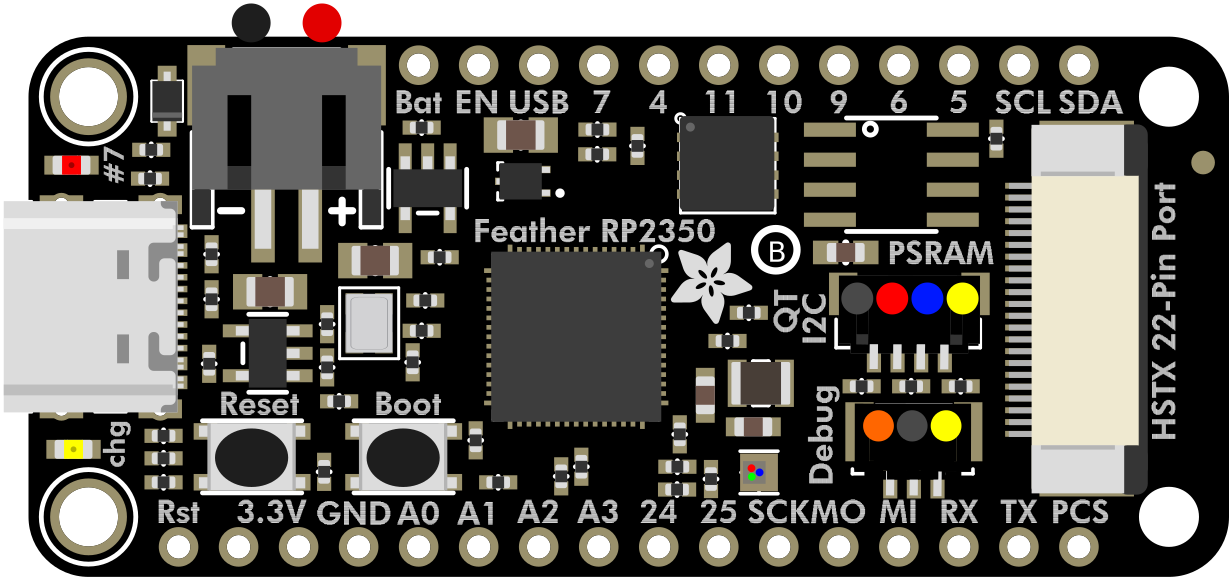
How to Use Adafruit Feather RP2350: Examples, Pinouts, and Specs
Introduction
The Adafruit Feather RP2040 is a compact development board featuring the RP2040 microcontroller, designed for IoT projects and prototyping. It comes with built-in USB, battery charging capabilities, and extensive GPIO options, making it a versatile choice for a wide range of applications.
Explore Projects Built with Adafruit Feather RP2350
Solar-Powered Environmental Data Logger with Adafruit Feather M0 Express

This circuit is designed for environmental data collection and logging, utilizing an Adafruit Feather M0 Express microcontroller as the central processing unit. It interfaces with a BME280 sensor for atmospheric temperature, humidity, and pressure measurements, an SGP30 sensor for monitoring air quality (eCO2 and TVOC), and a STEMMA soil sensor for detecting soil moisture and temperature. The system is powered by a solar panel and a 3.7v LiPo battery, managed by an Adafruit BQ24074 Solar-DC-USB Lipo Charger, and provides easy access to the microcontroller's connections through an Adafruit Terminal Breakout FeatherWing.
Adafruit Feather 32u4 Bluefruit with MPR121 Capacitive Touch Sensor Interface

This circuit integrates an Adafruit MPR121 capacitive touch sensor with an Adafruit Feather 32u4 Bluefruit microcontroller. The MPR121 is powered by the 3.3V supply from the Feather and communicates with the microcontroller via I2C, with SCL connected to pin 3 and SDA connected to pin 2 of the Feather. This setup allows the Feather to detect touch inputs from the MPR121 for further processing or wireless communication.
Biometric and RFID Security System with Dual Adafruit Feather nRF52840 Controllers

This circuit features two Adafruit Feather nRF52840 microcontrollers, each interfaced with an RFID-RC522 module for RFID communication and an AT24C256 external EEPROM for additional memory storage. One of the microcontrollers is also connected to an R307 Fingerprint Sensor for biometric input, and both microcontrollers are powered by a shared power supply and a coin cell breakout for backup or RTC power. The circuit is likely designed for secure access control or identification purposes, utilizing both RFID and fingerprint authentication, with data storage capabilities.
Touch-Sensitive Interface with Adafruit MPR121 and Feather 32u4 Bluefruit

This circuit integrates an Adafruit MPR121 capacitive touch sensor with an Adafruit Feather 32u4 Bluefruit microcontroller. The MPR121 is powered by the Feather and communicates via I2C (SCL and SDA) to detect touch inputs, which can be processed or transmitted wirelessly by the Feather.
Explore Projects Built with Adafruit Feather RP2350
Solar-Powered Environmental Data Logger with Adafruit Feather M0 Express
This circuit is designed for environmental data collection and logging, utilizing an Adafruit Feather M0 Express microcontroller as the central processing unit. It interfaces with a BME280 sensor for atmospheric temperature, humidity, and pressure measurements, an SGP30 sensor for monitoring air quality (eCO2 and TVOC), and a STEMMA soil sensor for detecting soil moisture and temperature. The system is powered by a solar panel and a 3.7v LiPo battery, managed by an Adafruit BQ24074 Solar-DC-USB Lipo Charger, and provides easy access to the microcontroller's connections through an Adafruit Terminal Breakout FeatherWing.
Adafruit Feather 32u4 Bluefruit with MPR121 Capacitive Touch Sensor Interface
This circuit integrates an Adafruit MPR121 capacitive touch sensor with an Adafruit Feather 32u4 Bluefruit microcontroller. The MPR121 is powered by the 3.3V supply from the Feather and communicates with the microcontroller via I2C, with SCL connected to pin 3 and SDA connected to pin 2 of the Feather. This setup allows the Feather to detect touch inputs from the MPR121 for further processing or wireless communication.
Biometric and RFID Security System with Dual Adafruit Feather nRF52840 Controllers
This circuit features two Adafruit Feather nRF52840 microcontrollers, each interfaced with an RFID-RC522 module for RFID communication and an AT24C256 external EEPROM for additional memory storage. One of the microcontrollers is also connected to an R307 Fingerprint Sensor for biometric input, and both microcontrollers are powered by a shared power supply and a coin cell breakout for backup or RTC power. The circuit is likely designed for secure access control or identification purposes, utilizing both RFID and fingerprint authentication, with data storage capabilities.
Touch-Sensitive Interface with Adafruit MPR121 and Feather 32u4 Bluefruit
This circuit integrates an Adafruit MPR121 capacitive touch sensor with an Adafruit Feather 32u4 Bluefruit microcontroller. The MPR121 is powered by the Feather and communicates via I2C (SCL and SDA) to detect touch inputs, which can be processed or transmitted wirelessly by the Feather.
Common Applications and Use Cases
- IoT Projects: Ideal for creating connected devices and smart home applications.
- Prototyping: Suitable for rapid development and testing of new ideas.
- Wearable Electronics: Compact size and battery charging make it perfect for wearable tech.
- Educational Projects: Great for learning about microcontrollers and embedded systems.
Technical Specifications
Key Technical Details
| Specification | Value |
|---|---|
| Microcontroller | RP2040 |
| Operating Voltage | 3.3V |
| Input Voltage | 5V (via USB) / 3.7V (via LiPo battery) |
| Digital I/O Pins | 20 |
| Analog Input Pins | 3 |
| Flash Memory | 8MB |
| SRAM | 264KB |
| Clock Speed | 133 MHz |
| USB | USB 1.1 (Full Speed) |
| Battery Charging | Yes (LiPo battery) |
| Dimensions | 51mm x 23mm x 8mm |
Pin Configuration and Descriptions
| Pin Number | Pin Name | Description |
|---|---|---|
| 1 | 3V3 | 3.3V Power Output |
| 2 | GND | Ground |
| 3 | A0 | Analog Input 0 |
| 4 | A1 | Analog Input 1 |
| 5 | A2 | Analog Input 2 |
| 6 | D0 | Digital I/O 0 (UART RX) |
| 7 | D1 | Digital I/O 1 (UART TX) |
| 8 | D2 | Digital I/O 2 |
| 9 | D3 | Digital I/O 3 |
| 10 | D4 | Digital I/O 4 |
| 11 | D5 | Digital I/O 5 |
| 12 | D6 | Digital I/O 6 |
| 13 | D7 | Digital I/O 7 |
| 14 | D8 | Digital I/O 8 |
| 15 | D9 | Digital I/O 9 |
| 16 | D10 | Digital I/O 10 |
| 17 | D11 | Digital I/O 11 |
| 18 | D12 | Digital I/O 12 |
| 19 | D13 | Digital I/O 13 (LED) |
| 20 | SCL | I2C Clock |
| 21 | SDA | I2C Data |
| 22 | MOSI | SPI Master Out Slave In |
| 23 | MISO | SPI Master In Slave Out |
| 24 | SCK | SPI Clock |
| 25 | AREF | Analog Reference |
| 26 | EN | Enable Pin |
| 27 | RST | Reset Pin |
Usage Instructions
How to Use the Component in a Circuit
Powering the Board:
- Connect the board to your computer using a USB cable for power and programming.
- Alternatively, connect a 3.7V LiPo battery to the battery connector for portable projects.
Programming the Board:
- Use the Arduino IDE or CircuitPython to program the board.
- Select "Adafruit Feather RP2040" from the board manager in the Arduino IDE.
Connecting Peripherals:
- Use the GPIO pins to connect sensors, actuators, and other peripherals.
- Utilize the I2C, SPI, and UART interfaces for communication with other devices.
Important Considerations and Best Practices
- Voltage Levels: Ensure that all connected peripherals operate at 3.3V logic levels to avoid damaging the board.
- Battery Charging: When using a LiPo battery, the built-in charging circuit will manage the charging process.
- Pin Usage: Be mindful of the pin assignments and avoid conflicts, especially when using multiple peripherals.
Example Code for Arduino UNO
// Blink an LED connected to pin D13

void setup() {
  pinMode(13, OUTPUT); // Set pin D13 as an output
}

void loop() {
  digitalWrite(13, HIGH); // Turn the LED on
  delay(1000);            // Wait for 1 second
  digitalWrite(13, LOW);  // Turn the LED off
  delay(1000);            // Wait for 1 second
}
Troubleshooting and FAQs
Common Issues Users Might Face
Board Not Recognized by Computer:
- Ensure the USB cable is properly connected.
- Try a different USB cable or port.
- Check if the board is in bootloader mode by pressing the reset button twice.
Program Not Uploading:
- Verify that the correct board and port are selected in the Arduino IDE.
- Ensure no other programs are using the same COM port.
Peripheral Not Working:
- Double-check the wiring and connections.
- Ensure the peripheral is compatible with 3.3V logic levels.
Solutions and Tips for Troubleshooting
- Resetting the Board: Press the reset button twice to enter bootloader mode if the board is not responding.
- Updating Firmware: Ensure you have the latest firmware and libraries installed for the Adafruit Feather RP2040.
- Consulting Documentation: Refer to the official Adafruit documentation and forums for additional support and resources.
By following this documentation, users can effectively utilize the Adafruit Feather RP2040 for their IoT projects and prototyping needs. Whether you are a beginner or an experienced user, this guide provides the essential information to get started and troubleshoot common issues.