How to Use OLED 128x64 I2C Monochrome Display GND-VDD: Examples, Pinouts, and Specs
Introduction
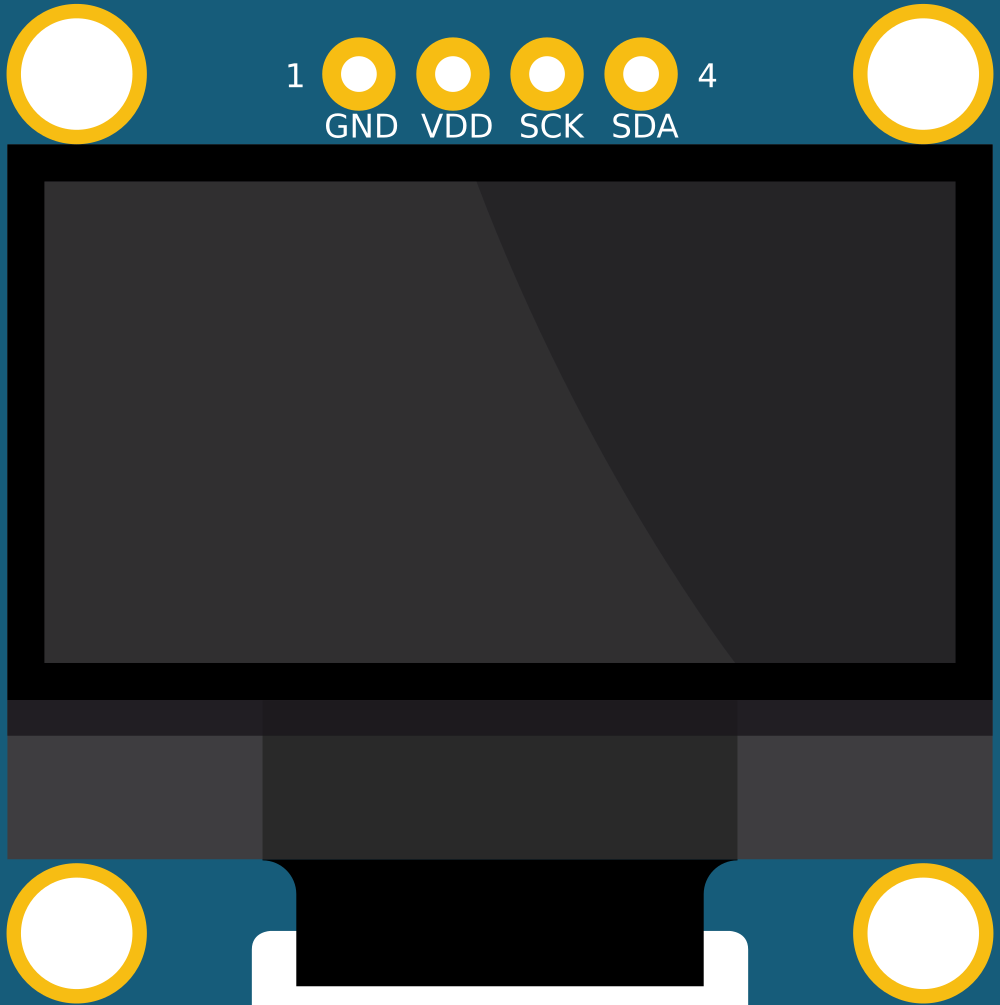
The OLED 128x64 I2C Monochrome Display GND-VDD is a compact and versatile display module suitable for integrating with microcontrollers such as Arduino, ESP8266, and others. With its high resolution of 128x64 pixels, this display provides clear and sharp text, graphics, and images in monochrome. It utilizes the I2C communication protocol, which simplifies the wiring and connectivity to just four pins, including power (VDD) and ground (GND). Common applications include user interfaces, data monitoring displays, and small-scale information panels.
Explore Projects Built with OLED 128x64 I2C Monochrome Display GND-VDD
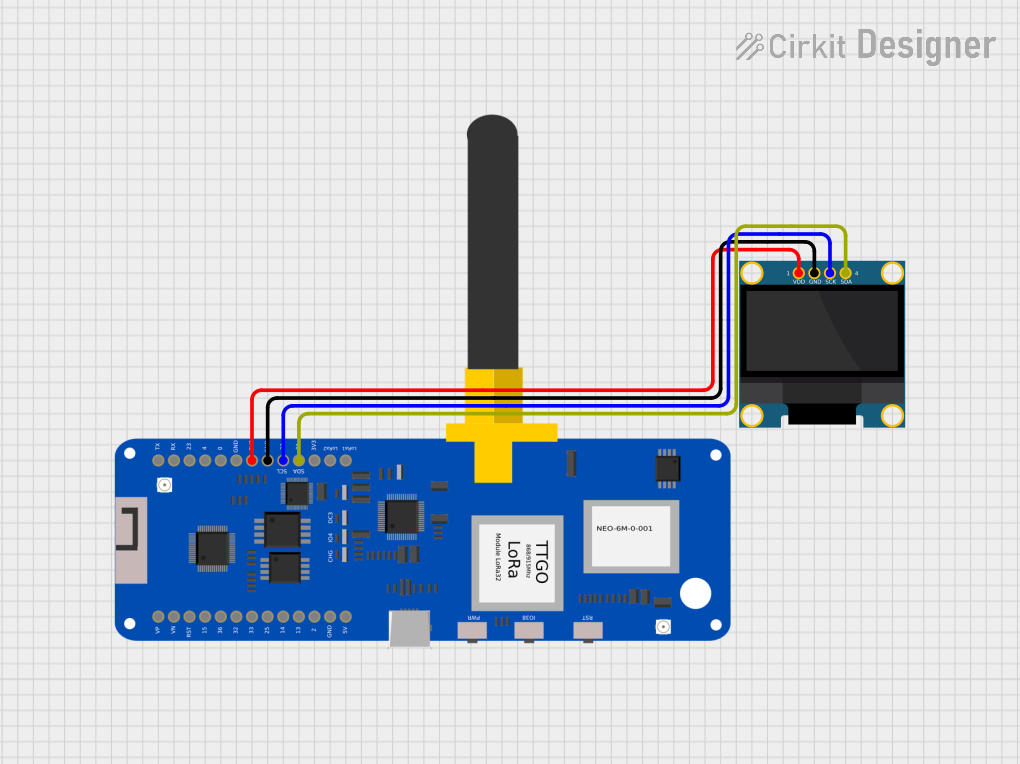


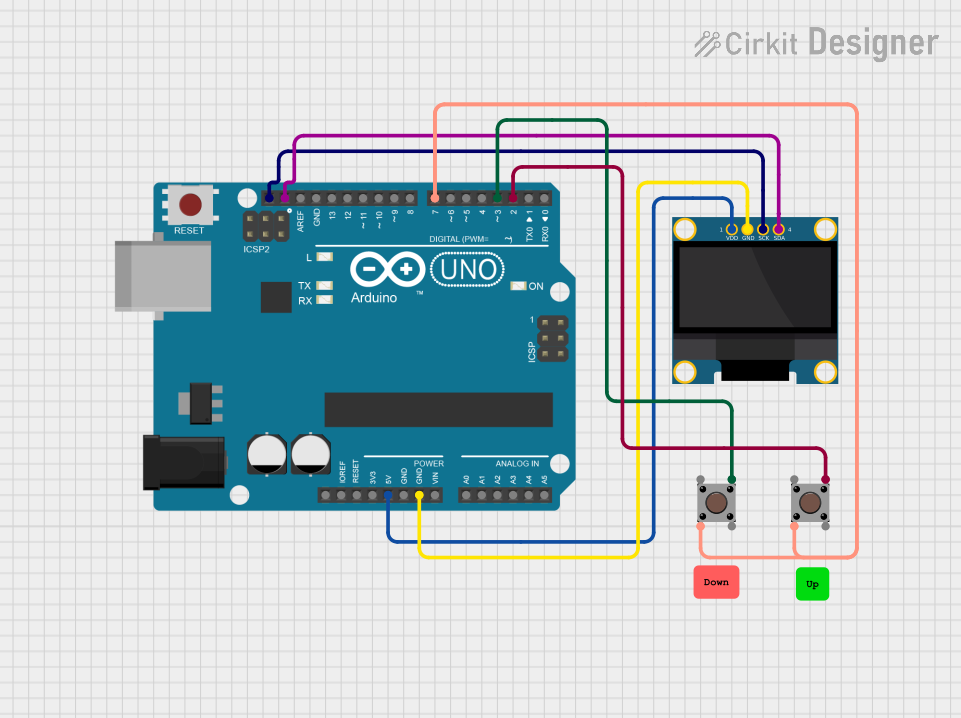
Explore Projects Built with OLED 128x64 I2C Monochrome Display GND-VDD
Technical Specifications
Key Technical Details
- Display Type: OLED (Organic Light-Emitting Diode)
- Resolution: 128x64 pixels
- Color: Monochrome (White)
- Interface: I2C (Inter-Integrated Circuit)
- Operating Voltage (VDD): 3.3V to 5V
- Current Consumption: Typically 20mA (depends on brightness)
- Viewing Angle: >160 degrees
- Driver IC: SSD1306 or compatible
Pin Configuration and Descriptions
| Pin Number | Pin Name | Description |
|---|---|---|
| 1 | GND | Ground, connected to system ground |
| 2 | VDD | Power supply, 3.3V to 5V |
| 3 | SCL | Serial Clock Line for I2C communication |
| 4 | SDA | Serial Data Line for I2C communication |
Usage Instructions
Connecting the Display to a Microcontroller
- Connect the GND pin of the OLED display to the ground (GND) on the microcontroller.
- Connect the VDD pin to a 3.3V or 5V power output from the microcontroller.
- Connect the SCL pin to the I2C clock (SCL) pin on the microcontroller.
- Connect the SDA pin to the I2C data (SDA) pin on the microcontroller.
Initializing the Display
To use the display with an Arduino UNO, you will need to include libraries that support the SSD1306 driver and the I2C communication. The Adafruit SSD1306 and Adafruit GFX libraries are commonly used.
#include <Wire.h>
#include <Adafruit_GFX.h>
#include <Adafruit_SSD1306.h>

// OLED display TWI address
#define OLED_ADDR   0x3C
// Reset pin not used on 4-pin OLED module
#define OLED_RESET  -1

Adafruit_SSD1306 display(128, 64, &Wire, OLED_RESET);

void setup() {
  // Initialize with the I2C addr 0x3C (for the 128x64)
  if(!display.begin(SSD1306_SWITCHCAPVCC, OLED_ADDR)) {
    Serial.println(F("SSD1306 allocation failed"));
    for(;;); // Don't proceed, loop forever
  }
  display.display();
  delay(2000); // Pause for 2 seconds
  display.clearDisplay();
}

void loop() {
  // Your code to update the display goes here
}
Displaying Text and Graphics
After initializing the display, you can use the display object to draw text, shapes, and images. Here's an example of displaying text:
void loop() {
  display.setTextSize(1);      // Normal 1:1 pixel scale
  display.setTextColor(WHITE); // Draw white text
  display.setCursor(0,0);      // Start at top-left corner
  display.clearDisplay();
  display.println(F("Hello, world!"));
  display.display();
  delay(2000);
}
Important Considerations and Best Practices
- Always check the voltage compatibility of the OLED display with your microcontroller.
- Use pull-up resistors on the SCL and SDA lines if your microcontroller does not have built-in pull-ups.
- Avoid displaying static images for extended periods to prevent OLED burn-in.
Troubleshooting and FAQs
Common Issues
- Display not powering on: Check connections for VDD and GND, and ensure the power supply is within the specified range.
- Garbled or no display: Verify that the I2C address is correct and that the SCL and SDA connections are secure.
- Dim display: Adjust the contrast or check if the display is receiving the correct voltage.
Solutions and Tips for Troubleshooting
- Use the
i2c_scannersketch to confirm the I2C address of the display. - Ensure that the correct driver library (SSD1306 or compatible) is installed and included in your sketch.
- Check for soldering issues on the display pins and the microcontroller's I2C pins.
FAQs
Q: Can I use this display with a 5V microcontroller? A: Yes, the OLED display can typically handle a 5V power supply, but always check the datasheet of your specific module to confirm.
Q: How do I prevent OLED burn-in? A: To prevent burn-in, avoid displaying static content for long periods. Use screen savers or periodically clear the display and refresh the content.
Q: What libraries do I need for Arduino? A: You will need the Adafruit SSD1306 and Adafruit GFX libraries, which can be installed via the Arduino Library Manager.
Q: How can I display images on the OLED?
A: Convert your images to a bitmap array compatible with the display's resolution and use the drawBitmap function provided by the library.
This documentation provides a comprehensive guide to using the OLED 128x64 I2C Monochrome Display with a microcontroller. For further assistance, consult the datasheet of the specific OLED module you have or reach out to the community forums for support.