How to Use f446re: Examples, Pinouts, and Specs

 Design with f446re in Cirkit Designer
Introduction
The F446RE is a high-performance microcontroller from STMicroelectronics, part of the STM32 family. It is based on a 32-bit ARM Cortex-M4 core with a floating-point unit (FPU), making it ideal for applications requiring efficient computation and real-time performance. The F446RE is commonly used in industrial automation, IoT devices, robotics, motor control, and audio processing. Its integrated peripherals and low power consumption make it a versatile choice for a wide range of embedded systems.
Explore Projects Built with f446re

 Open Project in Cirkit Designer
 Open Project in Cirkit Designer
 Open Project in Cirkit Designer
 Open Project in Cirkit Designer
Explore Projects Built with f446re

 Open Project in Cirkit Designer
 Open Project in Cirkit Designer
 Open Project in Cirkit Designer
 Open Project in Cirkit Designer
Technical Specifications
The following are the key technical details of the F446RE microcontroller:
- Core: ARM Cortex-M4 with FPU
- Operating Frequency: Up to 180 MHz
- Flash Memory: 512 KB
- SRAM: 128 KB
- GPIO Pins: 50 (on the Nucleo-64 board)
- Communication Interfaces:
- 3x SPI
- 3x I2C
- 6x USART/UART
- 1x CAN
- 1x USB OTG (Full-Speed)
- Timers: 14 (including advanced control timers for motor control)
- ADC: 3x 12-bit ADCs
- DAC: 2x 12-bit DACs
- Power Supply Voltage: 1.7V to 3.6V
- Operating Temperature: -40°C to +85°C
- Package: LQFP64 (on the Nucleo-64 development board)
Pin Configuration and Descriptions
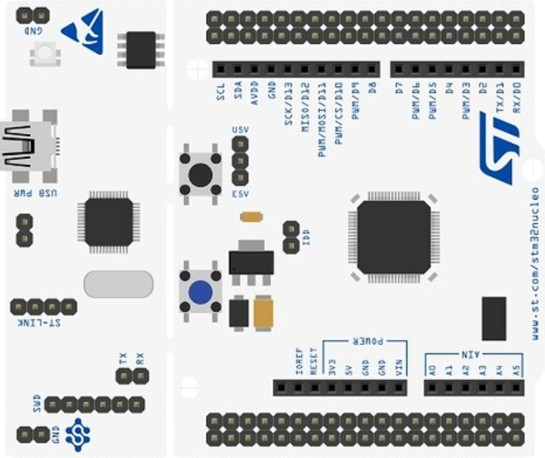
The F446RE is available on the Nucleo-64 development board, which provides easy access to its pins. Below is a table summarizing the key pin functions:
| Pin Name | Function | Description |
|---|---|---|
| PA0 | GPIO, ADC_IN0, TIM2_CH1 | General-purpose I/O, ADC input, Timer channel |
| PA1 | GPIO, ADC_IN1, TIM2_CH2 | General-purpose I/O, ADC input, Timer channel |
| PA9 | GPIO, USART1_TX | UART transmit pin |
| PA10 | GPIO, USART1_RX | UART receive pin |
| PB6 | GPIO, I2C1_SCL | I2C clock line |
| PB7 | GPIO, I2C1_SDA | I2C data line |
| PC13 | GPIO | User button (on Nucleo board) |
| 3V3 | Power | 3.3V power supply |
| GND | Ground | Ground connection |
For a complete pinout, refer to the official STM32 Nucleo-64 datasheet.
Usage Instructions
How to Use the F446RE in a Circuit
- Power Supply: Connect the 3.3V and GND pins to a stable power source. The Nucleo-64 board can also be powered via USB.
- Programming: Use the onboard ST-LINK/V2-1 debugger to program the microcontroller via USB. Compatible IDEs include STM32CubeIDE, Keil, and IAR.
- Peripherals: Connect external devices (e.g., sensors, actuators) to the GPIO, ADC, or communication interface pins as needed.
- Clock Configuration: Configure the system clock using the STM32CubeMX tool to optimize performance and power consumption.
Important Considerations and Best Practices
- Voltage Levels: Ensure all connected peripherals operate within the 3.3V logic level to avoid damage.
- Decoupling Capacitors: Place decoupling capacitors (e.g., 0.1 µF) near the power pins to stabilize the supply voltage.
- Debugging: Use the onboard ST-LINK debugger for real-time debugging and firmware uploads.
- Code Development: Leverage the STM32 HAL (Hardware Abstraction Layer) or LL (Low Layer) libraries for efficient code development.
Example Code for Arduino IDE
The F446RE can be programmed using the Arduino IDE with the STM32 core installed. Below is an example of blinking an LED connected to pin PA5:
// Include the STM32 HAL library
#include <Arduino.h>

// Define the LED pin (PA5 is connected to the onboard LED on Nucleo-64)
#define LED_PIN PA5

void setup() {
  pinMode(LED_PIN, OUTPUT); // Set PA5 as an output pin
}

void loop() {
  digitalWrite(LED_PIN, HIGH); // Turn the LED on
  delay(500);                  // Wait for 500 milliseconds
  digitalWrite(LED_PIN, LOW);  // Turn the LED off
  delay(500);                  // Wait for 500 milliseconds
}
Troubleshooting and FAQs
Common Issues and Solutions
Microcontroller Not Detected by IDE:
- Ensure the USB cable is properly connected and functional.
- Verify that the ST-LINK drivers are installed on your computer.
- Check the power supply to the Nucleo board.
Program Not Running:
- Confirm that the correct clock configuration is set in the STM32CubeMX tool.
- Ensure the microcontroller is not in a low-power mode that disables peripherals.
Peripheral Not Responding:
- Double-check the pin connections and ensure they match the configuration in your code.
- Verify that the peripheral initialization code is correct.
Overheating:
- Ensure the microcontroller is not exposed to voltages exceeding its maximum ratings.
- Check for short circuits or excessive current draw in the circuit.
FAQs
Q: Can I use the F446RE with 5V peripherals?
A: The F446RE operates at 3.3V logic levels. Use level shifters to interface with 5V peripherals.
Q: How do I reset the microcontroller?
A: Press the reset button on the Nucleo-64 board or use the software reset function in your code.
Q: Is the F446RE compatible with Arduino libraries?
A: Yes, with the STM32 core installed in the Arduino IDE, many Arduino libraries can be used with the F446RE.
Q: Can I use the USB port for serial communication?
A: Yes, the USB port on the Nucleo-64 board can be used as a virtual COM port for serial communication.
For further assistance, refer to the official STM32 documentation and community forums.