Cirkit Designer Logo
Cirkit Designer
Your all-in-one circuit design IDE
Home / 
Component Documentation

How to Use 16x2 I2C LCD (SIM TEST): Examples, Pinouts, and Specs

Image of 16x2 I2C LCD (SIM TEST)
Cirkit Designer LogoDesign with 16x2 I2C LCD (SIM TEST) in Cirkit Designer

Introduction

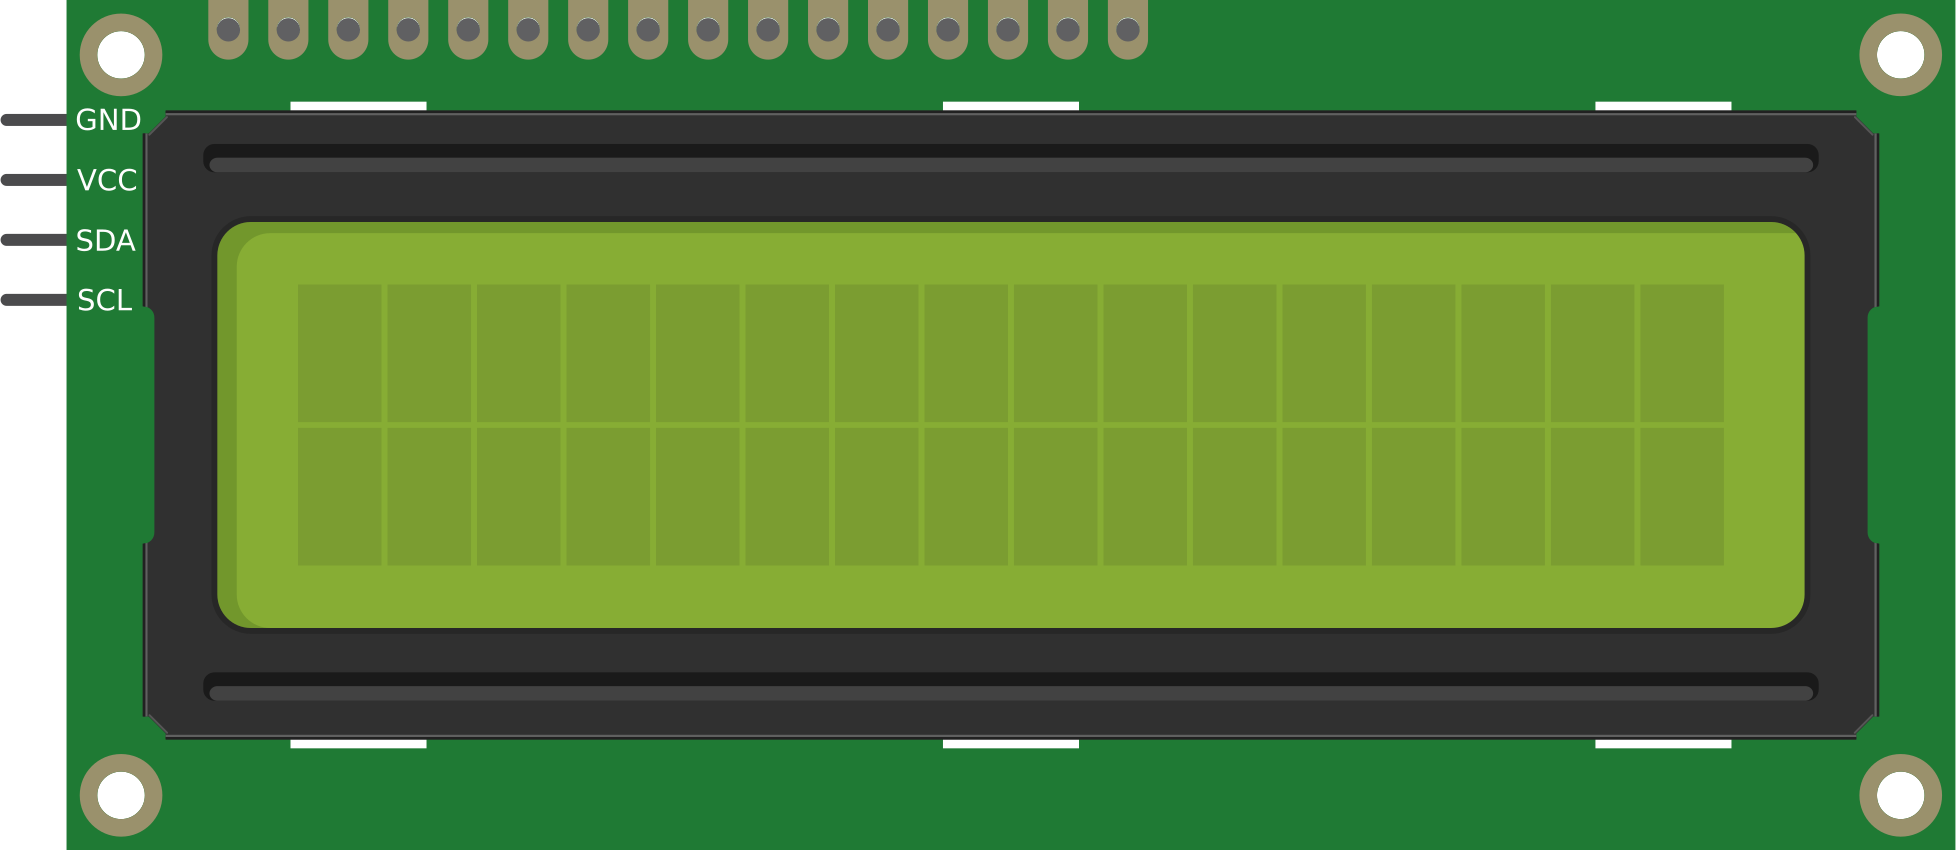
The 16x2 I2C LCD is a liquid crystal display that can show 16 characters per line and has 2 lines, making it ideal for displaying text in various applications. The I2C interface allows for easy communication with microcontrollers using only two wires (SDA and SCL), simplifying connections and reducing the number of pins needed. This feature makes it particularly popular in projects involving Arduino, Raspberry Pi, and other microcontrollers.

Explore Projects Built with 16x2 I2C LCD (SIM TEST)

Use Cirkit Designer to design, explore, and prototype these projects online. Some projects support real-time simulation. Click "Open Project" to start designing instantly!
Arduino Leonardo Controlled LCD Display with I2C Interface
Image of ert: A project utilizing 16x2 I2C LCD (SIM TEST) in a practical application
This circuit connects an Arduino Leonardo microcontroller to a 16x2 LCD display via an LCM1602 IIC interface module, enabling the display of text on the LCD. The Arduino is programmed to display the messages 'TEST LCD i2C' and 'KelasRobot.com' on the LCD. The IIC module facilitates communication between the Arduino and the LCD using the I2C protocol, simplifying the wiring and pin usage.
Cirkit Designer LogoOpen Project in Cirkit Designer
I2C LCD Display Module with Power Supply Interface
Image of J8 +j22 lcd closeup: A project utilizing 16x2 I2C LCD (SIM TEST) in a practical application
This circuit interfaces a 20x4 I2C LCD display with a power source and an I2C communication bus. The LCD is powered by a 4.2V supply from a connector and communicates via I2C through another connector, which provides the SCL and SDA lines as well as ground.
Cirkit Designer LogoOpen Project in Cirkit Designer
A-Star 32U4 Mini and I2C LCD Screen Battery-Powered Display
Image of lcd disolay: A project utilizing 16x2 I2C LCD (SIM TEST) in a practical application
This circuit features an A-Star 32U4 Mini microcontroller connected to a 16x2 I2C LCD screen. The microcontroller provides power and ground to the LCD, and communicates with it via the I2C protocol using the A4 (SDA) and A5 (SCL) pins.
Cirkit Designer LogoOpen Project in Cirkit Designer
Arduino Mega 2560 I2C LCD Display Interface
Image of project 3: A project utilizing 16x2 I2C LCD (SIM TEST) in a practical application
This circuit consists of an Arduino Mega 2560 microcontroller connected to a 16x2 I2C LCD screen. The LCD screen is powered by the Arduino's 5V and GND pins, and communicates with the Arduino via the I2C protocol using the SCL and SDA pins.
Cirkit Designer LogoOpen Project in Cirkit Designer

Explore Projects Built with 16x2 I2C LCD (SIM TEST)

Use Cirkit Designer to design, explore, and prototype these projects online. Some projects support real-time simulation. Click "Open Project" to start designing instantly!
Image of ert: A project utilizing 16x2 I2C LCD (SIM TEST) in a practical application
Arduino Leonardo Controlled LCD Display with I2C Interface
This circuit connects an Arduino Leonardo microcontroller to a 16x2 LCD display via an LCM1602 IIC interface module, enabling the display of text on the LCD. The Arduino is programmed to display the messages 'TEST LCD i2C' and 'KelasRobot.com' on the LCD. The IIC module facilitates communication between the Arduino and the LCD using the I2C protocol, simplifying the wiring and pin usage.
Cirkit Designer LogoOpen Project in Cirkit Designer
Image of J8 +j22 lcd closeup: A project utilizing 16x2 I2C LCD (SIM TEST) in a practical application
I2C LCD Display Module with Power Supply Interface
This circuit interfaces a 20x4 I2C LCD display with a power source and an I2C communication bus. The LCD is powered by a 4.2V supply from a connector and communicates via I2C through another connector, which provides the SCL and SDA lines as well as ground.
Cirkit Designer LogoOpen Project in Cirkit Designer
Image of lcd disolay: A project utilizing 16x2 I2C LCD (SIM TEST) in a practical application
A-Star 32U4 Mini and I2C LCD Screen Battery-Powered Display
This circuit features an A-Star 32U4 Mini microcontroller connected to a 16x2 I2C LCD screen. The microcontroller provides power and ground to the LCD, and communicates with it via the I2C protocol using the A4 (SDA) and A5 (SCL) pins.
Cirkit Designer LogoOpen Project in Cirkit Designer
Image of project 3: A project utilizing 16x2 I2C LCD (SIM TEST) in a practical application
Arduino Mega 2560 I2C LCD Display Interface
This circuit consists of an Arduino Mega 2560 microcontroller connected to a 16x2 I2C LCD screen. The LCD screen is powered by the Arduino's 5V and GND pins, and communicates with the Arduino via the I2C protocol using the SCL and SDA pins.
Cirkit Designer LogoOpen Project in Cirkit Designer

Common Applications and Use Cases

  • Arduino Projects: Displaying sensor data, user interfaces, and messages.
  • Home Automation: Showing status updates for smart home devices.
  • Educational Projects: Teaching programming and electronics concepts.
  • Industrial Applications: Monitoring and displaying machine status.

Technical Specifications

Key Technical Details

Specification Value
Display Type LCD (Liquid Crystal Display)
Character Size 5x8 dots
Number of Lines 2
Number of Characters 16
I2C Address 0x27 (common)
Operating Voltage 5V
Current Consumption ~20 mA

Pin Configuration and Descriptions

Pin Number Pin Name Description
1 GND Ground connection
2 VCC Power supply (5V)
3 SDA Serial Data Line (I2C)
4 SCL Serial Clock Line (I2C)
5 RS Register Select (not used in I2C)
6 RW Read/Write (not used in I2C)
7 E Enable (not used in I2C)
8 D0-D7 Data pins (not used in I2C)

Usage Instructions

How to Use the Component in a Circuit
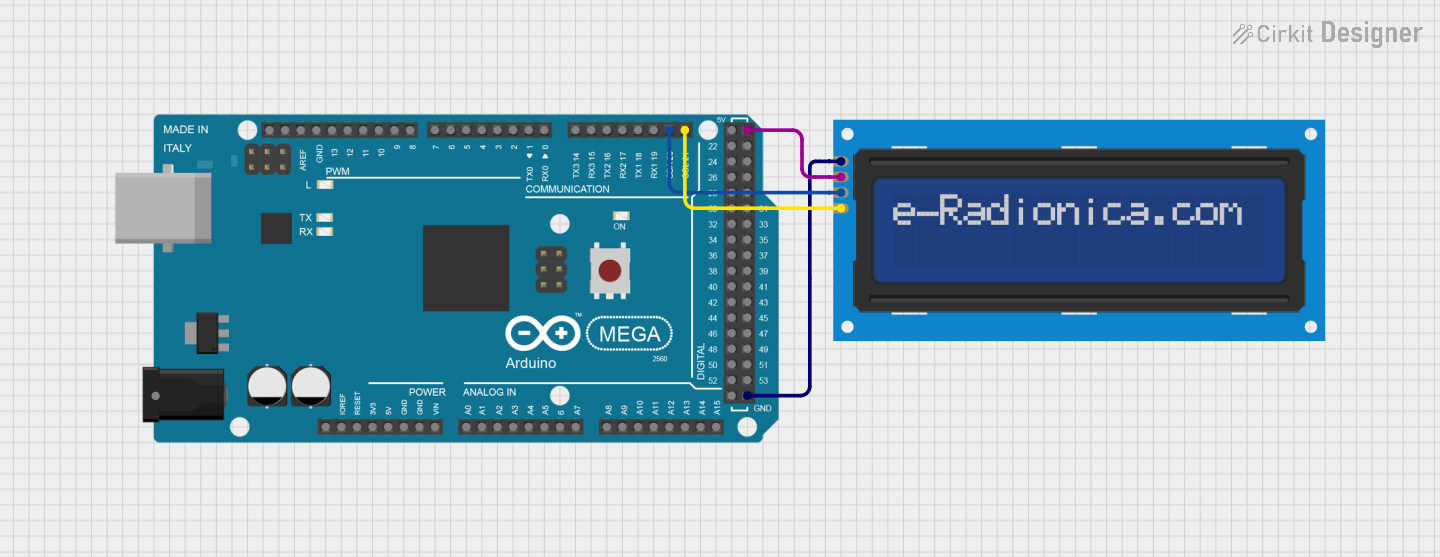
  1. Wiring:

    • Connect the GND pin of the LCD to the ground of your microcontroller.
    • Connect the VCC pin to the 5V output of your microcontroller.
    • Connect the SDA pin to the SDA pin of your microcontroller.
    • Connect the SCL pin to the SCL pin of your microcontroller.
  2. Library Installation:

    • For Arduino, install the LiquidCrystal_I2C library via the Library Manager.
  3. Sample Code: Below is a simple example of how to use the 16x2 I2C LCD with an Arduino UNO.

    #include <Wire.h>
    #include <LiquidCrystal_I2C.h>
    
    // Create an LCD object with the I2C address
    LiquidCrystal_I2C lcd(0x27, 16, 2);
    
    void setup() {
        // Initialize the LCD
        lcd.begin();
        // Turn on the backlight
        lcd.backlight();
        // Print a message to the LCD
        lcd.setCursor(0, 0);
        lcd.print("Hello, World!");
    }
    
    void loop() {
        // You can add more code here to update the display
    }
    

Important Considerations and Best Practices

  • Ensure that the I2C address (0x27) matches your specific module.
  • Use pull-up resistors on the SDA and SCL lines if not already included.
  • Avoid connecting multiple I2C devices with the same address.

Troubleshooting and FAQs

Common Issues Users Might Face

  1. No Display:

    • Check power connections (VCC and GND).
    • Ensure the I2C address is correct.
  2. Garbage Characters on Display:

    • Verify the wiring and connections.
    • Check if the correct library is being used.
  3. Backlight Not Working:

    • Ensure the backlight pin is connected properly.
    • Check for any shorts or faulty connections.

Solutions and Tips for Troubleshooting

  • Use an I2C scanner sketch to find the correct address of your LCD.
  • Double-check all connections and ensure they are secure.
  • If using multiple I2C devices, ensure they have unique addresses.

By following this documentation, users can effectively integrate the 16x2 I2C LCD into their projects, troubleshoot common issues, and enhance their understanding of this versatile component.