How to Use Hardware platform: Examples, Pinouts, and Specs
Introduction
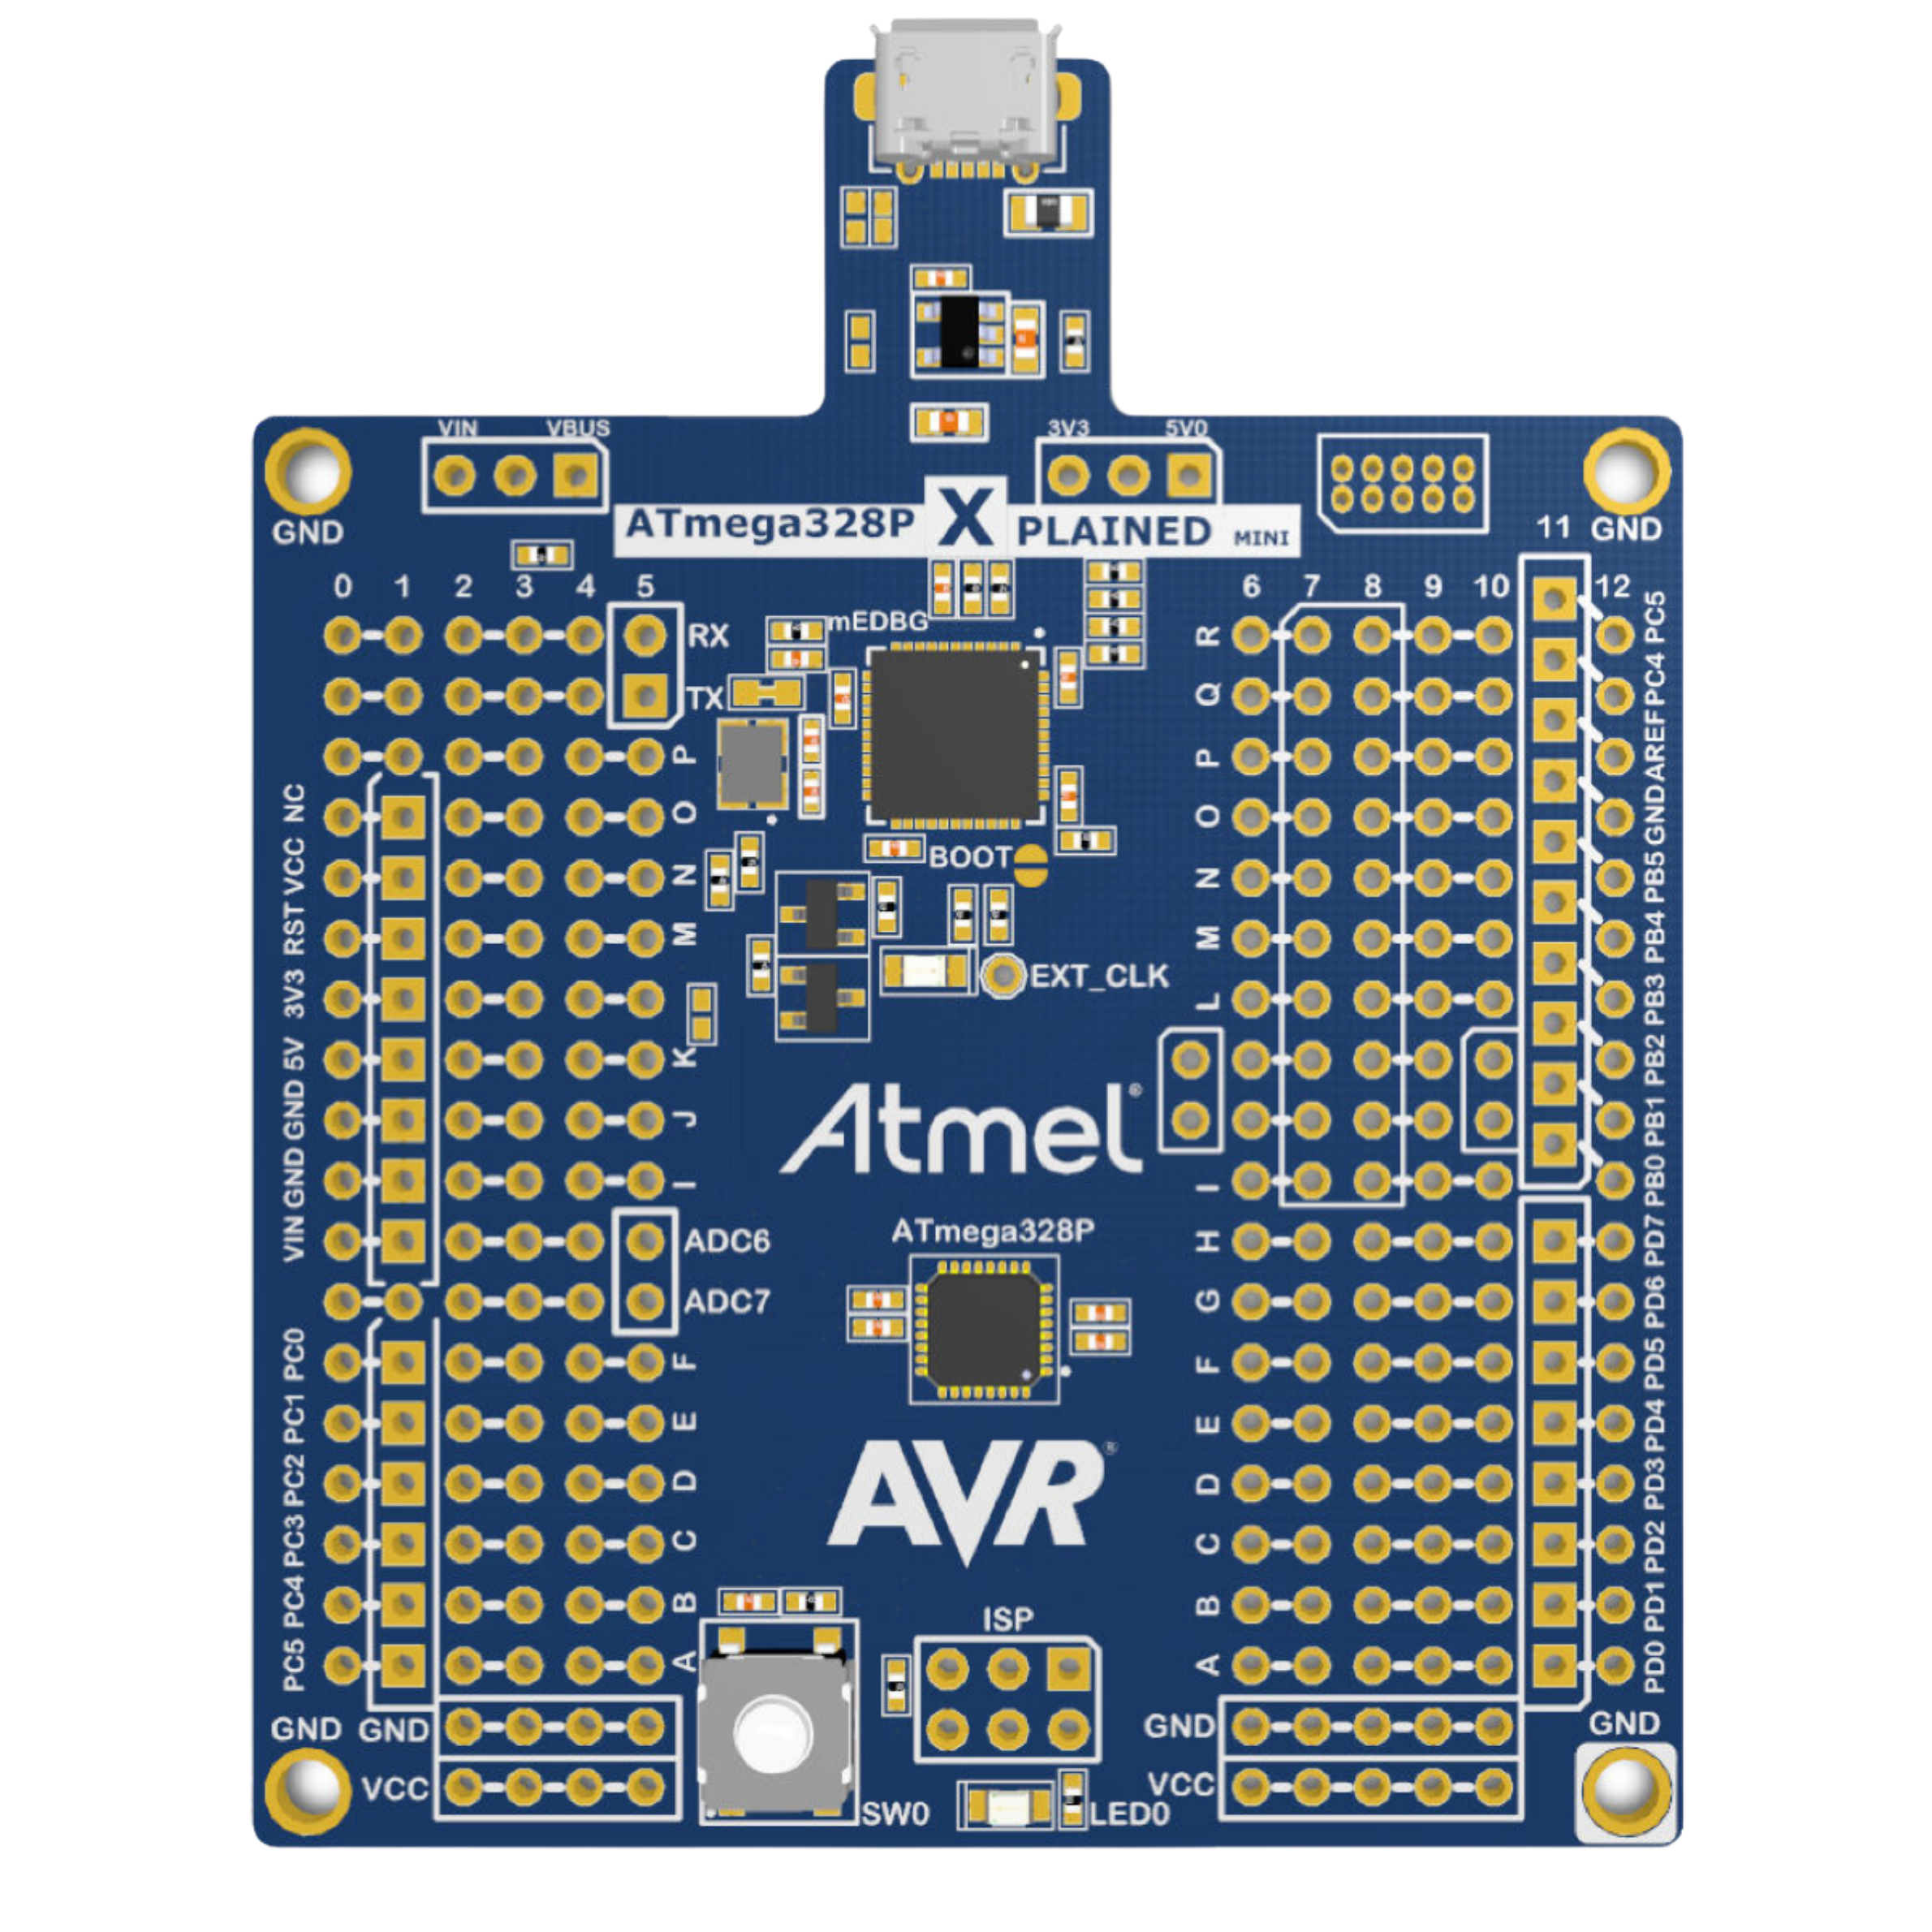
The ATmega328P Xplained Mini is a compact hardware platform developed by Microchip, designed to evaluate and prototype applications based on the ATmega328P microcontroller. This platform provides a convenient and cost-effective way to explore the capabilities of the ATmega328P, a popular 8-bit AVR microcontroller. It includes essential components such as a USB interface, power supply circuitry, and pin headers for easy access to the microcontroller's I/O pins.
Explore Projects Built with Hardware platform


Explore Projects Built with Hardware platform
Common Applications and Use Cases
- Embedded systems prototyping
- Educational purposes for learning microcontroller programming
- Development of IoT devices
- Small-scale automation projects
- Sensor interfacing and data acquisition
Technical Specifications
The ATmega328P Xplained Mini is built around the ATmega328P microcontroller and includes the following key specifications:
Microcontroller Specifications
| Parameter | Value |
|---|---|
| Microcontroller | ATmega328P |
| Architecture | 8-bit AVR |
| Operating Voltage | 1.8V - 5.5V |
| Flash Memory | 32 KB |
| SRAM | 2 KB |
| EEPROM | 1 KB |
| Clock Speed | Up to 20 MHz |
| GPIO Pins | 23 |
| ADC Channels | 6 (10-bit resolution) |
| PWM Channels | 6 |
| Communication Interfaces | UART, SPI, I²C |
Board Specifications
| Feature | Description |
|---|---|
| USB Interface | Micro-USB for programming and power |
| Power Supply | 5V via USB or external source |
| Debugging Interface | On-board debugger (mEDBG) |
| Pin Headers | 2.54mm pitch, Arduino-compatible |
| Dimensions | 65mm x 25mm |
Pin Configuration and Descriptions
The ATmega328P Xplained Mini provides access to the microcontroller's pins through headers. Below is a summary of the pin configuration:
| Pin Name | Pin Number | Description |
|---|---|---|
| VCC | - | Power supply (1.8V - 5.5V) |
| GND | - | Ground |
| RESET | - | Reset input |
| ADC0-ADC5 | - | Analog input channels |
| PWM | - | Pulse-width modulation outputs |
| TXD/RXD | - | UART communication pins |
| SCL/SDA | - | I²C communication pins |
| MOSI/MISO/SCK | - | SPI communication pins |
Usage Instructions
How to Use the ATmega328P Xplained Mini in a Circuit
- Powering the Board: Connect the board to a computer or USB power source using a Micro-USB cable. Alternatively, supply 5V to the VCC pin.
- Programming: Use the on-board mEDBG debugger to program the ATmega328P via the USB interface. Compatible software includes Atmel Studio or Arduino IDE.
- Connecting Peripherals: Use the pin headers to connect sensors, actuators, or other peripherals. Ensure proper voltage levels and pin configurations.
- Debugging: The mEDBG debugger allows for real-time debugging and programming without additional hardware.
Important Considerations and Best Practices
- Voltage Levels: Ensure that connected peripherals operate within the board's voltage range (1.8V - 5.5V).
- Pin Protection: Avoid exceeding the maximum current rating of the GPIO pins (40mA per pin).
- Static Protection: Handle the board with care to prevent damage from electrostatic discharge (ESD).
- Firmware Updates: Keep the mEDBG firmware updated for compatibility with the latest development tools.
Example Code for Arduino IDE
Below is an example of how to blink an LED connected to pin 13 of the ATmega328P Xplained Mini:
// Blink an LED connected to pin 13
// Ensure the LED is connected with a current-limiting resistor

void setup() {
  pinMode(13, OUTPUT); // Set pin 13 as an output
}

void loop() {
  digitalWrite(13, HIGH); // Turn the LED on
  delay(1000);            // Wait for 1 second
  digitalWrite(13, LOW);  // Turn the LED off
  delay(1000);            // Wait for 1 second
}
Troubleshooting and FAQs
Common Issues and Solutions
Board Not Detected by Computer:
- Ensure the USB cable is functional and supports data transfer.
- Verify that the mEDBG driver is installed correctly.
- Try connecting to a different USB port or computer.
Program Upload Fails:
- Check that the correct board and COM port are selected in the development environment.
- Ensure no other application is using the COM port.
- Reset the board and try uploading again.
Peripheral Not Responding:
- Verify the wiring and connections to the peripheral.
- Check that the peripheral operates within the board's voltage range.
- Confirm that the correct pins are being used in the code.
FAQs
Q: Can I use the ATmega328P Xplained Mini with the Arduino IDE?
A: Yes, the board is compatible with the Arduino IDE. Select "Arduino Uno" as the board type in the IDE.
Q: What is the maximum current output of the GPIO pins?
A: Each GPIO pin can source or sink up to 40mA, but it is recommended to stay below this limit for safe operation.
Q: How do I update the mEDBG firmware?
A: Use Microchip's Atmel Studio to update the firmware. Follow the instructions provided in the software.
Q: Can I power the board with an external power supply?
A: Yes, you can supply 5V directly to the VCC pin or use the USB interface for power.
This documentation provides a comprehensive guide to using the ATmega328P Xplained Mini, ensuring a smooth experience for both beginners and advanced users.