How to Use WS3 Weather Board: Examples, Pinouts, and Specs
Introduction
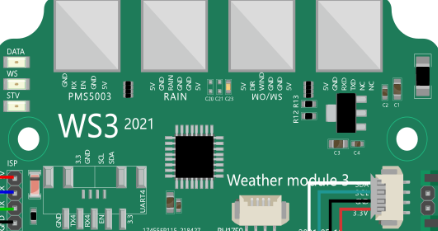
The WS3 Weather Board, manufactured by Waveshare (Part ID: Sensor Board), is a versatile sensor platform designed to monitor environmental conditions such as temperature, humidity, and atmospheric pressure. This compact and efficient board integrates multiple sensors, making it ideal for weather stations, IoT applications, and environmental monitoring systems. Its ability to collect and transmit weather data makes it a valuable tool for analysis, forecasting, and automation.
Explore Projects Built with WS3 Weather Board
Explore Projects Built with WS3 Weather Board
Common Applications
- Weather stations for real-time environmental monitoring
- IoT-based smart home and smart city systems
- Agricultural monitoring for temperature and humidity control
- Industrial applications requiring environmental data logging
- Educational projects and prototyping
Technical Specifications
Key Technical Details
- Power Supply Voltage: 3.3V or 5V
- Communication Interface: I2C
- Temperature Measurement Range: -40°C to +85°C (±0.3°C accuracy)
- Humidity Measurement Range: 0% to 100% RH (±2% accuracy)
- Pressure Measurement Range: 300 hPa to 1100 hPa (±1 hPa accuracy)
- Operating Temperature: -40°C to +85°C
- Dimensions: 40mm x 30mm x 10mm
- Mounting: 4 mounting holes for easy integration
Pin Configuration and Descriptions
The WS3 Weather Board features a 4-pin interface for easy connection to microcontrollers like the Arduino UNO.
| Pin | Name | Description |
|---|---|---|
| 1 | VCC | Power supply input (3.3V or 5V) |
| 2 | GND | Ground |
| 3 | SDA | I2C data line |
| 4 | SCL | I2C clock line |
Usage Instructions
How to Use the WS3 Weather Board in a Circuit
- Power the Board: Connect the VCC pin to a 3.3V or 5V power source and the GND pin to ground.
- Connect to a Microcontroller: Use the SDA and SCL pins to connect the board to the I2C interface of your microcontroller (e.g., Arduino UNO).
- Install Required Libraries: For Arduino, install libraries such as
Adafruit_SensorandAdafruit_BME280(if the board uses a BME280 sensor). - Write and Upload Code: Use the provided example code or write your own to read data from the board.
Important Considerations and Best Practices
- Ensure the power supply voltage matches the board's requirements (3.3V or 5V).
- Use pull-up resistors (typically 4.7kΩ) on the SDA and SCL lines if not already included in your setup.
- Avoid exposing the board to extreme environmental conditions beyond its operating range.
- Place the board in a location with good airflow for accurate readings.
- Use proper decoupling capacitors near the power pins to reduce noise.
Example Code for Arduino UNO
Below is an example code snippet to read temperature, humidity, and pressure data from the WS3 Weather Board using the BME280 sensor.
#include <Wire.h>
#include <Adafruit_Sensor.h>
#include <Adafruit_BME280.h>

// Create an instance of the BME280 sensor
Adafruit_BME280 bme;

// Define I2C address for the sensor (default is 0x76 or 0x77)
#define BME280_I2C_ADDRESS 0x76

void setup() {
  Serial.begin(9600); // Initialize serial communication
  while (!Serial);    // Wait for serial port to connect (for native USB boards)

  // Initialize the BME280 sensor
  if (!bme.begin(BME280_I2C_ADDRESS)) {
    Serial.println("Could not find a valid BME280 sensor, check wiring!");
    while (1); // Halt execution if sensor is not found
  }

  Serial.println("WS3 Weather Board Initialized");
}

void loop() {
  // Read and print temperature, humidity, and pressure data
  Serial.print("Temperature: ");
  Serial.print(bme.readTemperature());
  Serial.println(" °C");

  Serial.print("Humidity: ");
  Serial.print(bme.readHumidity());
  Serial.println(" %");

  Serial.print("Pressure: ");
  Serial.print(bme.readPressure() / 100.0F); // Convert Pa to hPa
  Serial.println(" hPa");

  delay(2000); // Wait 2 seconds before the next reading
}
Troubleshooting and FAQs
Common Issues and Solutions
Sensor Not Detected
- Cause: Incorrect I2C address or wiring.
- Solution: Verify the I2C address (default is 0x76 or 0x77) and check the SDA/SCL connections.
Inaccurate Readings
- Cause: Poor airflow or exposure to extreme conditions.
- Solution: Place the board in a well-ventilated area and ensure it operates within the specified range.
No Data Output
- Cause: Missing or incorrect library installation.
- Solution: Ensure the
Adafruit_SensorandAdafruit_BME280libraries are installed and up to date.
Interference on I2C Bus
- Cause: Long wires or lack of pull-up resistors.
- Solution: Use shorter wires and add 4.7kΩ pull-up resistors to the SDA and SCL lines if needed.
FAQs
Q: Can the WS3 Weather Board be used with a 5V microcontroller?
A: Yes, the board supports both 3.3V and 5V power supplies.Q: What is the maximum cable length for I2C communication?
A: For reliable communication, keep the cable length under 1 meter. Use shielded cables for longer distances.Q: Can I use multiple WS3 Weather Boards on the same I2C bus?
A: Yes, but ensure each board has a unique I2C address. Check the datasheet for address configuration options.Q: Is the board waterproof?
A: No, the WS3 Weather Board is not waterproof. Use a protective enclosure for outdoor applications.
By following this documentation, you can effectively integrate the WS3 Weather Board into your projects and ensure reliable performance.