
How to Use Arduino Yun: Examples, Pinouts, and Specs
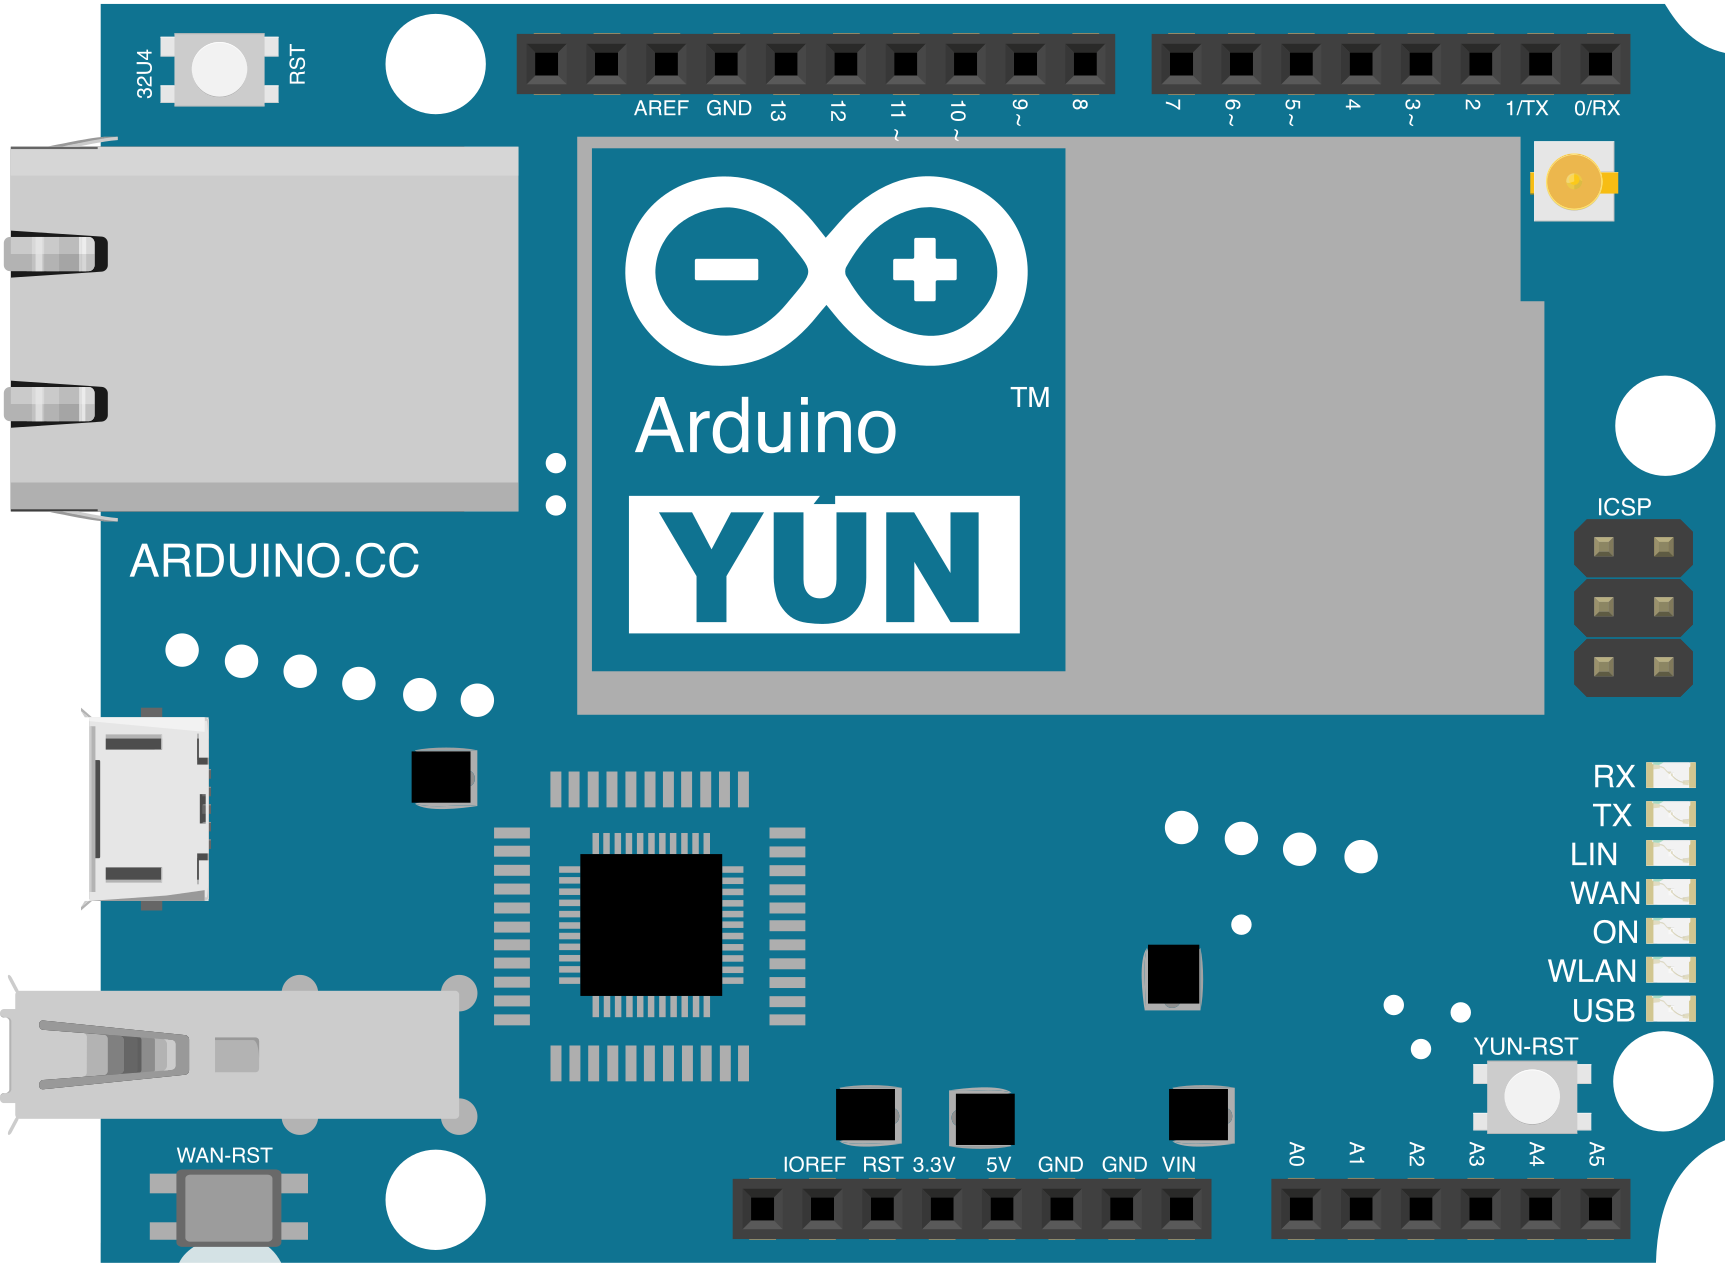
 Design with Arduino Yun in Cirkit Designer
Introduction
The Arduino Yun is a microcontroller board developed by Arduino that combines the functionality of a traditional Arduino board with built-in Wi-Fi capabilities. It is designed to simplify the development of Internet of Things (IoT) applications by integrating a powerful Linux-based system alongside the Arduino microcontroller. This dual-processor architecture allows for seamless communication between the microcontroller and the internet, making it ideal for projects requiring network connectivity.
Explore Projects Built with Arduino Yun
 Open Project in Cirkit Designer
 Open Project in Cirkit Designer
 Open Project in Cirkit Designer
 Open Project in Cirkit Designer
Explore Projects Built with Arduino Yun
Open Project in Cirkit DesignerOpen Project in Cirkit DesignerOpen Project in Cirkit DesignerOpen Project in Cirkit DesignerCommon Applications and Use Cases
- IoT devices and smart home automation
- Remote data logging and monitoring
- Web-based control systems
- Wireless sensor networks
- Prototyping connected devices
Technical Specifications
The Arduino Yun features a combination of an ATmega32U4 microcontroller and an Atheros AR9331 processor running Linux. Below are the key technical details:
Key Technical Details
| Specification | Value |
|---|---|
| Microcontroller | ATmega32U4 |
| Operating Voltage | 5V |
| Input Voltage (recommended) | 7-12V |
| Input Voltage (limit) | 6-20V |
| Digital I/O Pins | 20 (7 PWM outputs) |
| Analog Input Pins | 12 |
| Flash Memory | 32 KB (ATmega32U4) |
| SRAM | 2.5 KB (ATmega32U4) |
| EEPROM | 1 KB (ATmega32U4) |
| Clock Speed | 16 MHz (ATmega32U4) |
| Linux Processor | Atheros AR9331 |
| Linux OS | OpenWrt-based Linino |
| Wi-Fi | IEEE 802.11b/g/n |
| Ethernet | 10/100 Mbps |
| USB | Type-A USB host |
| MicroSD Card Slot | Yes |
Pin Configuration and Descriptions
| Pin Name | Description |
|---|---|
| VIN | Input voltage to the board when using an external power source (7-12V). |
| 5V | Regulated 5V output from the board. |
| GND | Ground pins. |
| Digital Pins 0-13 | General-purpose digital I/O pins. |
| PWM Pins | Digital pins 3, 5, 6, 9, 10, 11 support PWM output. |
| Analog Pins A0-A11 | Analog input pins (12-bit resolution). |
| ICSP Header | Used for programming the ATmega32U4 microcontroller. |
| RX/TX | Serial communication pins (0: RX, 1: TX). |
| USB Host | Connect USB devices (e.g., keyboards, storage). |
| Ethernet Port | Connect to wired networks. |
| MicroSD Slot | Expand storage for Linux-based applications. |
Usage Instructions
The Arduino Yun is versatile and can be used in a variety of projects. Below are the steps to get started and important considerations:
How to Use the Arduino Yun in a Circuit
- Power the Board:
- Connect the Arduino Yun to your computer via a micro-USB cable or use an external power supply (7-12V) through the VIN pin or DC jack.
- Connect to Wi-Fi:
- Open the Arduino IDE and navigate to the "Tools" menu. Select the correct board ("Arduino Yun") and port.
- Access the Yun's web interface by connecting to its default Wi-Fi network and entering
http://arduino.localin your browser. - Configure the Wi-Fi settings to connect the Yun to your local network.
- Upload Code:
- Write your sketch in the Arduino IDE and upload it to the board. The ATmega32U4 microcontroller will execute the code.
- Use Linux Features:
- Use the Linux processor for advanced tasks like running Python scripts, managing files, or hosting a web server.
Important Considerations and Best Practices
- Power Supply: Ensure the input voltage does not exceed the recommended range (7-12V) to avoid damaging the board.
- Wi-Fi Security: Use strong passwords and secure protocols when connecting the Yun to a network.
- Linux Processor: The Atheros AR9331 processor can be accessed via SSH for advanced configurations.
- MicroSD Card: Use a microSD card to expand storage for Linux-based applications.
- Serial Communication: Use the
Bridgelibrary to enable communication between the ATmega32U4 and the Linux processor.
Example Code for Arduino Yun
Below is an example of how to use the Arduino Yun to read a temperature sensor and send the data to a web server:
#include <Bridge.h>
#include <HttpClient.h>

const int sensorPin = A0; // Analog pin connected to the temperature sensor

void setup() {
  Bridge.begin(); // Initialize the Bridge library
  Serial.begin(9600); // Start serial communication
  while (!Serial); // Wait for the serial monitor to open
  Serial.println("Arduino Yun Temperature Logger");
}

void loop() {
  int sensorValue = analogRead(sensorPin); // Read the sensor value
  float voltage = sensorValue * (5.0 / 1023.0); // Convert to voltage
  float temperature = (voltage - 0.5) * 100.0; // Convert to temperature (Celsius)

  // Print temperature to the serial monitor
  Serial.print("Temperature: ");
  Serial.print(temperature);
  Serial.println(" °C");

  // Send temperature data to a web server
  HttpClient client;
  client.begin("http://example.com/log"); // Replace with your server URL
  client.post("temperature=" + String(temperature));
  client.end();

  delay(5000); // Wait 5 seconds before the next reading
}
Troubleshooting and FAQs
Common Issues and Solutions
The board is not detected by the Arduino IDE:
- Ensure the correct board and port are selected in the "Tools" menu.
- Check the USB cable and connection. Use a data-capable USB cable.
- Restart the Arduino IDE and reconnect the board.
Wi-Fi connection fails:
- Verify the Wi-Fi credentials entered in the web interface.
- Ensure the router is within range and supports 2.4 GHz Wi-Fi (the Yun does not support 5 GHz).
Linux processor is unresponsive:
- Reset the Linux processor by holding the WLAN RST button for 5 seconds.
- Ensure the microSD card is properly formatted and inserted if used.
Sketch upload fails:
- Check the USB connection and ensure no other program is using the serial port.
- Press the reset button on the board and try uploading again.
FAQs
Can I use the Arduino Yun without Wi-Fi?
Yes, the Yun can function as a standalone microcontroller without using its Wi-Fi capabilities.What is the maximum storage capacity for the microSD card?
The Arduino Yun supports microSD cards up to 32 GB.How do I access the Linux terminal?
Use an SSH client (e.g., PuTTY) to connect to the Yun's IP address. The default username isroot, and the password is set during the initial configuration.Can I run Python scripts on the Yun?
Yes, the Linux processor supports Python. You can upload scripts via SSH or the web interface.
This documentation provides a comprehensive guide to using the Arduino Yun effectively. For further assistance, refer to the official Arduino website or community forums.