
How to Use TMC 2209: Examples, Pinouts, and Specs
 Design with TMC 2209 in Cirkit Designer
Introduction
The TMC 2209, manufactured by BTT (BigTreeTech), is a highly efficient and versatile stepper motor driver designed for applications requiring precise motor control. It is widely used in 3D printers, CNC machines, and other motion control systems. The TMC 2209 is known for its silent operation, thanks to Trinamic's StealthChop2 technology, and offers advanced features such as sensorless homing, microstepping control, and dynamic current adjustment.
Explore Projects Built with TMC 2209
 Open Project in Cirkit Designer
 Open Project in Cirkit Designer
 Open Project in Cirkit Designer
 Open Project in Cirkit Designer
Explore Projects Built with TMC 2209
Open Project in Cirkit DesignerOpen Project in Cirkit DesignerOpen Project in Cirkit DesignerOpen Project in Cirkit DesignerCommon Applications
- 3D printers for smooth and quiet motor operation
- CNC machines requiring precise motion control
- Robotics and automation systems
- Any application requiring low-noise stepper motor control
Technical Specifications
The TMC 2209 offers a range of features and specifications that make it suitable for demanding applications. Below are the key technical details:
Key Specifications
| Parameter | Value |
|---|---|
| Operating Voltage | 4.75V to 29V |
| Maximum Motor Current | 2.0A RMS (2.8A peak) |
| Microstepping | Up to 256 microsteps |
| Communication Interface | UART |
| Logic Voltage | 3.3V or 5V compatible |
| Features | StealthChop2, SpreadCycle, |
| CoolStep, StallGuard4 | |
| Sensorless Homing | Yes |
| Overtemperature Protection | Yes |
Pin Configuration
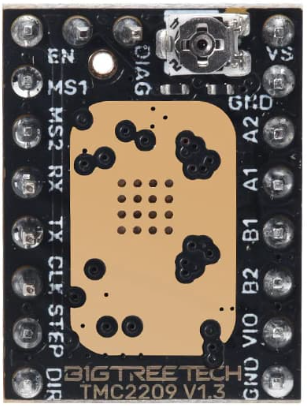
The TMC 2209 comes in a standard stepper driver module form factor. Below is the pinout and description:
| Pin Name | Description |
|---|---|
| VM | Motor power supply (4.75V to 29V) |
| GND | Ground connection |
| EN | Enable pin (active low) |
| DIR | Direction control pin |
| STEP | Step pulse input |
| UART | UART communication pin for advanced configuration |
| MS1, MS2 | Microstepping resolution selection pins |
| DIAG | Diagnostic output (used for sensorless homing) |
| VIO | Logic voltage input (3.3V or 5V) |
Usage Instructions
The TMC 2209 is designed to be user-friendly and can be integrated into a variety of systems. Below are the steps and considerations for using the TMC 2209 in a circuit.
Basic Circuit Connection
- Power Supply: Connect the VM pin to a power supply within the range of 4.75V to 29V. Ensure the power supply can handle the current requirements of your stepper motor.
- Logic Voltage: Connect the VIO pin to the logic voltage of your microcontroller (3.3V or 5V).
- Motor Connection: Connect the stepper motor's coils to the motor output pins on the TMC 2209 module.
- Control Pins: Connect the STEP, DIR, and EN pins to the corresponding pins on your microcontroller.
- UART Communication: If advanced features like sensorless homing or dynamic current adjustment are required, connect the UART pin to the microcontroller's UART interface.
Important Considerations
- Cooling: The TMC 2209 can generate heat during operation. Use a heatsink or active cooling to prevent overheating.
- Microstepping: Configure the MS1 and MS2 pins to set the desired microstepping resolution. For finer control, use UART to configure up to 256 microsteps.
- Sensorless Homing: Enable sensorless homing by connecting the DIAG pin to the microcontroller and configuring the UART settings.
- Current Adjustment: Use UART to dynamically adjust the motor current for optimal performance and efficiency.
Example Code for Arduino UNO
Below is an example of how to control the TMC 2209 using an Arduino UNO. This example demonstrates basic stepper motor control.
// Include the required library for TMC2209
#include <TMCStepper.h>

// Define pins for TMC2209
#define EN_PIN 8    // Enable pin
#define DIR_PIN 5   // Direction pin
#define STEP_PIN 2  // Step pin
#define SERIAL_PORT Serial  // UART communication port
#define DRIVER_ADDRESS 0b00 // TMC2209 driver address (default)

// Define motor current (in milliamps)
#define R_SENSE 0.11 // Sense resistor value
TMC2209Stepper driver(&SERIAL_PORT, R_SENSE, DRIVER_ADDRESS);

void setup() {
  pinMode(EN_PIN, OUTPUT);
  digitalWrite(EN_PIN, LOW); // Enable the driver

  driver.begin();           // Initialize the driver
  driver.toff(5);           // Enable driver in SpreadCycle mode
  driver.rms_current(800);  // Set motor current to 800mA
  driver.microsteps(16);    // Set microstepping to 1/16
  driver.en_spreadCycle(false); // Enable StealthChop2 for silent operation
}

void loop() {
  digitalWrite(DIR_PIN, HIGH); // Set direction
  for (int i = 0; i < 200; i++) { // Move 200 steps
    digitalWrite(STEP_PIN, HIGH);
    delayMicroseconds(500); // Adjust speed by changing delay
    digitalWrite(STEP_PIN, LOW);
    delayMicroseconds(500);
  }
  delay(1000); // Wait for 1 second
  digitalWrite(DIR_PIN, LOW); // Change direction
  for (int i = 0; i < 200; i++) { // Move 200 steps in reverse
    digitalWrite(STEP_PIN, HIGH);
    delayMicroseconds(500);
    digitalWrite(STEP_PIN, LOW);
    delayMicroseconds(500);
  }
  delay(1000); // Wait for 1 second
}
Notes
- Ensure the
TMCStepperlibrary is installed in your Arduino IDE. - Adjust the motor current (
rms_current) and microstepping (microsteps) as needed for your application.
Troubleshooting and FAQs
Common Issues
Motor Not Moving:
- Check the power supply voltage and current.
- Verify the STEP and DIR pin connections.
- Ensure the EN pin is set to LOW to enable the driver.
Overheating:
- Use a heatsink or active cooling on the TMC 2209 module.
- Reduce the motor current using UART or the
rms_currentfunction.
Noisy Operation:
- Enable StealthChop2 mode for silent operation.
- Check for loose connections or mechanical issues with the motor.
Sensorless Homing Not Working:
- Verify the DIAG pin connection to the microcontroller.
- Configure the UART settings correctly for StallGuard4.
Tips for Troubleshooting
- Use a multimeter to check voltage levels at the VM and VIO pins.
- Monitor the motor current and temperature during operation.
- Refer to the TMC 2209 datasheet for detailed configuration options.
By following this documentation, you can effectively integrate and use the TMC 2209 stepper motor driver in your projects.