How to Use 18650 lithium batteries: Examples, Pinouts, and Specs
Introduction
18650 lithium batteries, manufactured by Arduino (Part ID: Battery), are rechargeable lithium-ion cells widely used in portable electronics, electric vehicles, and DIY projects. These batteries are known for their high energy density, long cycle life, and reliable performance. Their cylindrical form factor and standardized size make them a popular choice for applications requiring compact and efficient energy storage.
Explore Projects Built with 18650 lithium batteries


Explore Projects Built with 18650 lithium batteries
Common Applications and Use Cases
- Powering portable devices such as flashlights, laptops, and cameras
- Energy storage in electric vehicles and e-bikes
- DIY electronics projects, including Arduino-based systems
- Backup power supplies and uninterruptible power systems (UPS)
- Solar energy storage systems
Technical Specifications
Below are the key technical details for the Arduino 18650 lithium battery:
| Parameter | Specification |
|---|---|
| Nominal Voltage | 3.7V |
| Capacity Range | 2000mAh to 3500mAh (varies by model) |
| Maximum Charging Voltage | 4.2V |
| Discharge Cutoff Voltage | 2.5V |
| Maximum Discharge Current | 10A (varies by model) |
| Standard Charge Current | 0.5C (C = battery capacity in Ah) |
| Dimensions | 18mm (diameter) x 65mm (length) |
| Weight | ~45g |
| Chemistry | Lithium-ion (Li-ion) |
| Cycle Life | 300-500 cycles (depending on usage) |
Pin Configuration and Descriptions
18650 batteries typically have two terminals: positive (+) and negative (-). These terminals are used for charging and discharging the battery.
| Pin | Description |
|---|---|
| Positive (+) | Connects to the positive terminal of the circuit |
| Negative (-) | Connects to the ground or negative terminal of the circuit |
Note: Some 18650 batteries come with built-in protection circuits (protected cells) that prevent overcharging, over-discharging, and short circuits. These may have slightly different dimensions.
Usage Instructions
How to Use the 18650 Battery in a Circuit
- Determine the Battery Requirements: Ensure the battery's voltage and capacity meet the requirements of your circuit or device.
- Connect the Terminals Properly:
- Connect the positive terminal of the battery to the positive input of your circuit.
- Connect the negative terminal to the ground or negative input.
- Use a Battery Holder: For safety and convenience, use a dedicated 18650 battery holder to secure the battery and ensure proper connections.
- Charge the Battery Safely: Use a compatible lithium-ion battery charger that supports 18650 cells. Ensure the charger does not exceed the maximum charging voltage of 4.2V.
- Monitor Discharge Levels: Avoid discharging the battery below 2.5V to prevent damage and reduce cycle life.
Important Considerations and Best Practices
- Avoid Overcharging and Over-discharging: Use a battery management system (BMS) or protection circuit to safeguard the battery.
- Handle with Care: Do not puncture, crush, or expose the battery to high temperatures.
- Store Properly: Store the battery in a cool, dry place when not in use. Avoid storing it in a fully charged or fully discharged state for extended periods.
- Use in Series or Parallel: When connecting multiple 18650 batteries in series or parallel, ensure they are of the same capacity and charge level to prevent imbalances.
Example: Using 18650 Batteries with an Arduino UNO
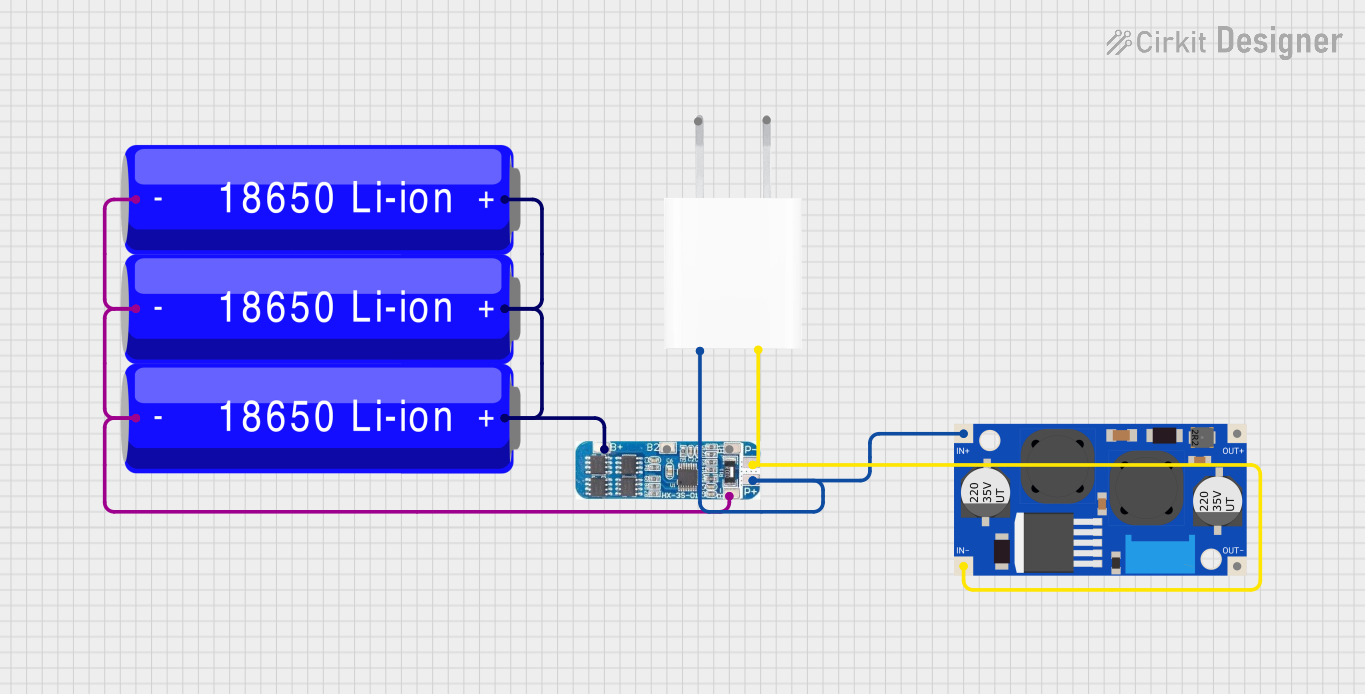
Below is an example of powering an Arduino UNO using a 18650 battery and a DC-DC step-up converter to regulate the voltage to 5V.
Circuit Components:
- 18650 battery
- Battery holder
- DC-DC step-up converter (e.g., MT3608)
- Arduino UNO
Circuit Diagram:
- Connect the positive terminal of the 18650 battery to the input (+) of the DC-DC converter.
- Connect the negative terminal of the battery to the input (-) of the DC-DC converter.
- Adjust the DC-DC converter output to 5V using a multimeter.
- Connect the output (+) of the DC-DC converter to the VIN pin of the Arduino UNO.
- Connect the output (-) of the DC-DC converter to the GND pin of the Arduino UNO.
Sample Code:
// Example code to blink an LED connected to pin 13 of the Arduino UNO
// This demonstrates the Arduino UNO powered by a 18650 battery

void setup() {
  pinMode(13, OUTPUT); // Set pin 13 as an output pin
}

void loop() {
  digitalWrite(13, HIGH); // Turn the LED on
  delay(1000);            // Wait for 1 second
  digitalWrite(13, LOW);  // Turn the LED off
  delay(1000);            // Wait for 1 second
}
Troubleshooting and FAQs
Common Issues and Solutions
Battery Not Charging:
- Ensure the charger is compatible with 18650 batteries.
- Check the connections and ensure the charger is supplying the correct voltage (4.2V max).
- If using a protected cell, verify that the protection circuit has not been triggered.
Battery Drains Quickly:
- Check for excessive current draw in your circuit.
- Ensure the battery is not damaged or nearing the end of its cycle life.
- Avoid using the battery in extreme temperatures.
Battery Overheats During Use:
- Ensure the battery is not being over-discharged (exceeding its maximum discharge current).
- Use a battery with a higher current rating if your application requires it.
- Verify that the battery is not short-circuited.
Arduino UNO Not Powering On:
- Check the output voltage of the DC-DC converter and ensure it is set to 5V.
- Verify all connections between the battery, converter, and Arduino UNO.
FAQs
Q: Can I use 18650 batteries without a protection circuit?
A: While it is possible, it is not recommended. Using unprotected cells increases the risk of overcharging, over-discharging, and short circuits, which can damage the battery or cause safety hazards.
Q: How do I know when my 18650 battery is fully charged?
A: A fully charged 18650 battery will have a voltage of approximately 4.2V. Most chargers have an indicator light that turns green when charging is complete.
Q: Can I connect multiple 18650 batteries in series or parallel?
A: Yes, but ensure all batteries are of the same capacity, charge level, and type. Use a battery management system (BMS) to balance the cells and prevent overcharging or over-discharging.
Q: How long does an 18650 battery last?
A: The lifespan depends on usage and charging habits. Typically, an 18650 battery lasts for 300-500 charge cycles under normal conditions.