How to Use 12V ARGB LED STRIP: Examples, Pinouts, and Specs

Introduction
The 12V ARGB LED Strip is a flexible lighting solution that features addressable RGB (ARGB) technology. This allows for individual control of each LED, enabling dynamic lighting effects, smooth color transitions, and custom patterns. The strip operates at 12 volts, making it suitable for a wide range of applications, including decorative lighting, gaming setups, DIY projects, and architectural lighting.
Explore Projects Built with 12V ARGB LED STRIP

Explore Projects Built with 12V ARGB LED STRIP
Common Applications
- Ambient lighting for rooms, desks, or gaming setups
- Customizable lighting for PC cases
- Decorative lighting for events and holidays
- Automotive interior or exterior lighting
- DIY projects requiring dynamic and colorful illumination
Technical Specifications
Below are the key technical details and pin configuration for the 12V ARGB LED Strip:
Key Technical Details
| Parameter | Value |
|---|---|
| Operating Voltage | 12V DC |
| LED Type | Addressable RGB (5050 SMD) |
| Control Protocol | WS2811 or similar |
| Power Consumption | ~18W per meter (varies by model) |
| Number of LEDs | Typically 30, 60, or 144 LEDs per meter |
| Color Depth | 24-bit (8 bits per channel: R, G, B) |
| Waterproof Rating | IP20 (non-waterproof) or IP65/IP67 (waterproof) |
| Operating Temperature | -20°C to 50°C |
| Strip Length | Typically 1m, 2m, or 5m |
| Cuttable Sections | Every 3 LEDs (varies by model) |
Pin Configuration
The 12V ARGB LED Strip typically has three or four pins, depending on the model. Below is the pin configuration:
| Pin Name | Description |
|---|---|
| 12V | Positive power supply (12V DC) |
| GND | Ground connection |
| DI (Data In) | Input for data signal from the controller |
| DO (Data Out) | Output for data signal to the next strip (optional) |
Note: Some models may combine the data and clock lines into a single pin (DI), depending on the control protocol.
Usage Instructions
How to Use the 12V ARGB LED Strip in a Circuit
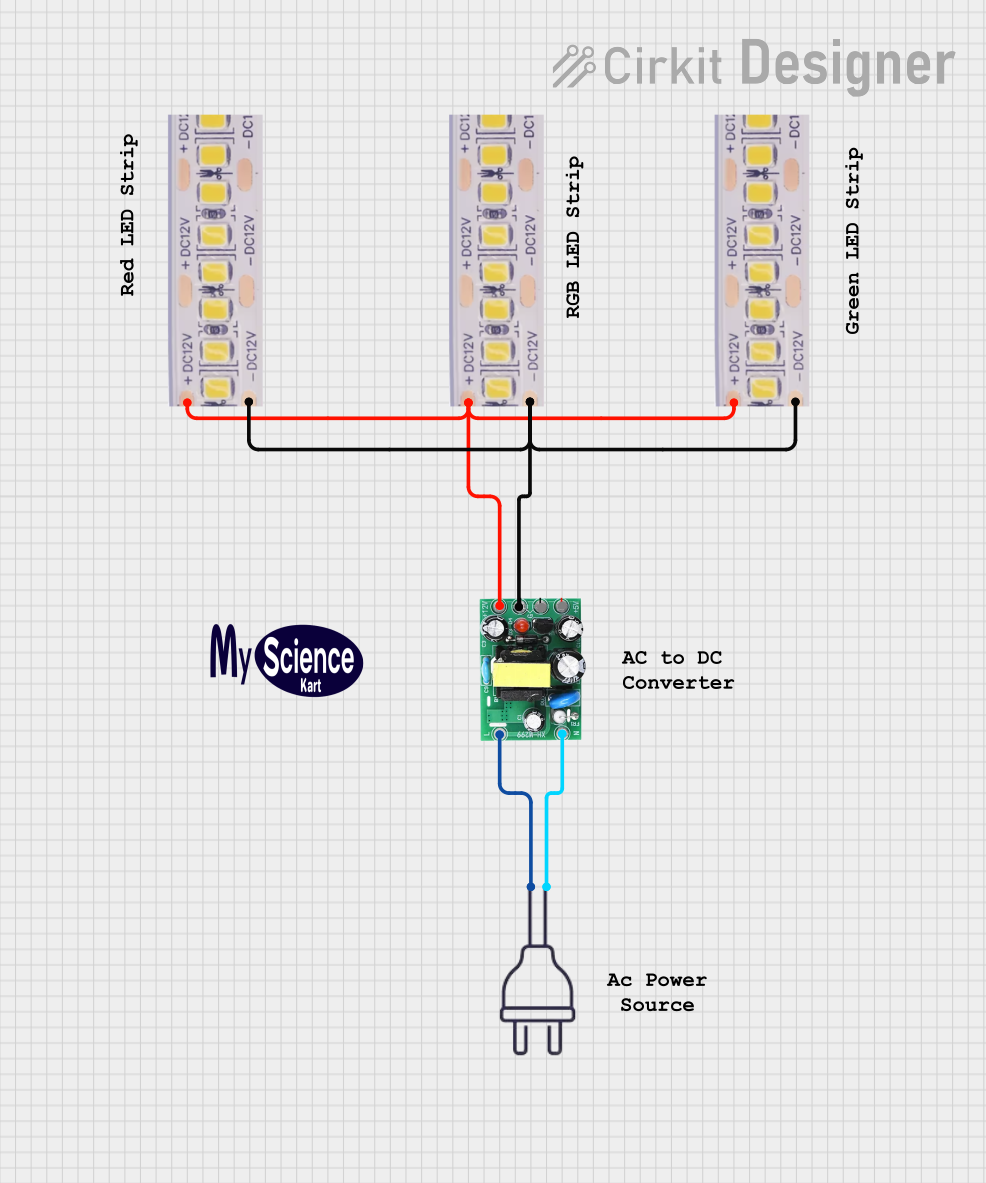
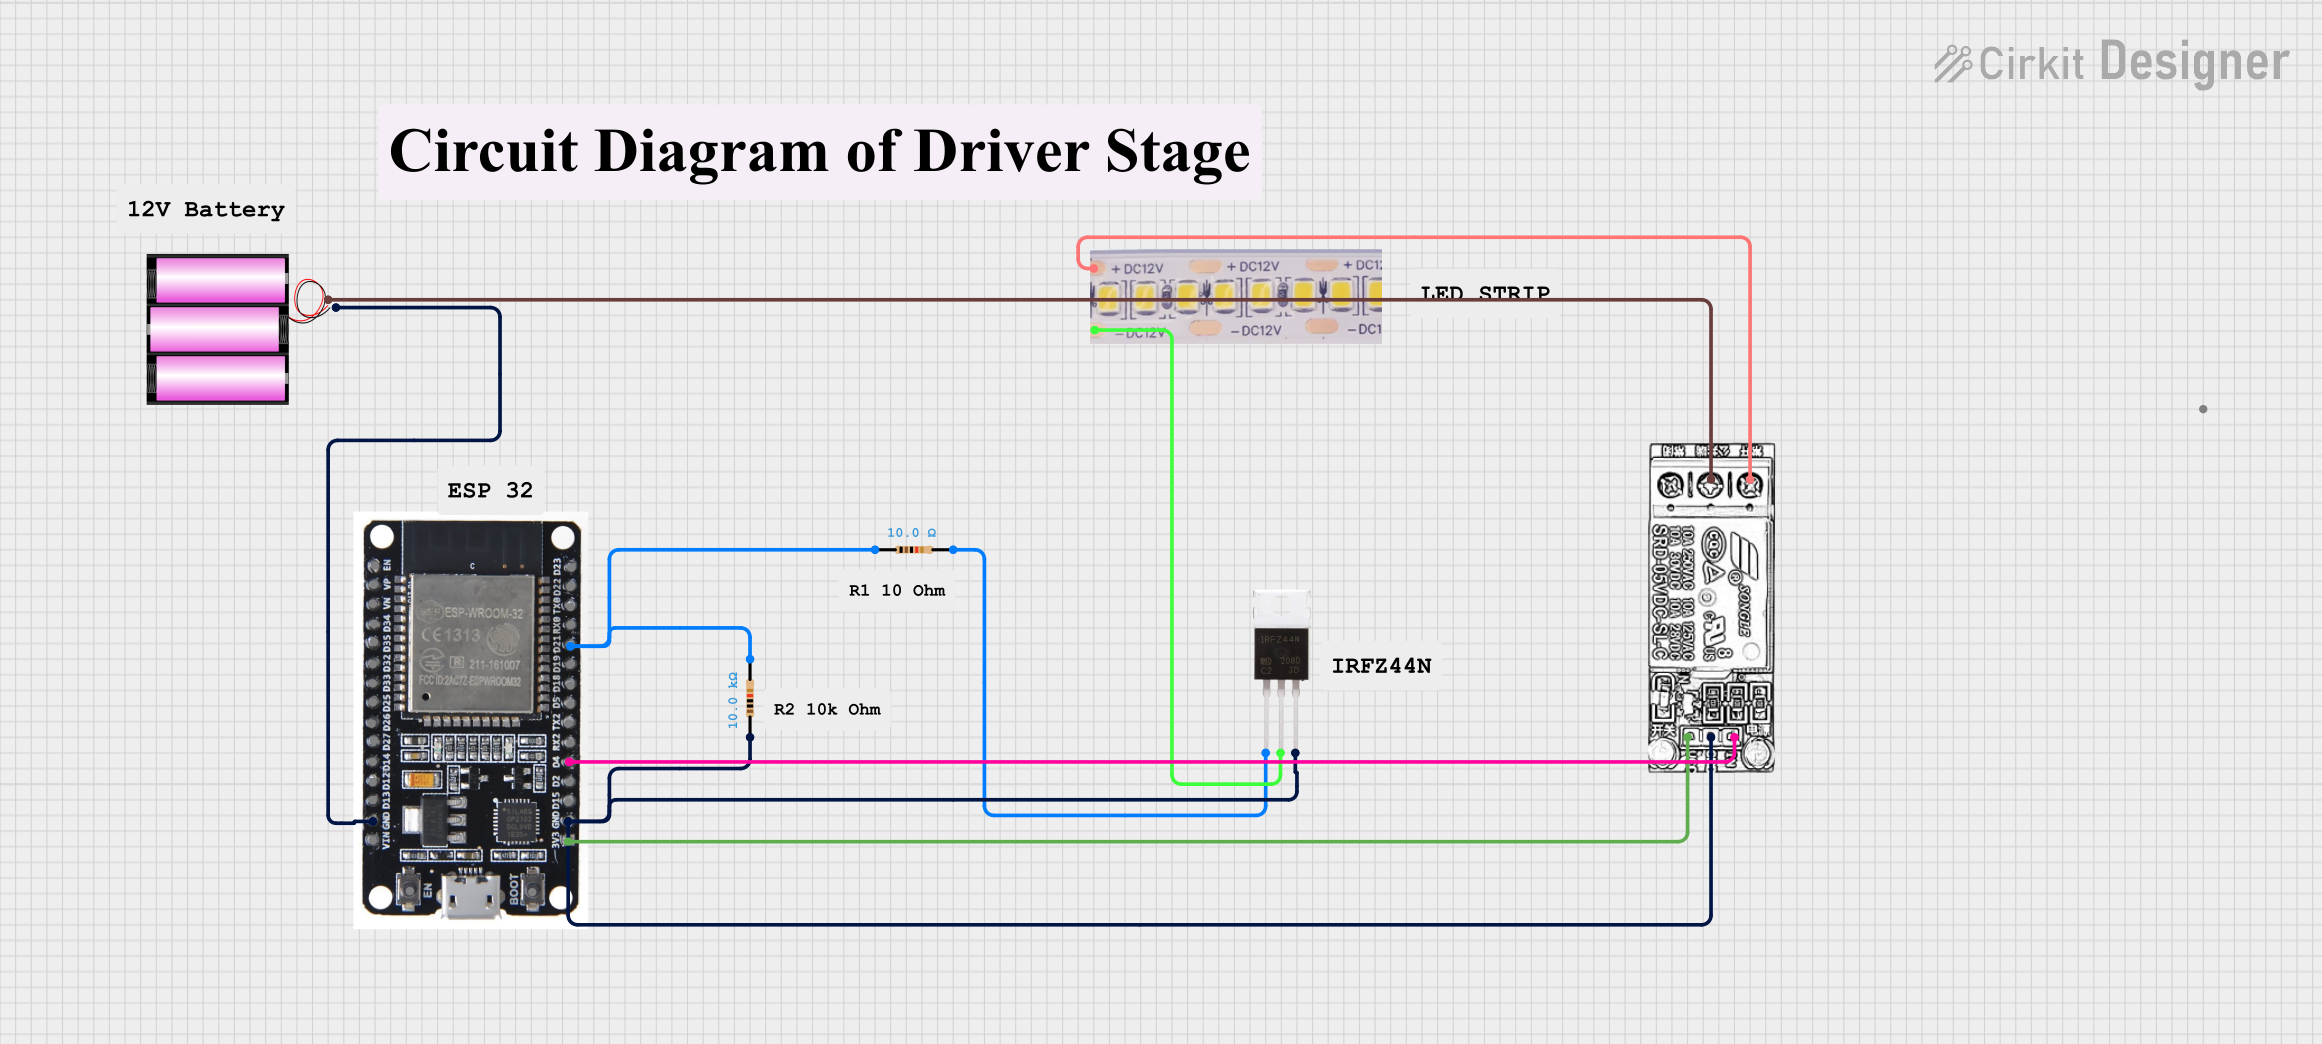
- Power Supply: Connect the 12V pin of the LED strip to a 12V DC power source. Ensure the power supply can handle the current required by the strip (e.g., a 5m strip with 60 LEDs/m may require up to 6A).
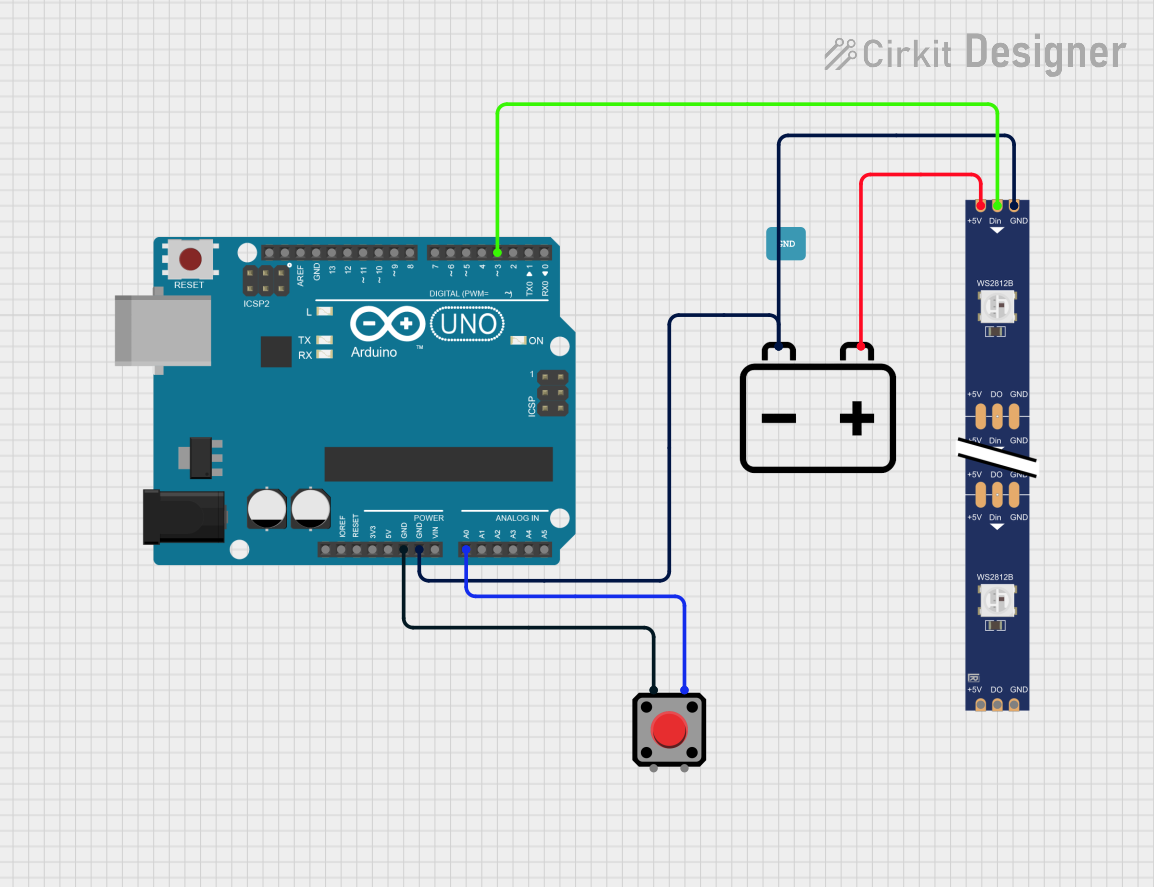
- Ground Connection: Connect the GND pin of the strip to the ground of the power supply and the controller.
- Data Signal: Connect the DI pin of the strip to the data output pin of a microcontroller (e.g., Arduino UNO). Use a resistor (330-470 ohms) in series with the data line to protect the LEDs.
- Capacitor: Place a 1000µF capacitor across the 12V and GND pins near the strip to stabilize the power supply.
- Controller: Use a microcontroller or dedicated ARGB controller to send data signals to the strip. Libraries like Adafruit NeoPixel or FastLED can simplify programming.
Important Considerations
- Voltage Matching: Ensure the power supply matches the 12V requirement of the strip. Using a higher voltage can damage the LEDs.
- Data Signal Voltage: If using a 5V microcontroller (e.g., Arduino UNO), use a level shifter to step up the data signal to 12V for reliable operation.
- Heat Management: For long strips, consider adding heat sinks or ensuring proper ventilation to prevent overheating.
- Signal Integrity: For strips longer than 5m, use a signal amplifier or repeater to maintain data integrity.
Example Code for Arduino UNO
Below is an example of how to control a 12V ARGB LED Strip using the FastLED library:
#include <FastLED.h>

// Define the number of LEDs in the strip
#define NUM_LEDS 60

// Define the data pin connected to the DI pin of the LED strip
#define DATA_PIN 6

// Create an array to hold the LED data
CRGB leds[NUM_LEDS];

void setup() {
  // Initialize the LED strip
  FastLED.addLeds<WS2811, DATA_PIN, GRB>(leds, NUM_LEDS);
  FastLED.clear(); // Clear any previous data
  FastLED.show();  // Update the strip to turn off all LEDs
}

void loop() {
  // Example: Set all LEDs to red
  for (int i = 0; i < NUM_LEDS; i++) {
    leds[i] = CRGB::Red; // Set each LED to red
  }
  FastLED.show(); // Update the strip to display the color
  delay(1000);    // Wait for 1 second

  // Example: Turn off all LEDs
  FastLED.clear(); // Clear the LED data
  FastLED.show();  // Update the strip to turn off all LEDs
  delay(1000);     // Wait for 1 second
}
Note: Install the FastLED library in the Arduino IDE before uploading the code.
Troubleshooting and FAQs
Common Issues and Solutions
LEDs Not Lighting Up
- Check the power supply connection and ensure it provides 12V DC.
- Verify the GND connection between the strip, power supply, and controller.
- Ensure the data pin is correctly connected to the microcontroller.
Flickering or Incorrect Colors
- Add a 330-470 ohm resistor in series with the data line to reduce noise.
- Use a 1000µF capacitor across the 12V and GND pins to stabilize the power supply.
- Check for loose connections or damaged wires.
Only the First Few LEDs Work
- Ensure the data signal voltage matches the strip's requirements (use a level shifter if needed).
- For long strips, use a signal amplifier or repeater to maintain data integrity.
Overheating
- Reduce the brightness of the LEDs in your code.
- Ensure proper ventilation or add heat sinks if necessary.
FAQs
Can I cut the LED strip? Yes, the strip can be cut at marked intervals (usually every 3 LEDs). Ensure you seal the cut ends if the strip is waterproof.
Can I extend the LED strip? Yes, but ensure the power supply and controller can handle the additional current and data length. Use a signal amplifier for long extensions.
What is the maximum length I can control? This depends on the microcontroller and power supply. For long strips, use multiple power injection points and signal amplifiers.
Can I use a 5V power supply? No, the strip requires a 12V power supply. Using a lower voltage will result in dim or non-functional LEDs.