How to Use Waveshare2.13 e-paper HAT v4: Examples, Pinouts, and Specs
Introduction
The Waveshare 2.13 e-Paper HAT v4 is a compact display module that leverages e-paper technology to deliver low-power, high-contrast visual output. With its 2.13-inch screen, this module is ideal for applications requiring static images, text, or graphical data. Its compatibility with Raspberry Pi and other microcontrollers makes it a versatile choice for a wide range of projects.
Explore Projects Built with Waveshare2.13 e-paper HAT v4


Explore Projects Built with Waveshare2.13 e-paper HAT v4
Common Applications
- Digital signage and labels
- IoT dashboards and displays
- Low-power information panels
- E-book readers
- Smart home devices
Technical Specifications
Key Technical Details
| Specification | Value |
|---|---|
| Display Technology | E-paper (EPD) |
| Screen Size | 2.13 inches |
| Resolution | 250 × 122 pixels |
| Display Colors | Black, White, and Red |
| Interface | SPI |
| Operating Voltage | 3.3V / 5V |
| Power Consumption (Active) | ~26.4mW |
| Power Consumption (Idle) | ~0.017mW |
| Refresh Time | ~2 seconds |
| Dimensions | 65mm × 30.2mm |
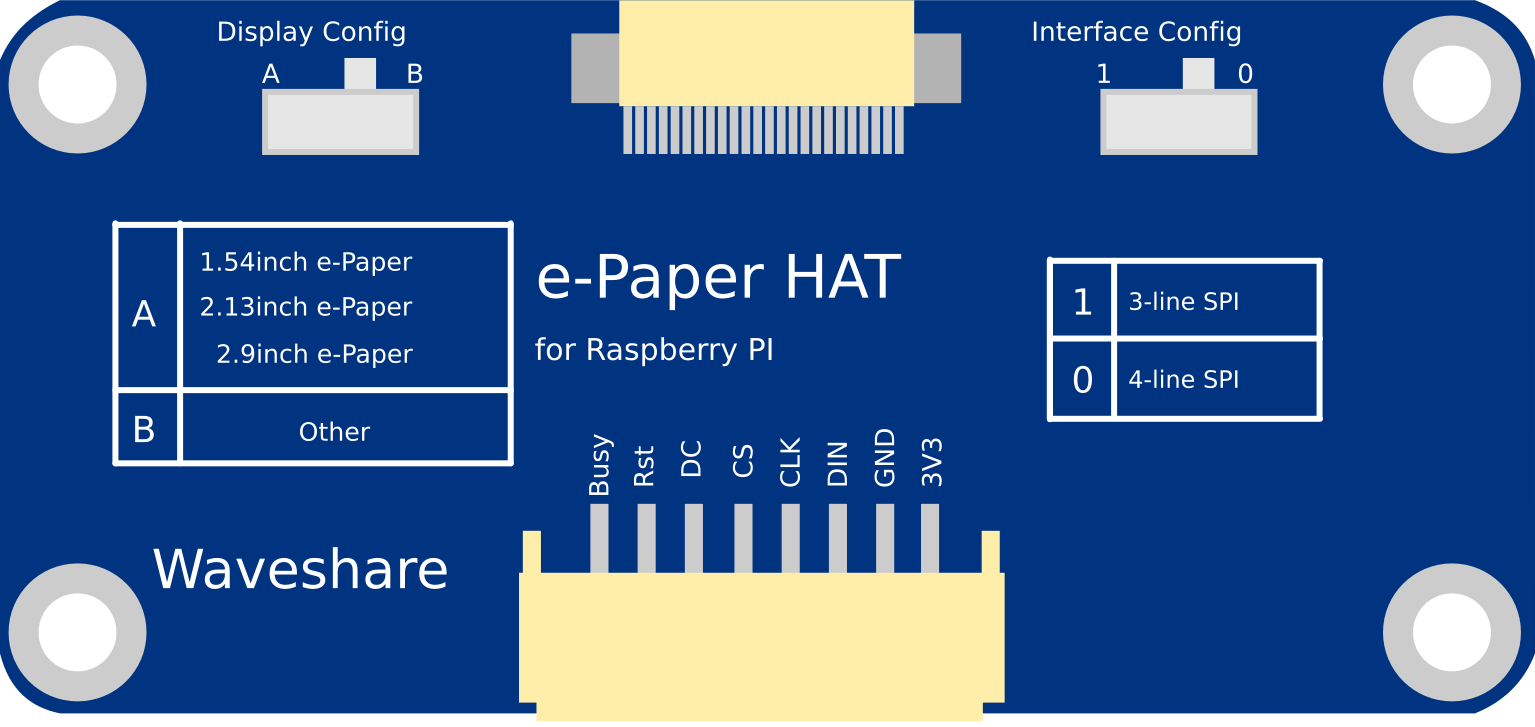
Pin Configuration
The Waveshare 2.13 e-Paper HAT v4 uses a 2×20 GPIO header for connection. Below is the pin configuration:
| Pin Name | GPIO Pin (Raspberry Pi) | Description |
|---|---|---|
| VCC | 2 (5V) or 1 (3.3V) | Power supply |
| GND | 6 | Ground |
| DIN | 19 (GPIO10, MOSI) | SPI data input |
| CLK | 23 (GPIO11, SCLK) | SPI clock input |
| CS | 24 (GPIO8, CE0) | Chip select |
| DC | 22 (GPIO25) | Data/Command control |
| RST | 11 (GPIO17) | Reset |
| BUSY | 18 (GPIO24) | Busy status indicator |
Usage Instructions
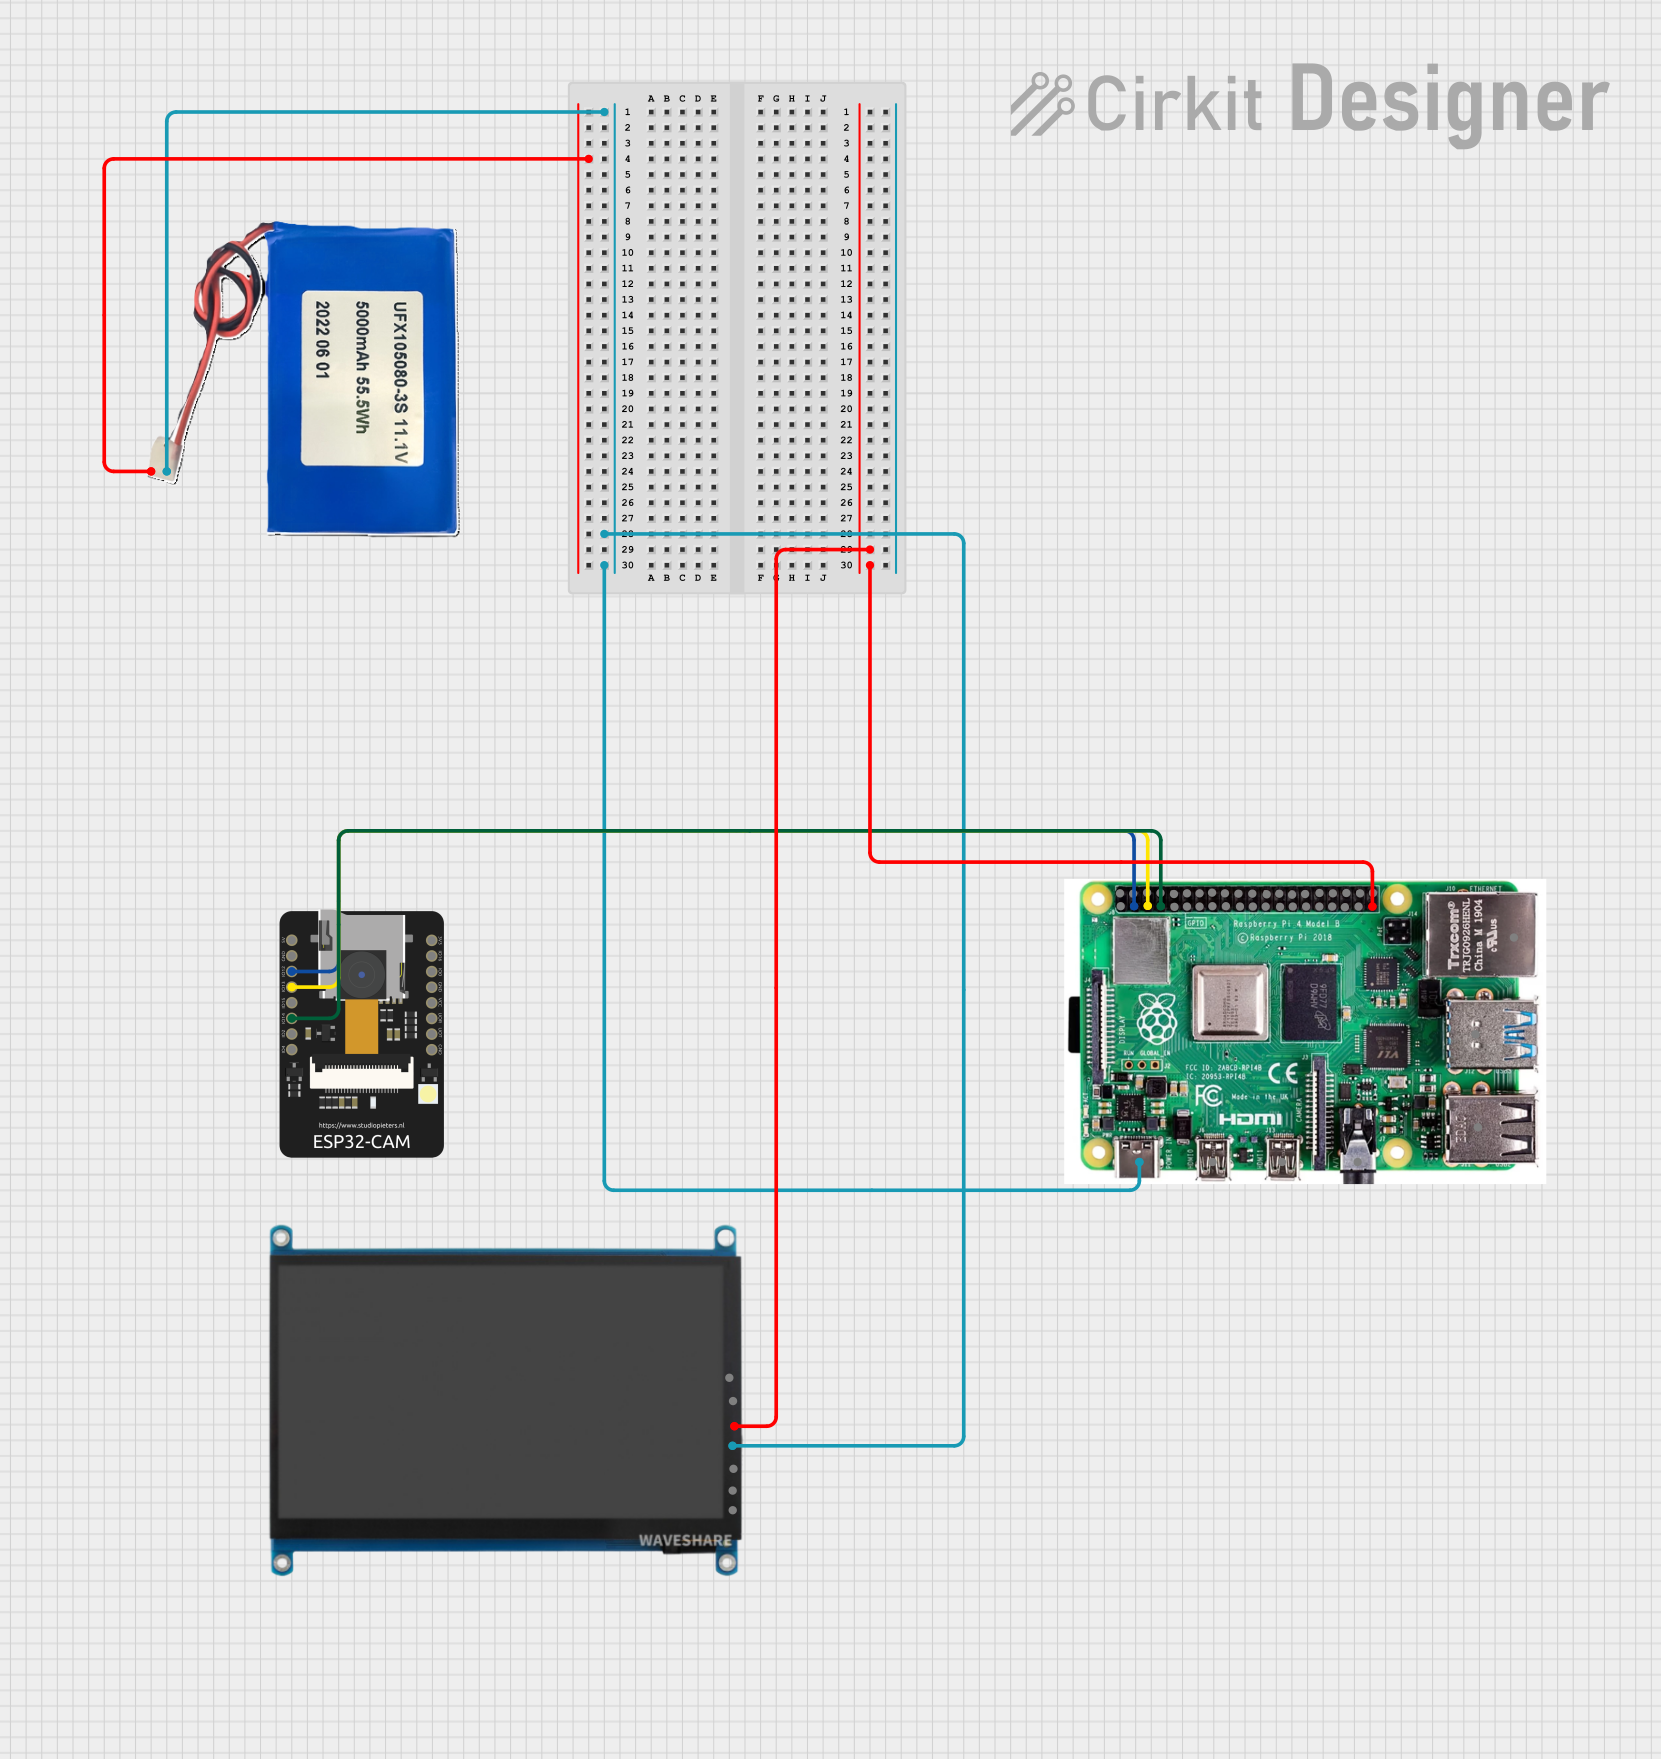
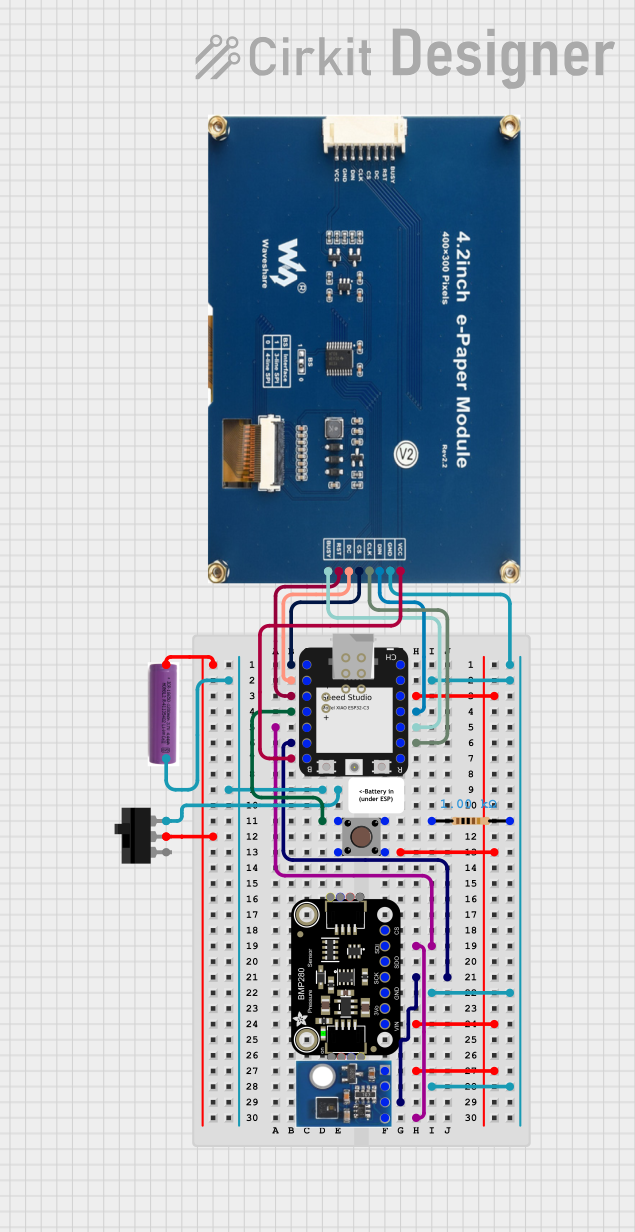
Connecting the e-Paper HAT to a Raspberry Pi
Hardware Setup:
- Align the Waveshare 2.13 e-Paper HAT v4 with the Raspberry Pi GPIO header.
- Ensure the pins are properly connected as per the pin configuration table above.
- Power on the Raspberry Pi.
Software Setup:
- Install the required libraries and dependencies:
sudo apt update sudo apt install python3-pip pip3 install RPi.GPIO spidev - Clone the Waveshare e-Paper library:
git clone https://github.com/waveshare/e-Paper
cd e-Paper/RaspberryPi_JetsonNano/python
- Install the required libraries and dependencies:
Running a Demo:
- Navigate to the example directory:
cd examples - Run the demo script:
python3 epd_2in13_V2_test.py
- Navigate to the example directory:
Example Code for Custom Display
Below is an example Python script to display custom text on the e-paper screen:
import sys
import os
from waveshare_epd import epd2in13_V2  # Import the e-paper library
from PIL import Image, ImageDraw, ImageFont  # For creating custom images
import time

try:
    # Initialize the e-paper display
    epd = epd2in13_V2.EPD()
    epd.init()
    epd.Clear(0xFF)  # Clear the display to white

    # Create a blank image for drawing
    image = Image.new('1', (epd.height, epd.width), 255)  # 1-bit mode, white background
    draw = ImageDraw.Draw(image)

    # Load a font and write text
    font = ImageFont.truetype('/usr/share/fonts/truetype/dejavu/DejaVuSans-Bold.ttf', 18)
    draw.text((10, 10), 'Hello, e-Paper!', font=font, fill=0)  # Black text

    # Display the image on the e-paper
    epd.display(epd.getbuffer(image))
    time.sleep(2)

    # Put the display to sleep to save power
    epd.sleep()

except IOError as e:
    print(f"IOError: {e}")

except KeyboardInterrupt:
    print("Program interrupted")
    epd2in13_V2.epdconfig.module_exit()
    sys.exit()
Best Practices
- Always ensure the e-paper module is connected securely to avoid loose connections.
- Avoid frequent refreshes to minimize ghosting and extend the lifespan of the display.
- Use the
epd.sleep()function to reduce power consumption when the display is not in use. - Handle the module carefully to avoid damaging the delicate e-paper screen.
Troubleshooting and FAQs
Common Issues and Solutions
| Issue | Possible Cause | Solution |
|---|---|---|
| Display not refreshing | Incorrect wiring | Verify pin connections. |
| Missing software dependencies | Install required libraries. | |
| Incorrect SPI configuration | Enable SPI on Raspberry Pi. | |
| Ghosting on the display | Frequent refreshes | Reduce refresh frequency. |
| Display not cleared before update | Use epd.Clear() before updates. |
|
| Module not detected by software | Incorrect GPIO pin mapping | Check pin configuration. |
| Faulty module | Test with another Raspberry Pi. |
FAQs
Can I use this module with Arduino?
- Yes, but you will need to use the appropriate e-paper library for Arduino and connect the pins accordingly.
What is the refresh rate of the display?
- The refresh time is approximately 2 seconds. This is typical for e-paper technology.
Can I display images on this module?
- Yes, you can display monochrome or tri-color (black, white, red) images by converting them to the appropriate format.
How do I clean the display?
- Use a soft, dry cloth to gently wipe the screen. Avoid using liquids or abrasive materials.
By following this documentation, you can effectively integrate and utilize the Waveshare 2.13 e-Paper HAT v4 in your projects.