Cirkit Designer
Your all-in-one circuit design IDE
Home /
Component Documentation
How to Use Gravity: ENS160 Air Quality Sensor: Examples, Pinouts, and Specs
Introduction
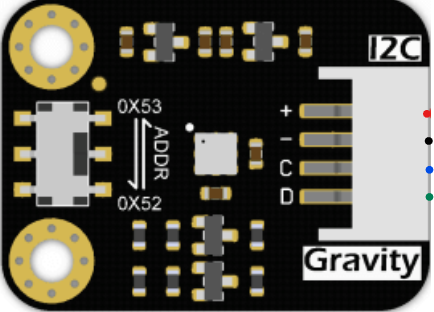
The Gravity: ENS160 Air Quality Sensor, manufactured by DFRobot, is a digital sensor designed to measure air quality by detecting various gases and volatile organic compounds (VOCs) in the environment. It provides accurate and reliable data, making it ideal for applications such as indoor air quality monitoring, HVAC systems, and smart home devices.
Explore Projects Built with Gravity: ENS160 Air Quality Sensor
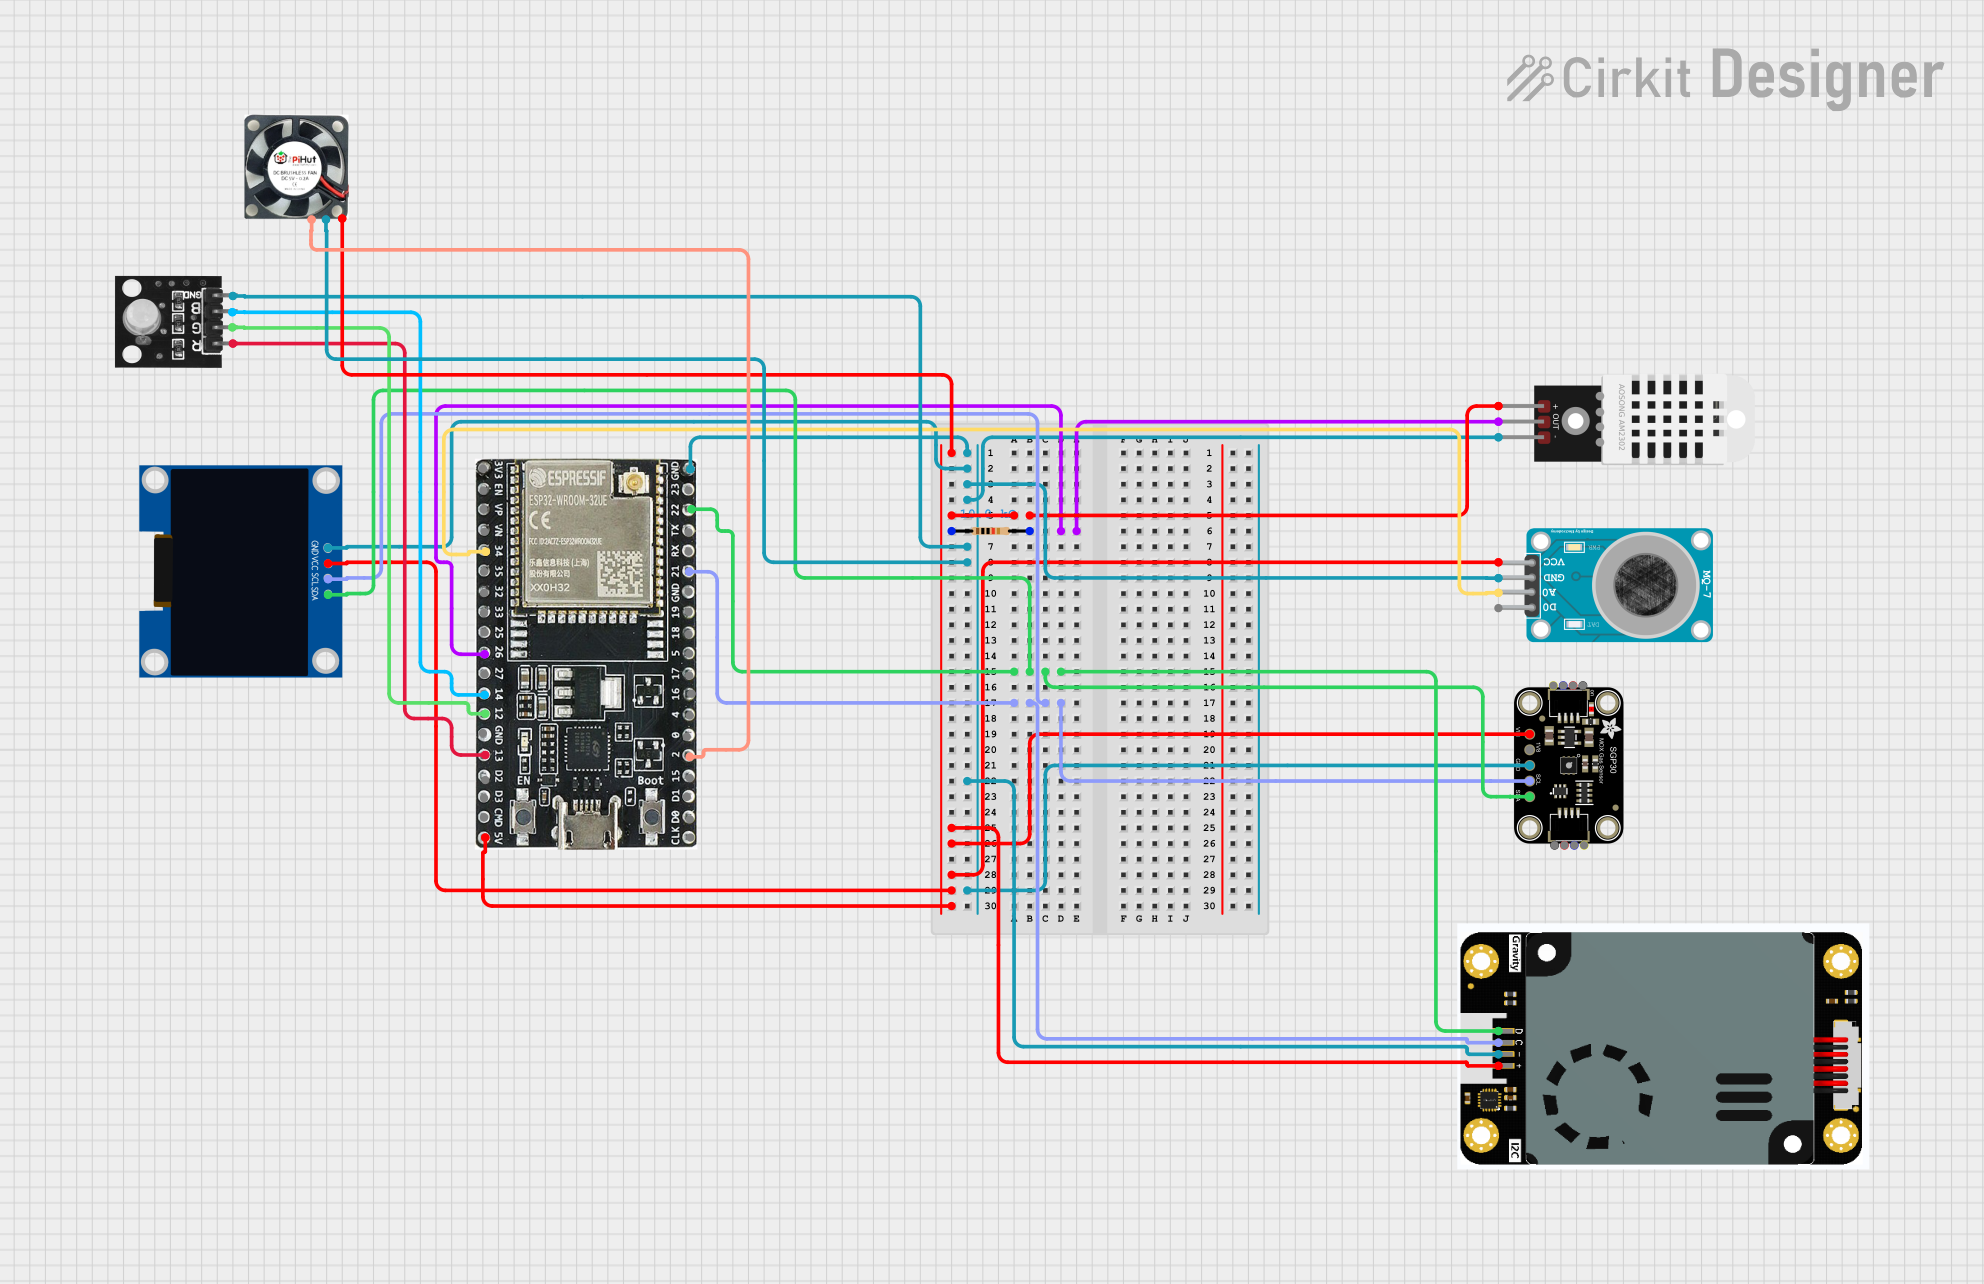
ESP32-Based Environmental Monitoring System with Gas Sensors and OLED Display

This circuit is an environmental monitoring system using an ESP32 microcontroller. It integrates various sensors, including the MQ-7 and MQ135 gas sensors, ENS160+AHT21 air quality and temperature/humidity sensor, and a KY-037 microphone, to collect environmental data. The data is displayed on a 1.3" OLED screen.
ESP32-Based IoT Indoor Air Quality Monitoring System with OLED Display and RGB LED
This IoT indoor air quality monitoring circuit uses an ESP32 microcontroller to read data from a DHT22 temperature and humidity sensor, an MQ-7 carbon monoxide sensor, and a PM2.5 air quality sensor. The collected data is displayed on a 128x64 OLED display, and an RGB LED and PWM fan are controlled based on the air quality readings to indicate and manage air quality levels.
ESP8266-Based Air Quality Monitoring System with LCD Display and Wi-Fi Connectivity
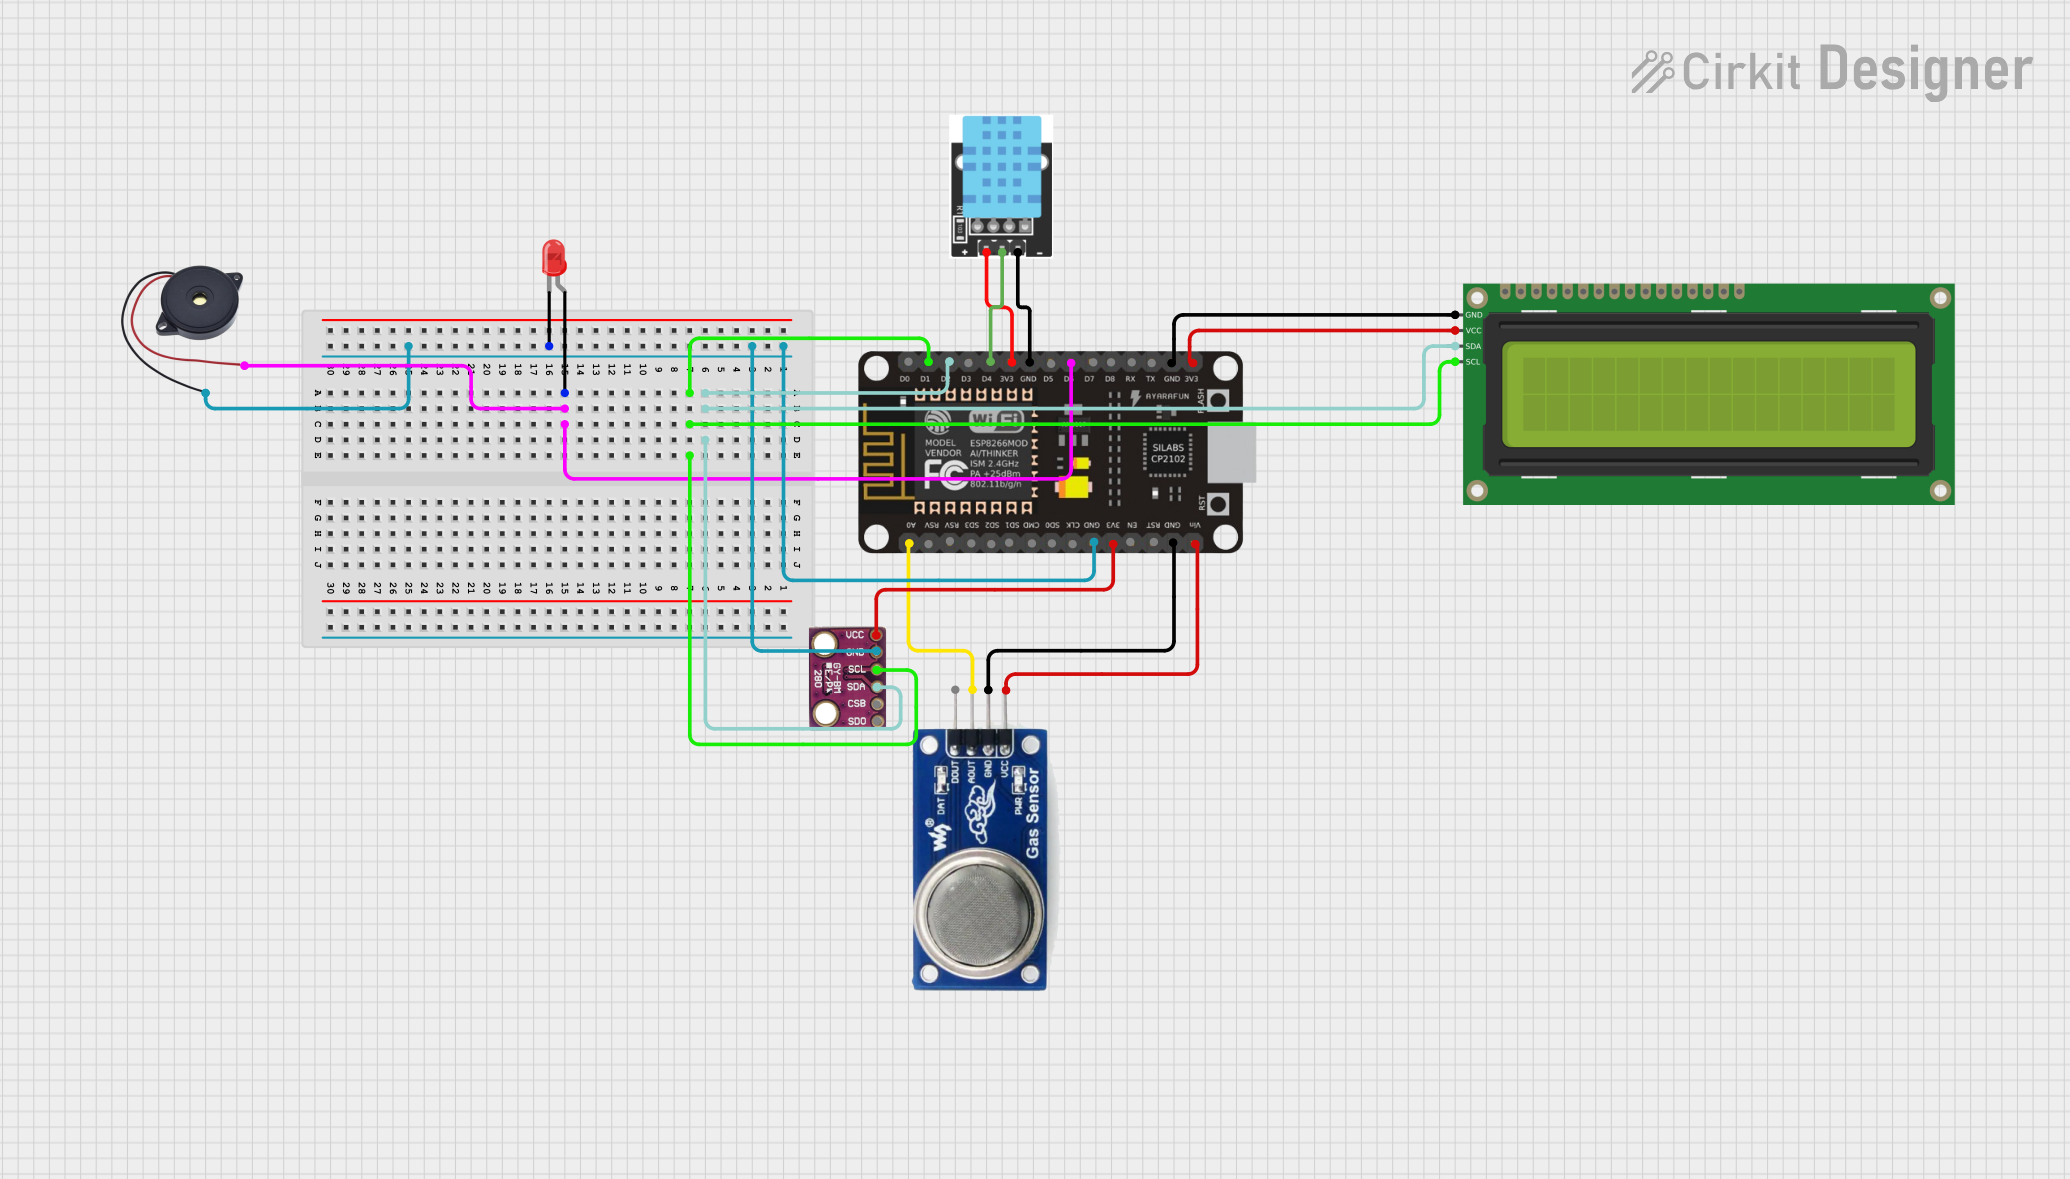
This circuit is an air quality monitoring system using an ESP8266 NodeMCU microcontroller. It integrates various sensors including a DHT11 for temperature and humidity, an MQ135 for air quality, and a BMP280 for pressure and altitude, displaying the data on a 16x2 I2C LCD and sending alerts via Blynk. A buzzer and LED are used to provide audible and visual alerts when air quality or temperature exceeds predefined thresholds.
Arduino UNO Air Purification System with MQ-135 and ENS160 Sensors
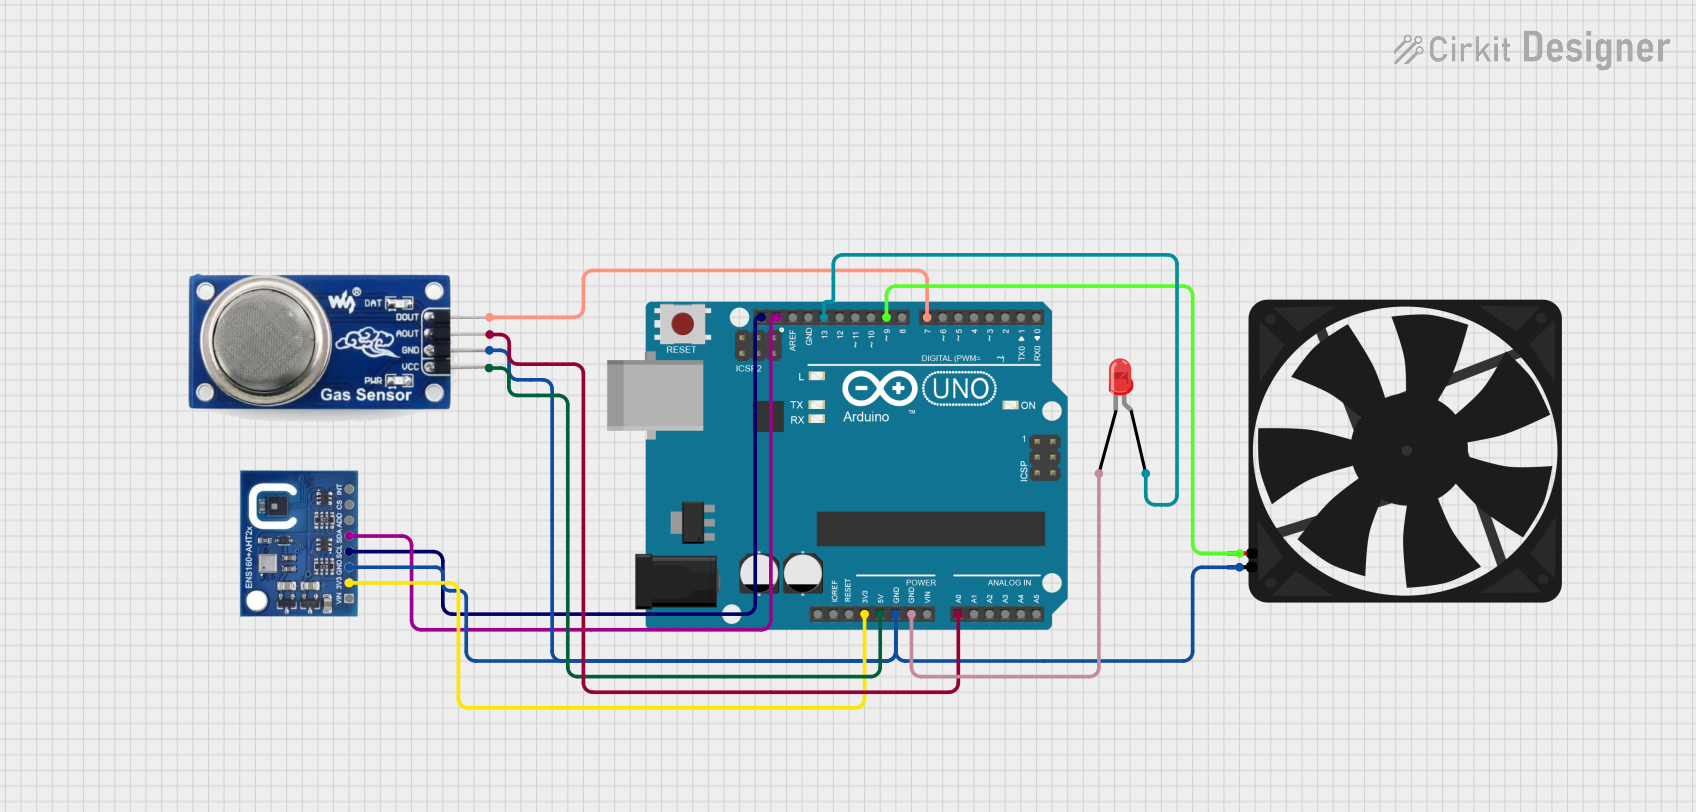
This circuit is an air purification system that uses an Arduino UNO to monitor air quality through an MQ-135 gas sensor and an ENS160+AHT21 sensor. If poor air quality is detected, the system activates an LED and turns on a fan to purify the air.
Explore Projects Built with Gravity: ENS160 Air Quality Sensor
ESP32-Based Environmental Monitoring System with Gas Sensors and OLED Display
This circuit is an environmental monitoring system using an ESP32 microcontroller. It integrates various sensors, including the MQ-7 and MQ135 gas sensors, ENS160+AHT21 air quality and temperature/humidity sensor, and a KY-037 microphone, to collect environmental data. The data is displayed on a 1.3" OLED screen.
ESP32-Based IoT Indoor Air Quality Monitoring System with OLED Display and RGB LED
This IoT indoor air quality monitoring circuit uses an ESP32 microcontroller to read data from a DHT22 temperature and humidity sensor, an MQ-7 carbon monoxide sensor, and a PM2.5 air quality sensor. The collected data is displayed on a 128x64 OLED display, and an RGB LED and PWM fan are controlled based on the air quality readings to indicate and manage air quality levels.
ESP8266-Based Air Quality Monitoring System with LCD Display and Wi-Fi Connectivity
This circuit is an air quality monitoring system using an ESP8266 NodeMCU microcontroller. It integrates various sensors including a DHT11 for temperature and humidity, an MQ135 for air quality, and a BMP280 for pressure and altitude, displaying the data on a 16x2 I2C LCD and sending alerts via Blynk. A buzzer and LED are used to provide audible and visual alerts when air quality or temperature exceeds predefined thresholds.
Arduino UNO Air Purification System with MQ-135 and ENS160 Sensors
This circuit is an air purification system that uses an Arduino UNO to monitor air quality through an MQ-135 gas sensor and an ENS160+AHT21 sensor. If poor air quality is detected, the system activates an LED and turns on a fan to purify the air.
Technical Specifications
Key Technical Details
| Parameter | Value |
|---|---|
| Supply Voltage | 3.3V - 5V |
| Operating Current | < 20mA |
| Interface | I2C |
| I2C Address | 0x53 |
| Measurement Range | 0 - 500 IAQ (Indoor Air Quality) |
| Operating Temperature | -40°C to 85°C |
| Dimensions | 30mm x 22mm |
Pin Configuration and Descriptions
| Pin | Name | Description |
|---|---|---|
| 1 | VCC | Power supply (3.3V - 5V) |
| 2 | GND | Ground |
| 3 | SDA | I2C data line |
| 4 | SCL | I2C clock line |
Usage Instructions
How to Use the Component in a Circuit
- Power Supply: Connect the VCC pin to a 3.3V or 5V power supply and the GND pin to the ground.
- I2C Communication: Connect the SDA pin to the SDA pin on your microcontroller (e.g., Arduino UNO) and the SCL pin to the SCL pin on your microcontroller.
- Pull-up Resistors: Ensure that the I2C lines (SDA and SCL) have pull-up resistors (typically 4.7kΩ) if they are not already present on your microcontroller.
Important Considerations and Best Practices
- Power Supply: Ensure a stable power supply to avoid fluctuations that could affect sensor readings.
- I2C Address: The default I2C address is 0x53. Ensure no other devices on the same I2C bus have the same address.
- Calibration: Allow the sensor to warm up for a few minutes after powering on to ensure accurate readings.
- Environmental Factors: Place the sensor in an area representative of the air quality you wish to measure, avoiding direct exposure to contaminants or extreme conditions.
Sample Arduino Code
Below is a sample code to interface the Gravity: ENS160 Air Quality Sensor with an Arduino UNO:
#include <Wire.h>

// I2C address of the ENS160 sensor
#define ENS160_ADDRESS 0x53

void setup() {
  // Initialize serial communication at 9600 baud rate
  Serial.begin(9600);

  // Initialize I2C communication
  Wire.begin();

  // Initialize the ENS160 sensor
  initENS160();
}

void loop() {
  // Read air quality data from the sensor
  int airQuality = readAirQuality();

  // Print the air quality data to the serial monitor
  Serial.print("Air Quality: ");
  Serial.println(airQuality);

  // Wait for 1 second before the next reading
  delay(1000);
}

void initENS160() {
  // Send initialization commands to the ENS160 sensor
  Wire.beginTransmission(ENS160_ADDRESS);
  Wire.write(0x00); // Example command to initialize the sensor
  Wire.endTransmission();
}

int readAirQuality() {
  int airQuality = 0;

  // Request air quality data from the ENS160 sensor
  Wire.beginTransmission(ENS160_ADDRESS);
  Wire.write(0x01); // Example command to read air quality data
  Wire.endTransmission();

  // Read the data from the sensor
  Wire.requestFrom(ENS160_ADDRESS, 2);
  if (Wire.available() == 2) {
    airQuality = Wire.read() << 8 | Wire.read();
  }

  return airQuality;
}
Troubleshooting and FAQs
Common Issues Users Might Face
- No Data Output: Ensure that the sensor is properly connected to the power supply and I2C lines. Check for loose connections.
- Incorrect Readings: Allow the sensor to warm up for a few minutes. Ensure that the sensor is placed in a representative environment.
- I2C Communication Errors: Verify the I2C address and ensure no address conflicts on the bus. Check for proper pull-up resistors on the I2C lines.
Solutions and Tips for Troubleshooting
- Check Connections: Double-check all wiring connections to ensure they are secure and correct.
- Power Supply: Use a stable power supply to avoid fluctuations that could affect sensor performance.
- I2C Address: Ensure the correct I2C address is used in the code. Use an I2C scanner sketch to detect the sensor's address if unsure.
- Sensor Placement: Place the sensor in an area free from direct exposure to contaminants or extreme conditions for accurate readings.
By following this documentation, users can effectively integrate and utilize the Gravity: ENS160 Air Quality Sensor in their projects, ensuring accurate and reliable air quality measurements.