How to Use 4-Electrode TENS Unit: Examples, Pinouts, and Specs

Introduction
The 4-Electrode TENS (Transcutaneous Electrical Nerve Stimulation) Unit is a medical device designed to provide non-invasive pain relief. It works by delivering low-voltage electrical impulses through four electrodes placed on the skin. These impulses stimulate the nerves in the targeted area, which can help reduce pain perception and improve comfort.
This device is commonly used in physical therapy, rehabilitation, and personal pain management. It is effective for conditions such as chronic pain, muscle soreness, and post-surgical recovery.
Explore Projects Built with 4-Electrode TENS Unit

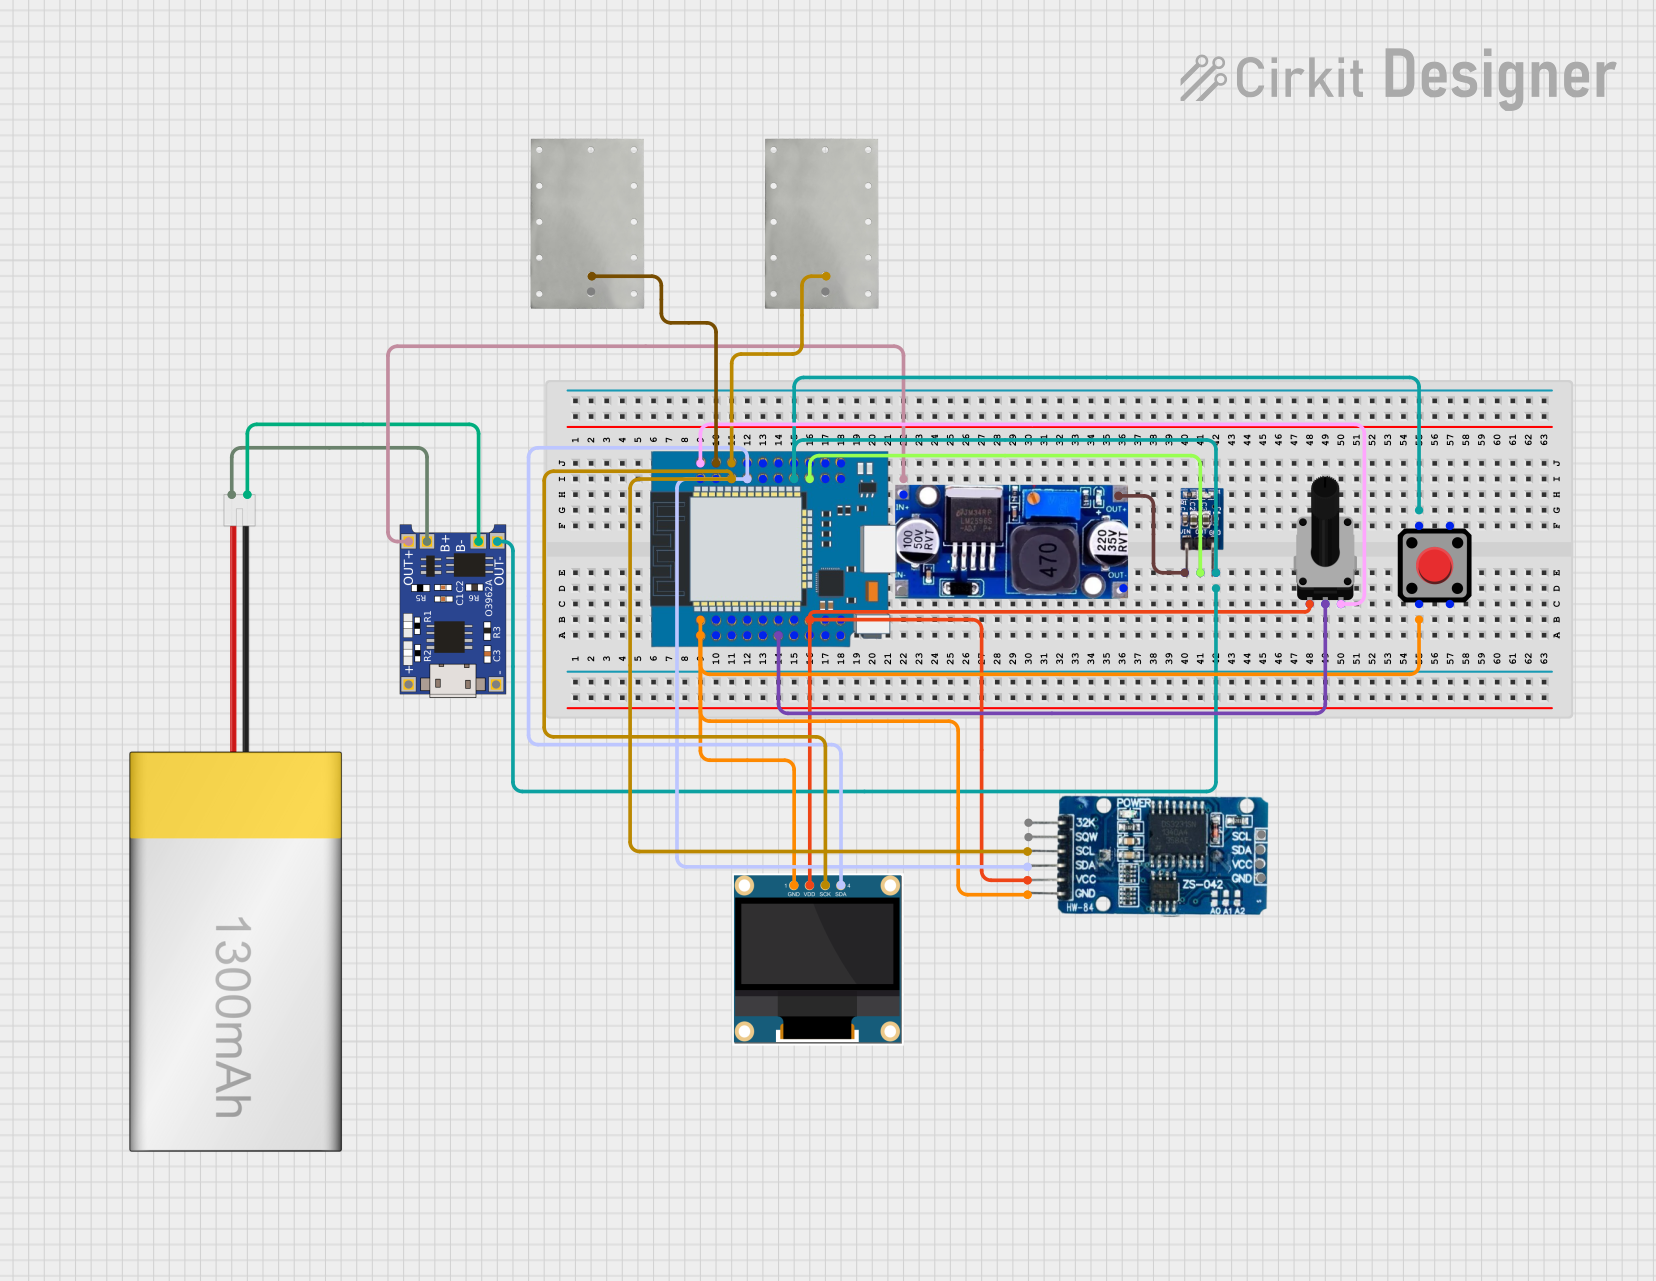
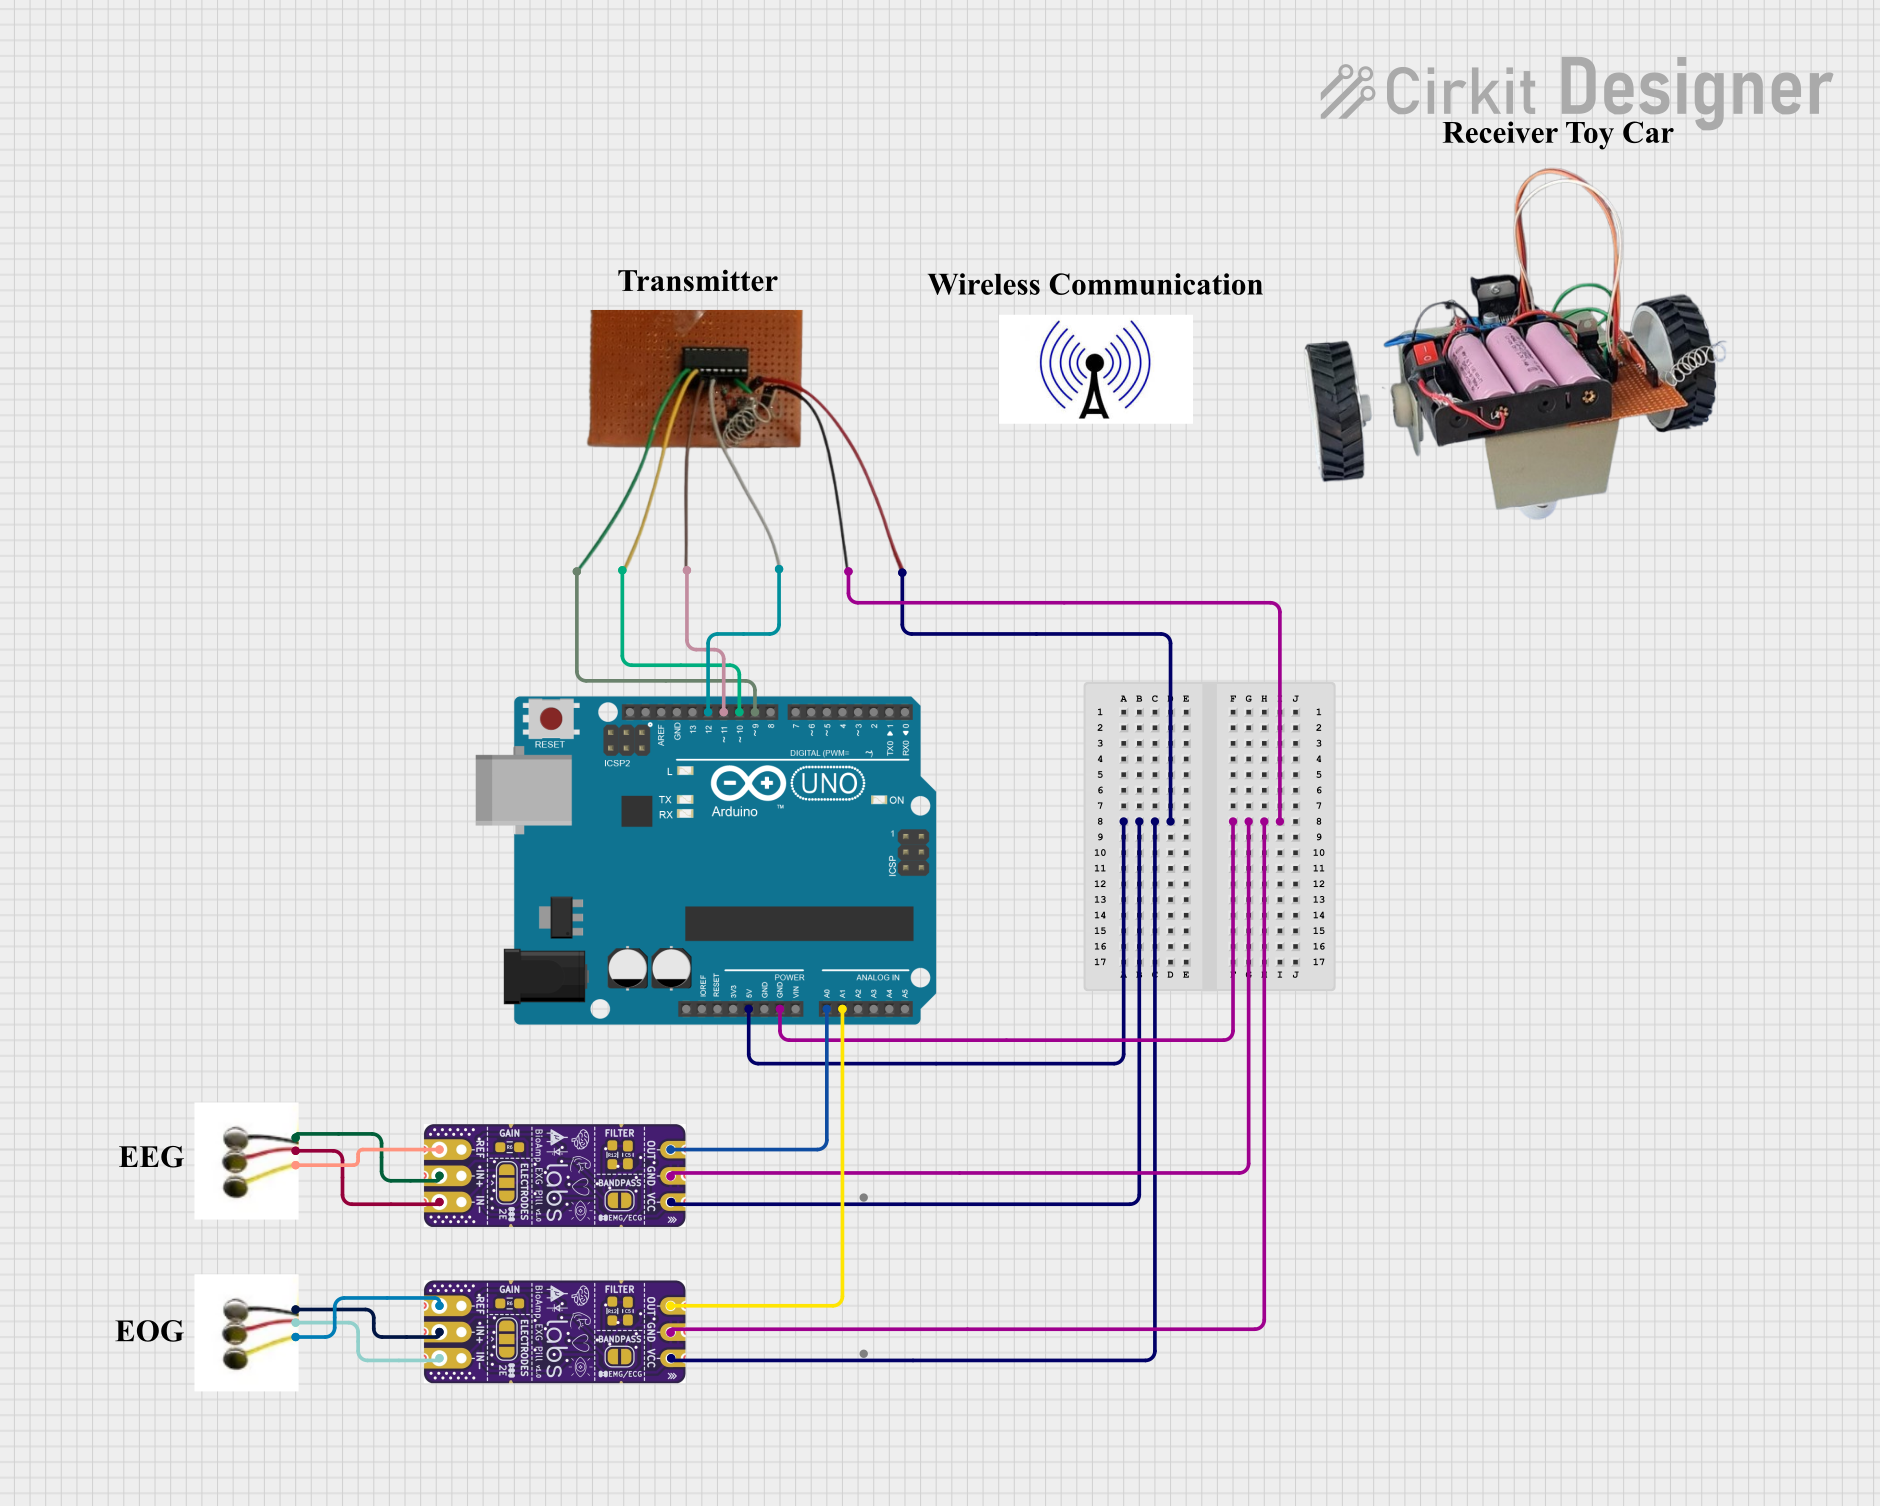

Explore Projects Built with 4-Electrode TENS Unit
Technical Specifications
Below are the key technical details and pin configuration for the 4-Electrode TENS Unit:
Key Technical Details
| Parameter | Specification |
|---|---|
| Power Supply | 9V DC (via battery or adapter) |
| Output Voltage Range | 0V to 50V (adjustable) |
| Output Current Range | 0mA to 100mA (adjustable) |
| Frequency Range | 1Hz to 150Hz |
| Pulse Width | 50µs to 300µs |
| Number of Channels | 2 (supports 4 electrodes) |
| Electrode Compatibility | Standard reusable gel electrodes |
| Safety Features | Overcurrent protection, timer |
Pin Configuration and Descriptions
The 4-Electrode TENS Unit typically has the following pin configuration:
| Pin Number | Label | Description |
|---|---|---|
| 1 | VCC | Power input (9V DC) |
| 2 | GND | Ground connection |
| 3 | CH1+ | Positive output for Channel 1 |
| 4 | CH1- | Negative output for Channel 1 |
| 5 | CH2+ | Positive output for Channel 2 |
| 6 | CH2- | Negative output for Channel 2 |
| 7 | INTENSITY_ADJ | Intensity adjustment input (potentiometer) |
| 8 | MODE_SELECT | Mode selection input (e.g., burst, continuous) |
Usage Instructions
How to Use the Component in a Circuit
- Power the Unit: Connect a 9V DC power source to the
VCCandGNDpins. - Connect Electrodes: Attach the four electrodes to the
CH1+,CH1-,CH2+, andCH2-pins. Ensure the electrodes are securely placed on the skin in the desired area. - Adjust Intensity: Use the
INTENSITY_ADJpin (typically connected to a potentiometer) to control the output intensity. Start with a low setting and gradually increase as needed. - Select Mode: Use the
MODE_SELECTpin to choose the desired stimulation mode (e.g., burst, continuous, or modulation). - Operation: Turn on the device and monitor the user's comfort level. Adjust settings as necessary.
Important Considerations and Best Practices
- Electrode Placement: Ensure the electrodes are placed on clean, dry skin. Avoid placing them over open wounds or sensitive areas.
- Start Low: Always begin with the lowest intensity setting and gradually increase to avoid discomfort.
- Timer Usage: Use the built-in timer to limit the session duration (typically 20–30 minutes).
- Safety: Do not use the device near the heart, on the head, or if the user has a pacemaker or other implanted medical devices.
- Maintenance: Clean the electrodes after each use and replace them when they lose adhesiveness.
Arduino UNO Example Code
The 4-Electrode TENS Unit can be controlled using an Arduino UNO for custom applications. Below is an example code snippet to adjust intensity and mode:
// Example code to control a 4-Electrode TENS Unit using Arduino UNO

const int intensityPin = A0; // Connect to INTENSITY_ADJ pin
const int modePin = 2;       // Connect to MODE_SELECT pin

void setup() {
  pinMode(modePin, OUTPUT);  // Set mode pin as output
  analogWrite(intensityPin, 0); // Start with 0 intensity
}

void loop() {
  // Example: Gradually increase intensity
  for (int intensity = 0; intensity <= 255; intensity += 5) {
    analogWrite(intensityPin, intensity); // Adjust intensity
    delay(100); // Wait 100ms before increasing intensity
  }

  // Example: Toggle mode
  digitalWrite(modePin, HIGH); // Set mode to HIGH (e.g., burst mode)
  delay(5000); // Keep mode for 5 seconds
  digitalWrite(modePin, LOW);  // Set mode to LOW (e.g., continuous mode)
  delay(5000); // Keep mode for 5 seconds
}
Note: Ensure the Arduino's output voltage and current are compatible with the TENS Unit's control pins. Use appropriate resistors or level shifters if needed.
Troubleshooting and FAQs
Common Issues and Solutions
No Output from Electrodes:
- Cause: Loose connections or insufficient power supply.
- Solution: Check all connections and ensure the power source is providing 9V DC.
Discomfort or Pain During Use:
- Cause: Intensity set too high or improper electrode placement.
- Solution: Reduce the intensity and reposition the electrodes.
Electrodes Not Sticking:
- Cause: Worn-out or dirty electrodes.
- Solution: Clean the electrodes or replace them with new ones.
Device Not Turning On:
- Cause: Dead battery or faulty power connection.
- Solution: Replace the battery or check the power adapter.
FAQs
Q1: Can I use the TENS Unit for muscle stimulation?
Yes, the TENS Unit can be used for muscle stimulation, but ensure you select the appropriate mode and intensity for this purpose.
Q2: Is it safe to use the TENS Unit daily?
Yes, it is generally safe for daily use, but limit each session to 20–30 minutes and follow the manufacturer's guidelines.
Q3: Can I control the TENS Unit wirelessly?
Yes, with additional components like a Bluetooth module, you can integrate wireless control into the TENS Unit.
Q4: What should I do if the device overheats?
Stop using the device immediately and check for any short circuits or overcurrent issues. Allow the device to cool before resuming use.
By following this documentation, users can safely and effectively operate the 4-Electrode TENS Unit for pain relief and other therapeutic applications.