
How to Use Gc9a01 display: Examples, Pinouts, and Specs
 Design with Gc9a01 display in Cirkit Designer
Introduction
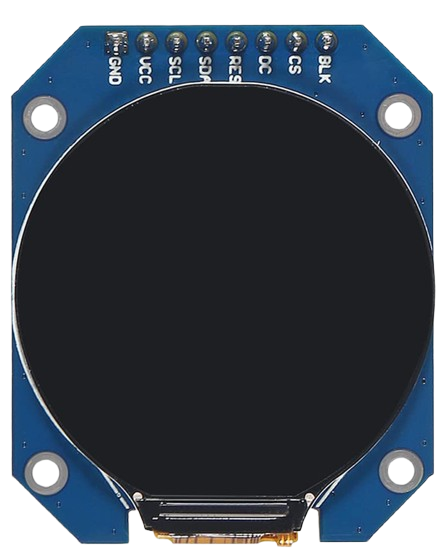
The GC9A01 display is a compact, high-resolution TFT LCD screen designed for use in embedded systems and microcontroller projects. It features a circular form factor, vibrant colors, and a wide viewing angle, making it ideal for applications requiring a visually appealing graphical interface. The display is controlled via an SPI interface, which ensures fast and efficient communication with microcontrollers.
Explore Projects Built with Gc9a01 display
 Open Project in Cirkit Designer
 Open Project in Cirkit Designer
 Open Project in Cirkit Designer
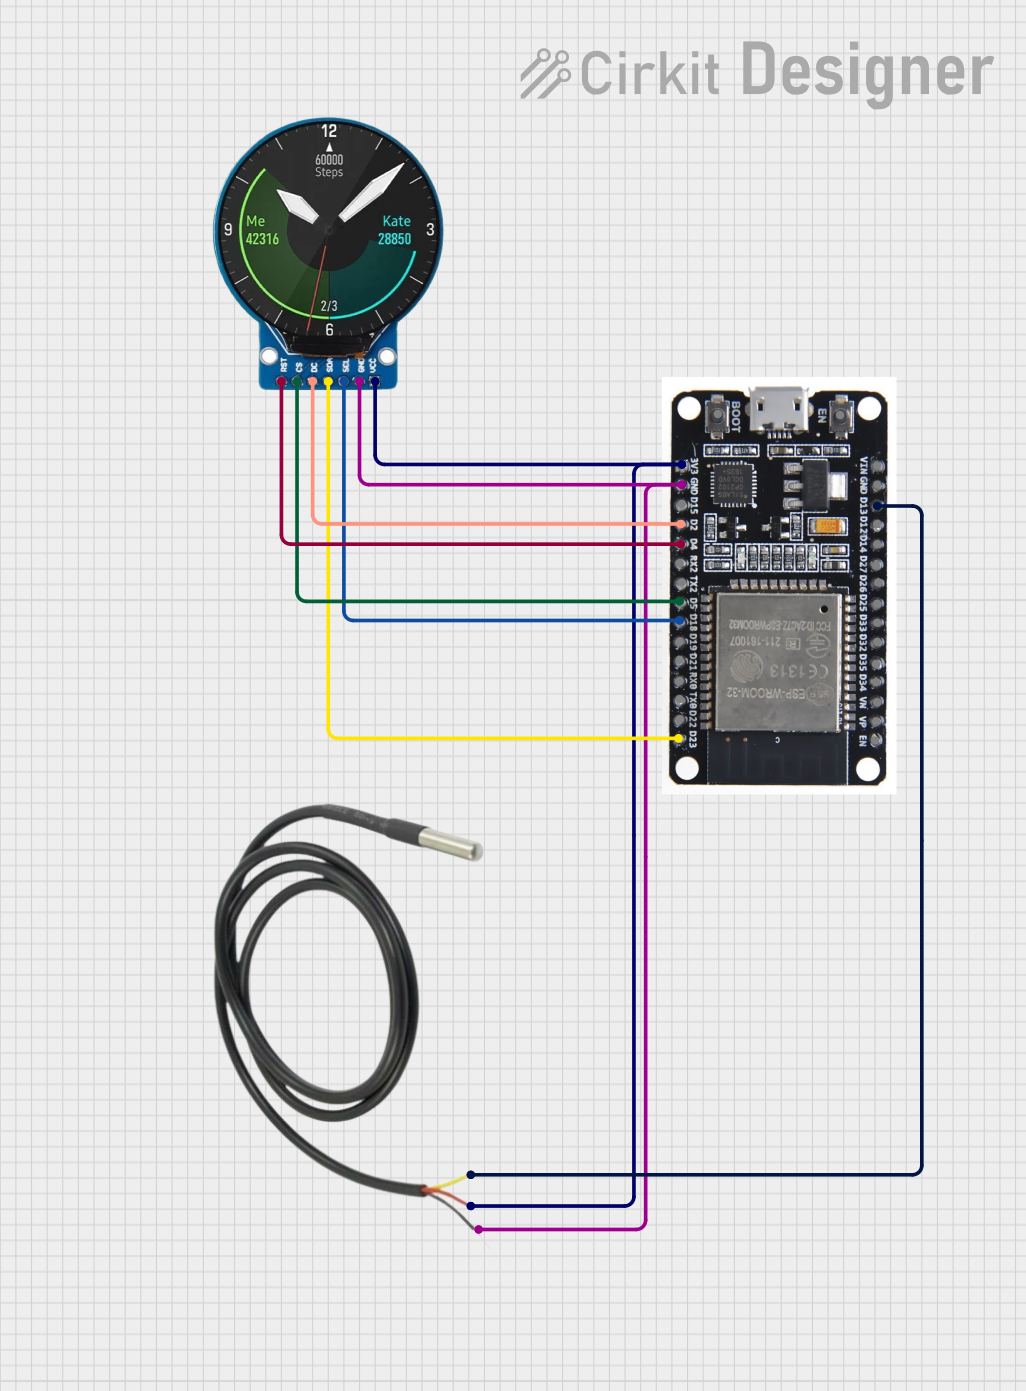 Open Project in Cirkit Designer
Explore Projects Built with Gc9a01 display
Open Project in Cirkit DesignerOpen Project in Cirkit DesignerOpen Project in Cirkit DesignerOpen Project in Cirkit DesignerCommon Applications and Use Cases
- Wearable devices (e.g., smartwatches)
- Portable instrumentation displays
- Graphical user interfaces for IoT devices
- Custom dashboards and control panels
- Educational and hobbyist projects
Technical Specifications
The GC9A01 display offers a range of features that make it versatile and easy to integrate into various projects. Below are its key technical details:
Key Technical Details
| Parameter | Specification |
|---|---|
| Display Type | TFT LCD |
| Resolution | 240 x 240 pixels |
| Display Size | 1.28 inches (circular) |
| Interface | SPI (Serial Peripheral Interface) |
| Operating Voltage | 3.3V |
| Backlight Voltage | 3.0V to 3.3V |
| Current Consumption | ~20mA (typical) |
| Viewing Angle | Wide (all directions) |
| Color Depth | 65K colors (16-bit RGB565) |
Pin Configuration and Descriptions
The GC9A01 display typically has the following pinout:
| Pin Name | Pin Number | Description |
|---|---|---|
| VCC | 1 | Power supply input (3.3V) |
| GND | 2 | Ground connection |
| SCL | 3 | SPI clock line (SCK) |
| SDA | 4 | SPI data line (MOSI) |
| RES | 5 | Reset pin (active low) |
| DC | 6 | Data/Command control pin (High = Data, Low = Command) |
| CS | 7 | Chip select (active low) |
| BLK | 8 | Backlight control (connect to 3.3V or PWM for brightness control) |
Usage Instructions
The GC9A01 display is straightforward to use with microcontrollers such as the Arduino UNO. Below are the steps to integrate and use the display in your project:
Connecting the GC9A01 to an Arduino UNO
- Power Supply: Connect the
VCCpin to the 3.3V output of the Arduino and theGNDpin to the Arduino's ground. - SPI Connections:
- Connect the
SCLpin to the Arduino'sD13(SPI clock). - Connect the
SDApin to the Arduino'sD11(SPI MOSI).
- Connect the
- Control Pins:
- Connect the
RESpin toD8(or any digital pin). - Connect the
DCpin toD9(or any digital pin). - Connect the
CSpin toD10(or any digital pin).
- Connect the
- Backlight: Connect the
BLKpin to 3.3V or a PWM-capable pin for brightness control.
Example Arduino Code
Below is an example code snippet to initialize and display graphics on the GC9A01 using the Arduino IDE. This example uses the popular Adafruit_GFX and Adafruit_GC9A01 libraries.
#include <Adafruit_GFX.h>       // Core graphics library
#include <Adafruit_GC9A01.h>    // GC9A01 driver library
#include <SPI.h>                // SPI library

// Define pin connections
#define TFT_CS   10  // Chip select pin
#define TFT_DC   9   // Data/Command pin
#define TFT_RST  8   // Reset pin

// Initialize the display object
Adafruit_GC9A01 tft = Adafruit_GC9A01(TFT_CS, TFT_DC, TFT_RST);

void setup() {
  // Initialize serial communication for debugging
  Serial.begin(9600);
  Serial.println("GC9A01 Display Test");

  // Initialize the display
  tft.begin();
  tft.setRotation(0);  // Set display rotation (0-3)
  tft.fillScreen(0x0000);  // Clear screen with black color

  // Draw a simple graphic
  tft.setTextColor(0xFFFF);  // Set text color to white
  tft.setTextSize(2);        // Set text size
  tft.setCursor(20, 20);     // Set cursor position
  tft.println("Hello, GC9A01!");

  // Draw a circle
  tft.drawCircle(120, 120, 50, 0xF800);  // Red circle at center
}

void loop() {
  // Add any dynamic updates here
}
Important Considerations and Best Practices
- Voltage Levels: Ensure the display operates at 3.3V. Using 5V logic without level shifters may damage the display.
- SPI Speed: The GC9A01 supports high SPI clock speeds, but start with a moderate speed (e.g., 4 MHz) and increase as needed.
- Backlight Control: Use a PWM pin to adjust the brightness of the backlight for power efficiency.
- Library Compatibility: Ensure you have the latest versions of the
Adafruit_GFXandAdafruit_GC9A01libraries installed.
Troubleshooting and FAQs
Common Issues
Display Not Turning On:
- Verify the power connections (
VCCandGND). - Ensure the backlight pin (
BLK) is connected to 3.3V or a PWM pin.
- Verify the power connections (
No Graphics Displayed:
- Check the SPI connections (
SCL,SDA,CS,DC). - Ensure the
RESpin is properly connected and not floating. - Confirm that the correct pins are defined in the code.
- Check the SPI connections (
Flickering or Artifacts:
- Reduce the SPI clock speed in the library settings.
- Ensure stable power supply to the display.
Incorrect Colors or Orientation:
- Verify the
setRotation()value in the code. - Ensure the color format (RGB565) is used correctly.
- Verify the
FAQs
Q: Can I use the GC9A01 with a 5V microcontroller?
A: Yes, but you must use level shifters to convert 5V logic to 3.3V to avoid damaging the display.
Q: What is the maximum SPI clock speed supported?
A: The GC9A01 can typically handle SPI clock speeds up to 40 MHz, but this depends on the specific setup and wiring quality.
Q: Can I use the display without a library?
A: Yes, but using a library like Adafruit_GC9A01 simplifies the process significantly by handling low-level commands and initialization.
Q: How do I control the backlight brightness?
A: Connect the BLK pin to a PWM-capable pin on your microcontroller and use analogWrite() to adjust brightness.
By following this documentation, you should be able to successfully integrate and use the GC9A01 display in your projects!