Cirkit Designer Logo
Cirkit Designer
Your all-in-one circuit design IDE
Home / 
Component Documentation

How to Use Adafruit ADXL343 + ADT7410 Sensor FeatherWing: Examples, Pinouts, and Specs

Image of Adafruit ADXL343 + ADT7410 Sensor FeatherWing
Cirkit Designer LogoDesign with Adafruit ADXL343 + ADT7410 Sensor FeatherWing in Cirkit Designer

Introduction

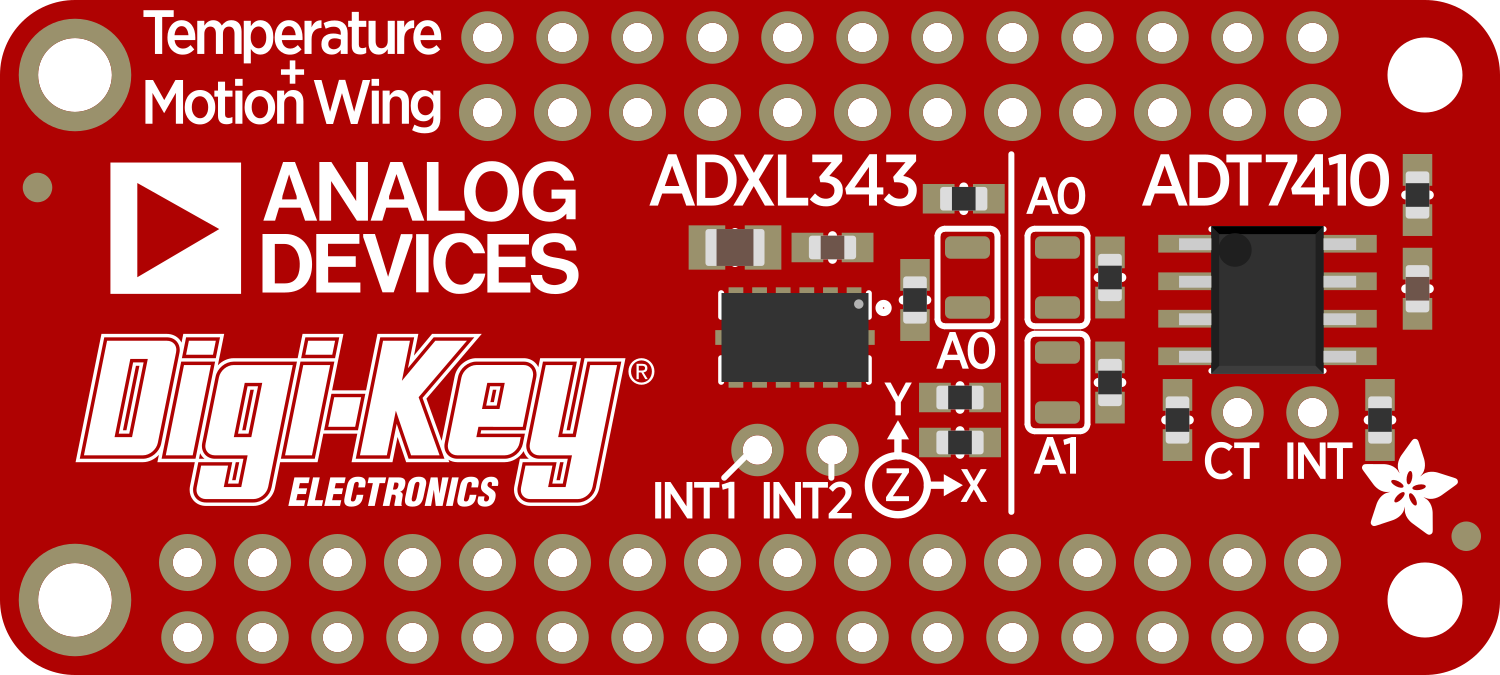
The Adafruit ADXL343 + ADT7410 Sensor FeatherWing is an add-on board designed for the Feather ecosystem. It combines a high-precision 3-axis accelerometer (ADXL343) with an accurate temperature sensor (ADT7410), enabling the measurement of motion and temperature in a single, compact package. This FeatherWing is ideal for projects that require environmental sensing, such as weather stations, home automation systems, or fitness trackers.

Explore Projects Built with Adafruit ADXL343 + ADT7410 Sensor FeatherWing

Use Cirkit Designer to design, explore, and prototype these projects online. Some projects support real-time simulation. Click "Open Project" to start designing instantly!
ESP32-Based Vibration Feedback System with Quad Alphanumeric Display and ADXL343 Accelerometer
Image of EC444 - Quest 3: A project utilizing Adafruit ADXL343 + ADT7410 Sensor FeatherWing in a practical application
This circuit features an Adafruit HUZZAH32 ESP32 Feather board as the central microcontroller, which is connected to an Adafruit Quad AlphaNumeric Featherwing display and an Adafruit ADXL343 accelerometer via I2C communication (SCL and SDA lines). The ESP32 controls a vibration motor connected to one of its GPIO pins (A5_IO4) and shares a common power supply (3.3V) and ground (GND) with the other components. The purpose of this circuit is likely to read acceleration data, display information on the alphanumeric display, and provide haptic feedback through the vibration motor.
Cirkit Designer LogoOpen Project in Cirkit Designer
Multi-Sensor Health Monitoring System with Adafruit Feather M0 Adalogger
Image of health tracker: A project utilizing Adafruit ADXL343 + ADT7410 Sensor FeatherWing in a practical application
This circuit is designed to interface multiple sensors with an Adafruit Feather M0 Adalogger microcontroller for data logging purposes. The sensors include a MAX30205 temperature sensor, a body dehydration sensor, a MAX30102 pulse oximeter, an Adafruit LSM6DSOX 6-axis accelerometer and gyroscope, and an Adafruit BME680 environmental sensor. All sensors are connected to the microcontroller via an I2C bus, sharing the SDA and SCL lines for communication.
Cirkit Designer LogoOpen Project in Cirkit Designer
Arduino Mega 2560-Based Sensor Data Logger with ESP32-CAM and LCD Interface
Image of DA_Schema: A project utilizing Adafruit ADXL343 + ADT7410 Sensor FeatherWing in a practical application
This is a multifunctional sensor system with visual feedback and control interfaces. It utilizes an Arduino Mega 2560 to process data from an accelerometer, ultrasonic sensor, and camera module, and displays information on an LCD screen. User inputs can be provided through toggle and DIP switches, while LEDs indicate system status.
Cirkit Designer LogoOpen Project in Cirkit Designer
ESP32-Based Force Measurement System with LSM303AGR Sensor
Image of final circuit diagram: A project utilizing Adafruit ADXL343 + ADT7410 Sensor FeatherWing in a practical application
This circuit features an Adafruit HUZZAH32 ESP32 Feather microcontroller connected to an Adafruit LSM303AGR sensor via I2C communication lines (SCL and SDA), a force sensing resistor (FSR) interfaced through an analog input with a pull-up resistor, and powered by a 3xAA battery pack. The LSM303AGR sensor provides acceleration and magnetic field measurements, while the FSR detects applied force. The ESP32 processes these inputs and can be programmed to respond to sensor data for applications such as motion tracking and force measurement.
Cirkit Designer LogoOpen Project in Cirkit Designer

Explore Projects Built with Adafruit ADXL343 + ADT7410 Sensor FeatherWing

Use Cirkit Designer to design, explore, and prototype these projects online. Some projects support real-time simulation. Click "Open Project" to start designing instantly!
Image of EC444 - Quest 3: A project utilizing Adafruit ADXL343 + ADT7410 Sensor FeatherWing in a practical application
ESP32-Based Vibration Feedback System with Quad Alphanumeric Display and ADXL343 Accelerometer
This circuit features an Adafruit HUZZAH32 ESP32 Feather board as the central microcontroller, which is connected to an Adafruit Quad AlphaNumeric Featherwing display and an Adafruit ADXL343 accelerometer via I2C communication (SCL and SDA lines). The ESP32 controls a vibration motor connected to one of its GPIO pins (A5_IO4) and shares a common power supply (3.3V) and ground (GND) with the other components. The purpose of this circuit is likely to read acceleration data, display information on the alphanumeric display, and provide haptic feedback through the vibration motor.
Cirkit Designer LogoOpen Project in Cirkit Designer
Image of health tracker: A project utilizing Adafruit ADXL343 + ADT7410 Sensor FeatherWing in a practical application
Multi-Sensor Health Monitoring System with Adafruit Feather M0 Adalogger
This circuit is designed to interface multiple sensors with an Adafruit Feather M0 Adalogger microcontroller for data logging purposes. The sensors include a MAX30205 temperature sensor, a body dehydration sensor, a MAX30102 pulse oximeter, an Adafruit LSM6DSOX 6-axis accelerometer and gyroscope, and an Adafruit BME680 environmental sensor. All sensors are connected to the microcontroller via an I2C bus, sharing the SDA and SCL lines for communication.
Cirkit Designer LogoOpen Project in Cirkit Designer
Image of DA_Schema: A project utilizing Adafruit ADXL343 + ADT7410 Sensor FeatherWing in a practical application
Arduino Mega 2560-Based Sensor Data Logger with ESP32-CAM and LCD Interface
This is a multifunctional sensor system with visual feedback and control interfaces. It utilizes an Arduino Mega 2560 to process data from an accelerometer, ultrasonic sensor, and camera module, and displays information on an LCD screen. User inputs can be provided through toggle and DIP switches, while LEDs indicate system status.
Cirkit Designer LogoOpen Project in Cirkit Designer
Image of final circuit diagram: A project utilizing Adafruit ADXL343 + ADT7410 Sensor FeatherWing in a practical application
ESP32-Based Force Measurement System with LSM303AGR Sensor
This circuit features an Adafruit HUZZAH32 ESP32 Feather microcontroller connected to an Adafruit LSM303AGR sensor via I2C communication lines (SCL and SDA), a force sensing resistor (FSR) interfaced through an analog input with a pull-up resistor, and powered by a 3xAA battery pack. The LSM303AGR sensor provides acceleration and magnetic field measurements, while the FSR detects applied force. The ESP32 processes these inputs and can be programmed to respond to sensor data for applications such as motion tracking and force measurement.
Cirkit Designer LogoOpen Project in Cirkit Designer

Common Applications and Use Cases

  • Motion detection and tracking
  • Orientation and tilt sensing
  • Temperature monitoring
  • Environmental data logging
  • Interactive devices
  • Wearable technology

Technical Specifications

General Features

  • 3-axis accelerometer (ADXL343)
  • High-precision temperature sensor (ADT7410)
  • I2C interface
  • 3.3V power supply with onboard voltage regulator
  • Compatible with all Feather main boards

ADXL343 Accelerometer Specifications

Parameter Value
Supply Voltage 2.0V - 3.6V
Resolution 13-bit
Measurement Range ±2g/±4g/±8g/±16g
Output Data Rate 0.1Hz to 3200Hz
Interface I2C (up to 3.4MHz)

ADT7410 Temperature Sensor Specifications

Parameter Value
Supply Voltage 2.7V - 5.5V
Temperature Range -55°C to +150°C
Resolution 0.0078°C (16-bit)
Accuracy ±0.5°C
Interface I2C (up to 3.4MHz)

Pin Configuration and Descriptions

Pin Description
GND Ground
3V 3.3V power supply
SCL I2C clock signal
SDA I2C data signal
INT Interrupt output (from ADXL343)
ADR I2C address selection for ADT7410

Usage Instructions

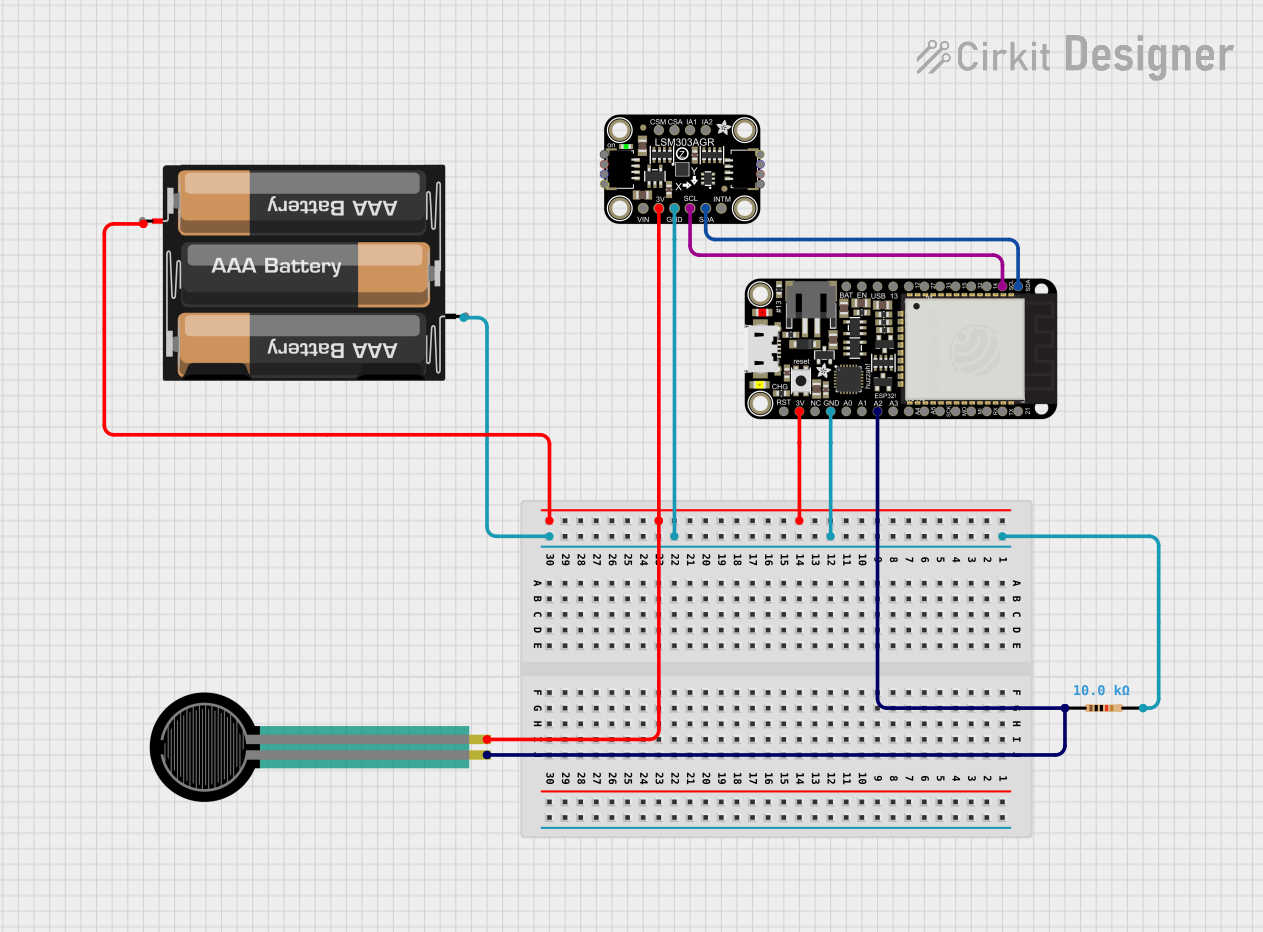
Integration with a Circuit

  1. Powering the Sensor FeatherWing: Connect the 3V and GND pins to the corresponding power supply pins on your Feather board.
  2. I2C Communication: Connect the SCL and SDA pins to the I2C clock and data lines on your Feather board.
  3. Address Selection: If necessary, set the ADR pin to the correct logic level to change the I2C address of the ADT7410.
  4. Interrupts: Optionally, connect the INT pin to a digital input on your Feather board to utilize the interrupt feature of the ADXL343.

Important Considerations and Best Practices

  • Ensure that the power supply is stable and within the specified voltage range.
  • Use pull-up resistors on the I2C lines if they are not already present on the Feather board.
  • Avoid placing the sensor near heat sources to prevent inaccurate temperature readings.
  • When using interrupts, configure the microcontroller's interrupt pin to the correct logic level (typically falling edge triggered for the ADXL343).

Troubleshooting and FAQs

Common Issues

  • I2C Communication Failure: Check the wiring of the SCL and SDA lines, and ensure that the correct I2C address is being used.
  • Inaccurate Temperature Readings: Ensure that the sensor is not being affected by external heat sources or self-heating from other components.
  • No Interrupts Triggered: Verify that the INT pin is correctly connected and that the interrupt settings in the ADXL343 are properly configured.

Solutions and Tips for Troubleshooting

  • Use a multimeter to check for proper power supply to the Sensor FeatherWing.
  • Use an I2C scanner sketch to confirm that the FeatherWing is detected on the I2C bus.
  • Check and re-solder any loose connections or cold solder joints.

FAQs

Q: Can I use this FeatherWing with a 5V Feather board? A: Yes, the onboard voltage regulator will step down the voltage to 3.3V for the sensors.

Q: How do I change the I2C address of the ADT7410? A: The I2C address can be changed by setting the ADR pin to a different logic level. Refer to the ADT7410 datasheet for the address table.

Q: What is the default I2C address for the sensors? A: The default I2C address for the ADXL343 is 0x53, and for the ADT7410, it is 0x48.

Example Code for Arduino UNO

Below is an example Arduino sketch that initializes both the ADXL343 and ADT7410 sensors and reads acceleration and temperature data.

#include <Wire.h>
#include <Adafruit_Sensor.h>
#include <Adafruit_ADXL343.h>
#include <Adafruit_ADT7410.h>

// Create sensor instances
Adafruit_ADXL343 accel = Adafruit_ADXL343(12345);
Adafruit_ADT7410 temp = Adafruit_ADT7410();

void setup() {
  Serial.begin(9600);
  // Initialize the ADXL343
  if (!accel.begin()) {
    Serial.println("Failed to initialize ADXL343");
    while (1);
  }
  // Initialize the ADT7410
  if (!temp.begin()) {
    Serial.println("Failed to initialize ADT7410");
    while (1);
  }
}

void loop() {
  // Read the accelerometer
  sensors_event_t event;
  accel.getEvent(&event);
  Serial.print("X: "); Serial.print(event.acceleration.x);
  Serial.print(" Y: "); Serial.print(event.acceleration.y);
  Serial.print(" Z: "); Serial.println(event.acceleration.z);

  // Read the temperature
  float temperature = temp.readTempC();
  Serial.print("Temperature: "); Serial.print(temperature);
  Serial.println(" C");

  delay(500);
}

Remember to install the necessary libraries using the Arduino Library Manager before uploading the sketch to your Arduino UNO. The libraries you'll need are Adafruit_Sensor, Adafruit_ADXL343, and Adafruit_ADT7410.

This documentation provides a comprehensive guide to using the Adafruit ADXL343 + ADT7410 Sensor FeatherWing. For further assistance, consult the Adafruit forums or the product's datasheets.