How to Use mppt elejoy: Examples, Pinouts, and Specs
Introduction
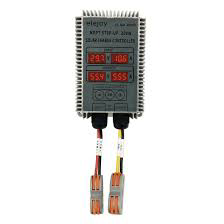
- The MPPT Elejoy is a Maximum Power Point Tracking (MPPT) solar charge controller designed to optimize the energy harvested from solar panels and efficiently charge batteries. It dynamically adjusts the input voltage and current to ensure the solar panel operates at its maximum power point.
- Common applications include solar-powered systems for residential, commercial, and off-grid setups, such as solar lighting, RVs, boats, and small renewable energy systems.
Explore Projects Built with mppt elejoy


Explore Projects Built with mppt elejoy
Technical Specifications
- Input Voltage Range: 12V to 48V DC (depending on model)
- Output Voltage: Configurable for 12V, 24V, or 48V battery systems
- Maximum Input Current: 20A, 30A, or 40A (model-dependent)
- Efficiency: Up to 98%
- Battery Type Compatibility: Lead-acid (sealed, AGM, gel) and lithium-ion
- Operating Temperature: -20°C to 60°C
- Communication Interface: RS485 or Bluetooth (optional, model-dependent)
Pin Configuration and Descriptions
| Pin/Terminal | Description |
|---|---|
| Solar Panel (+) | Positive terminal for connecting the solar panel |
| Solar Panel (-) | Negative terminal for connecting the solar panel |
| Battery (+) | Positive terminal for connecting the battery |
| Battery (-) | Negative terminal for connecting the battery |
| Load (+) | Positive terminal for connecting the DC load (optional, for load control) |
| Load (-) | Negative terminal for connecting the DC load (optional, for load control) |
| RS485 A/B | Communication interface for monitoring and configuration (optional, model-specific) |
Usage Instructions
Connecting the MPPT Elejoy:
- Ensure the solar panel, battery, and load (if used) are compatible with the MPPT Elejoy's voltage and current ratings.
- Connect the battery to the MPPT controller first, ensuring correct polarity. This step powers the controller.
- Connect the solar panel to the controller, again ensuring correct polarity.
- If using a load, connect it to the load terminals on the controller.
Configuring the MPPT Elejoy:
- Use the built-in display or companion app (if Bluetooth-enabled) to configure the battery type and system voltage.
- Set the charging parameters according to the battery manufacturer's recommendations.
Important Considerations:
- Always connect the battery before the solar panel to avoid damaging the controller.
- Avoid exceeding the voltage and current ratings of the MPPT Elejoy.
- Place the controller in a well-ventilated area to prevent overheating.
Arduino Integration Example: If the MPPT Elejoy supports RS485 communication, you can monitor its performance using an Arduino UNO. Below is an example code snippet for reading data via RS485:
#include <ModbusMaster.h> // Include the Modbus library for RS485 communication // Instantiate ModbusMaster object ModbusMaster node; // Define RS485 communication pins const int DE_RE_PIN = 2; // Pin to control RS485 direction void preTransmission() { digitalWrite(DE_RE_PIN, HIGH); // Enable transmission mode } void postTransmission() { digitalWrite(DE_RE_PIN, LOW); // Enable reception mode } void setup() { Serial.begin(9600); // Initialize serial communication pinMode(DE_RE_PIN, OUTPUT); digitalWrite(DE_RE_PIN, LOW); // Initialize Modbus communication node.begin(1, Serial); // Set Modbus ID to 1 node.preTransmission(preTransmission); node.postTransmission(postTransmission); } void loop() { uint8_t result; uint16_t data; // Read a register (e.g., battery voltage) from the MPPT Elejoy result = node.readInputRegisters(0x0001, 1); // Replace 0x0001 with the desired register address if (result == node.ku8MBSuccess) { data = node.getResponseBuffer(0); Serial.print("Battery Voltage: "); Serial.println(data / 100.0); // Assuming the value is scaled by 100 } else { Serial.println("Failed to read data from MPPT Elejoy"); } delay(1000); // Wait 1 second before the next read }- Note: Replace the register address (
0x0001) with the appropriate address for the desired data (e.g., battery voltage, current, etc.) as specified in the MPPT Elejoy's communication protocol.
- Note: Replace the register address (
Troubleshooting and FAQs
Common Issues
Controller does not power on:
- Ensure the battery is connected and has sufficient charge.
- Check all connections for proper polarity and secure contact.
Solar panel not charging the battery:
- Verify that the solar panel voltage is within the input range of the MPPT Elejoy.
- Check for loose or damaged connections between the solar panel and the controller.
Overheating:
- Ensure the controller is installed in a well-ventilated area.
- Check that the current and voltage ratings are not being exceeded.
Communication issues with RS485:
- Verify the wiring and ensure the correct Modbus ID is used.
- Check the baud rate and other communication settings.
FAQs
Can I use the MPPT Elejoy with lithium-ion batteries? Yes, the MPPT Elejoy supports lithium-ion batteries. Ensure you configure the charging parameters correctly.
What happens if I connect the solar panel before the battery? Connecting the solar panel first can damage the controller. Always connect the battery first.
How do I monitor the MPPT Elejoy remotely? If your model supports Bluetooth or RS485, use the companion app or a compatible monitoring system to track performance.
Can I use the MPPT Elejoy with an inverter? Yes, connect the inverter directly to the battery terminals, ensuring the inverter's input voltage matches the battery voltage.
This concludes the MPPT Elejoy documentation.