Cirkit Designer Logo
Cirkit Designer
Your all-in-one circuit design IDE
Home / 
Component Documentation

How to Use TIC 36V4: Examples, Pinouts, and Specs

Image of TIC 36V4
Cirkit Designer LogoDesign with TIC 36V4 in Cirkit Designer

Introduction

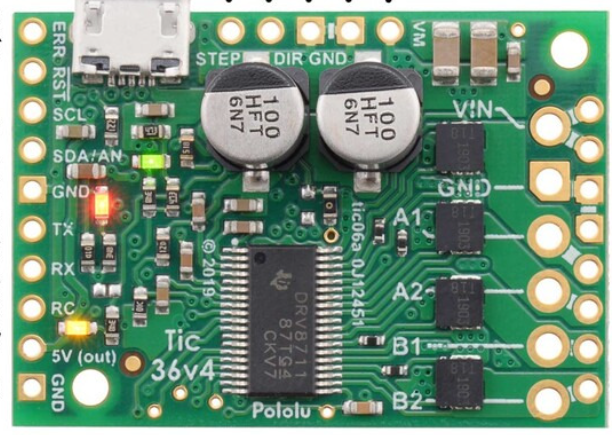
The TIC 36V4, manufactured by Pololu, is a high-performance integrated circuit designed for power management applications. It is capable of handling input voltages of up to 36 volts and is equipped with advanced features such as thermal protection and efficiency optimization. This makes it an ideal choice for applications requiring reliable and efficient power delivery.

Explore Projects Built with TIC 36V4

Use Cirkit Designer to design, explore, and prototype these projects online. Some projects support real-time simulation. Click "Open Project" to start designing instantly!
ESP32-Powered Wi-Fi Controlled Robotic Car with OLED Display and Ultrasonic Sensor
Image of playbot: A project utilizing TIC 36V4 in a practical application
This circuit is a battery-powered system featuring an ESP32 microcontroller that controls an OLED display, a motor driver for two hobby motors, an ultrasonic sensor for distance measurement, and a DFPlayer Mini for audio output through a loudspeaker. The TP4056 module manages battery charging, and a step-up boost converter provides a stable 5V supply to the components.
Cirkit Designer LogoOpen Project in Cirkit Designer
Battery-Powered DC Motor Control with USB Charging and LED Indicator
Image of lumantas: A project utilizing TIC 36V4 in a practical application
This circuit is designed to charge a Li-ion battery and power a DC motor and a 12V LED. The TP4056 module manages the battery charging process, while the PowerBoost 1000 and MT3608 boost converters step up the voltage to drive the motor and LED, respectively. Two rocker switches control the power flow to the LED and the charging circuit.
Cirkit Designer LogoOpen Project in Cirkit Designer
ESP32-Powered Obstacle Avoidance Robot with IR and Ultrasonic Sensors
Image of projcememek: A project utilizing TIC 36V4 in a practical application
This circuit features a 18650 Li-Ion battery connected to a TP4056 charging module, which in turn is connected to an MT3608 boost converter to step up the voltage. The output of the MT3608 powers an ESP32 microcontroller, a TCRT 5000 IR sensor, an HC-SR04 ultrasonic sensor, and an MG996R servo motor. The ESP32 is configured to control the servo motor via GPIO 27 and to receive input signals from the IR sensor and ultrasonic sensor through GPIO 14 and GPIO 13, respectively.
Cirkit Designer LogoOpen Project in Cirkit Designer
ESP32-Controlled Robotic Trolley with Obstacle Avoidance and Bluetooth Connectivity
Image of SHAIFUL DJK5B 2024 PROJECT 2: A project utilizing TIC 36V4 in a practical application
This circuit is designed to control a four-wheel trolley with bidirectional DC motors, using an ESP32 microcontroller for logic processing. The ESP32 receives commands via Bluetooth to drive the motors through two L298N motor drivers, allowing for forward, backward, left, and right movements. Additionally, the circuit includes an HC-SR04 ultrasonic sensor for obstacle detection and a piezo buzzer for audible alerts when obstacles are within a 10 cm range.
Cirkit Designer LogoOpen Project in Cirkit Designer

Explore Projects Built with TIC 36V4

Use Cirkit Designer to design, explore, and prototype these projects online. Some projects support real-time simulation. Click "Open Project" to start designing instantly!
Image of playbot: A project utilizing TIC 36V4 in a practical application
ESP32-Powered Wi-Fi Controlled Robotic Car with OLED Display and Ultrasonic Sensor
This circuit is a battery-powered system featuring an ESP32 microcontroller that controls an OLED display, a motor driver for two hobby motors, an ultrasonic sensor for distance measurement, and a DFPlayer Mini for audio output through a loudspeaker. The TP4056 module manages battery charging, and a step-up boost converter provides a stable 5V supply to the components.
Cirkit Designer LogoOpen Project in Cirkit Designer
Image of lumantas: A project utilizing TIC 36V4 in a practical application
Battery-Powered DC Motor Control with USB Charging and LED Indicator
This circuit is designed to charge a Li-ion battery and power a DC motor and a 12V LED. The TP4056 module manages the battery charging process, while the PowerBoost 1000 and MT3608 boost converters step up the voltage to drive the motor and LED, respectively. Two rocker switches control the power flow to the LED and the charging circuit.
Cirkit Designer LogoOpen Project in Cirkit Designer
Image of projcememek: A project utilizing TIC 36V4 in a practical application
ESP32-Powered Obstacle Avoidance Robot with IR and Ultrasonic Sensors
This circuit features a 18650 Li-Ion battery connected to a TP4056 charging module, which in turn is connected to an MT3608 boost converter to step up the voltage. The output of the MT3608 powers an ESP32 microcontroller, a TCRT 5000 IR sensor, an HC-SR04 ultrasonic sensor, and an MG996R servo motor. The ESP32 is configured to control the servo motor via GPIO 27 and to receive input signals from the IR sensor and ultrasonic sensor through GPIO 14 and GPIO 13, respectively.
Cirkit Designer LogoOpen Project in Cirkit Designer
Image of SHAIFUL DJK5B 2024 PROJECT 2: A project utilizing TIC 36V4 in a practical application
ESP32-Controlled Robotic Trolley with Obstacle Avoidance and Bluetooth Connectivity
This circuit is designed to control a four-wheel trolley with bidirectional DC motors, using an ESP32 microcontroller for logic processing. The ESP32 receives commands via Bluetooth to drive the motors through two L298N motor drivers, allowing for forward, backward, left, and right movements. Additionally, the circuit includes an HC-SR04 ultrasonic sensor for obstacle detection and a piezo buzzer for audible alerts when obstacles are within a 10 cm range.
Cirkit Designer LogoOpen Project in Cirkit Designer

Common Applications and Use Cases

  • Motor control systems
  • Robotics and automation
  • Battery-powered devices
  • Industrial power management
  • High-efficiency DC-DC converters

Technical Specifications

The TIC 36V4 is designed to deliver robust performance in demanding environments. Below are its key technical specifications:

General Specifications

Parameter Value
Input Voltage Range 8 V to 36 V
Maximum Output Current 4 A
Efficiency Up to 95%
Operating Temperature -40°C to +85°C
Thermal Protection Yes
Control Interface USB, TTL Serial, I²C, RC

Pin Configuration and Descriptions

The TIC 36V4 features a compact pinout for easy integration into circuits. Below is the pin configuration:

Pin Number Pin Name Description
1 VIN Input voltage (8 V to 36 V)
2 GND Ground connection
3 VOUT Regulated output voltage
4 ENABLE Enable/disable the output
5 SCL I²C clock line
6 SDA I²C data line
7 TX TTL serial transmit
8 RX TTL serial receive
9 USB+ USB data positive
10 USB- USB data negative

Usage Instructions

The TIC 36V4 is versatile and can be used in a variety of circuits. Below are the steps and best practices for using the component:

Basic Setup

  1. Power Supply: Connect a DC power source (8 V to 36 V) to the VIN pin. Ensure the power source can supply sufficient current for your application.
  2. Ground Connection: Connect the GND pin to the ground of your circuit.
  3. Output Connection: Connect the load to the VOUT pin. Ensure the load does not exceed the maximum current rating of 4 A.
  4. Enable Pin: Use the ENABLE pin to control the output. Pull it high to enable the output or low to disable it.

Using with Arduino UNO

The TIC 36V4 can be controlled via I²C or TTL serial communication. Below is an example of using I²C with an Arduino UNO:

Arduino Code Example

#include <Wire.h> // Include the Wire library for I²C communication

#define TIC_I2C_ADDRESS 0x0F // Replace with the actual I²C address of your TIC 36V4

void setup() {
  Wire.begin(); // Initialize I²C communication
  Serial.begin(9600); // Initialize serial communication for debugging

  // Send a command to enable the TIC 36V4 output
  Wire.beginTransmission(TIC_I2C_ADDRESS);
  Wire.write(0x85); // Example command to enable output (refer to TIC 36V4 datasheet)
  Wire.endTransmission();

  Serial.println("TIC 36V4 initialized and output enabled.");
}

void loop() {
  // Add your application logic here
}

Important Considerations

  • Thermal Management: Ensure adequate cooling for the TIC 36V4, especially in high-current applications. Use a heatsink or active cooling if necessary.
  • Input Voltage: Do not exceed the maximum input voltage of 36 V to avoid damaging the component.
  • Noise Filtering: Add decoupling capacitors near the VIN and VOUT pins to reduce noise and improve stability.

Troubleshooting and FAQs

Common Issues and Solutions

  1. No Output Voltage

    • Cause: The ENABLE pin is not pulled high.
    • Solution: Check the ENABLE pin connection and ensure it is set to a high logic level.
  2. Overheating

    • Cause: Excessive current draw or insufficient cooling.
    • Solution: Reduce the load current or improve thermal management with a heatsink or fan.
  3. Communication Failure

    • Cause: Incorrect I²C address or wiring.
    • Solution: Verify the I²C address and ensure proper connections for SCL and SDA lines.
  4. Output Voltage Instability

    • Cause: Insufficient decoupling or noisy input power.
    • Solution: Add decoupling capacitors (e.g., 100 µF and 0.1 µF) near the VIN and VOUT pins.

FAQs

Q: Can the TIC 36V4 be used with a 12 V battery?
A: Yes, the TIC 36V4 supports input voltages as low as 8 V, making it compatible with 12 V batteries.

Q: How do I reset the TIC 36V4?
A: To reset the TIC 36V4, disconnect the power supply and reconnect it after a few seconds.

Q: Is the TIC 36V4 compatible with 3.3 V logic?
A: Yes, the TIC 36V4 supports both 3.3 V and 5 V logic levels for communication interfaces.

Q: Can I use the TIC 36V4 for motor control?
A: Yes, the TIC 36V4 is suitable for motor control applications, provided the motor's voltage and current requirements are within the component's specifications.