Cirkit Designer
Your all-in-one circuit design IDE
Home /
Component Documentation
How to Use 4-Channel Capacitive Touch Sensor: Examples, Pinouts, and Specs
Introduction
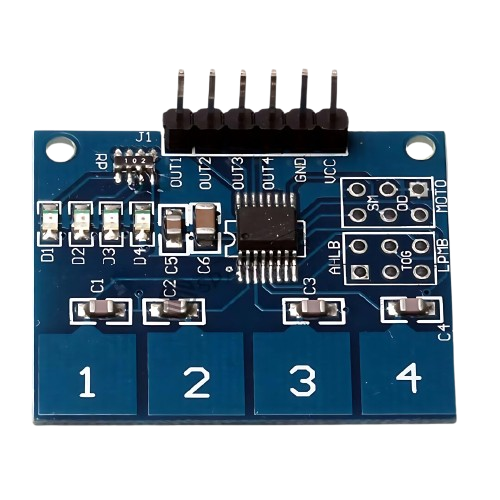
The 4-Channel Capacitive Touch Sensor (TTP224) by Robocraze is a versatile sensor module designed to detect touch inputs on up to four separate channels using capacitive sensing technology. This sensor is ideal for applications where traditional mechanical buttons are not suitable, providing a sleek and modern touch interface.
Explore Projects Built with 4-Channel Capacitive Touch Sensor
Arduino Nano-Based Capacitive Touch Controlled LED Lighting System

This circuit uses an Arduino Nano to interface with a 4-channel capacitive touch switch. Touch events are detected by the Arduino and used to control two LEDs (red and green), each with a current-limiting resistor, indicating different system states or touch responses.
Capacitive Touch and Ultrasonic Sensor Interface with Adafruit Feather nRF52840 Sense

This circuit features an Adafruit Feather nRF52840 Sense microcontroller connected to an ultrasonic sensor for distance measurement and an Adafruit AT42QT1010 capacitive touch sensor for touch input. The ultrasonic sensor's Trigger and Echo pins are interfaced with the microcontroller's digital pins D6 and D9, respectively, to send and receive ultrasonic signals. Additionally, a pressure-sensitive conductive sheet (Velostat) is connected in series with a 10k Ohm resistor to the microcontroller's analog pin A0, likely forming a pressure sensor.
Arduino UNO Capacitive Touch Sensor Interface
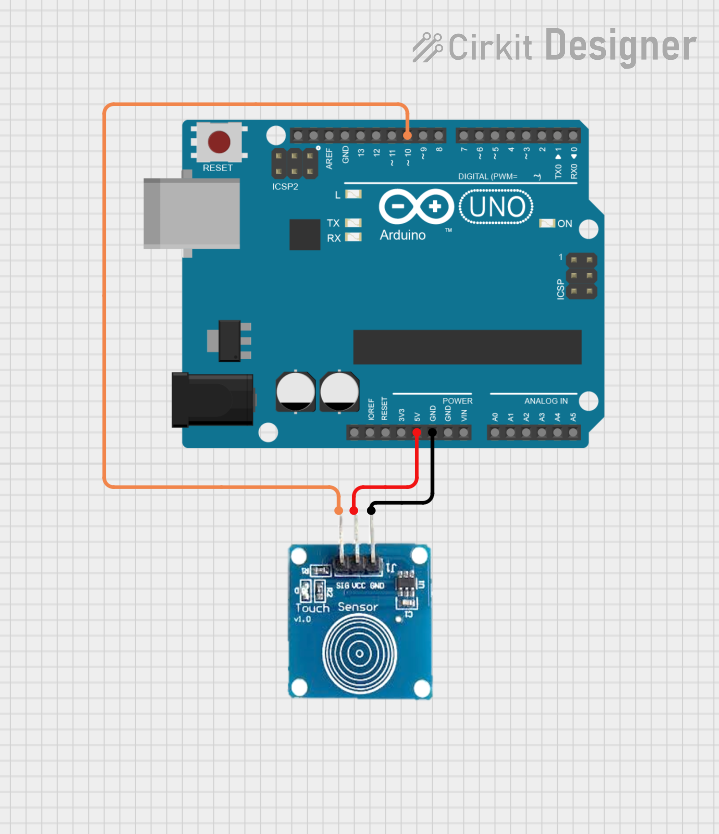
This circuit consists of an Arduino UNO microcontroller connected to a capacitive touch sensor. The sensor's VCC and GND pins are powered by the Arduino's 5V and GND pins, respectively, and the sensor's output is connected to the Arduino's digital pin D10. The Arduino can read touch inputs from the sensor to perform various actions based on the provided code.
Arduino UNO Touch Sensor Interface

This circuit consists of an Arduino UNO microcontroller connected to a capacitive touch sensor. The sensor's VCC and GND pins are connected to the 5V and GND pins of the Arduino, respectively, while the sensor's output pin is connected to digital pin D10 on the Arduino. The setup is designed to detect touch inputs via the sensor and process them using the Arduino.
Explore Projects Built with 4-Channel Capacitive Touch Sensor
Arduino Nano-Based Capacitive Touch Controlled LED Lighting System
This circuit uses an Arduino Nano to interface with a 4-channel capacitive touch switch. Touch events are detected by the Arduino and used to control two LEDs (red and green), each with a current-limiting resistor, indicating different system states or touch responses.
Capacitive Touch and Ultrasonic Sensor Interface with Adafruit Feather nRF52840 Sense
This circuit features an Adafruit Feather nRF52840 Sense microcontroller connected to an ultrasonic sensor for distance measurement and an Adafruit AT42QT1010 capacitive touch sensor for touch input. The ultrasonic sensor's Trigger and Echo pins are interfaced with the microcontroller's digital pins D6 and D9, respectively, to send and receive ultrasonic signals. Additionally, a pressure-sensitive conductive sheet (Velostat) is connected in series with a 10k Ohm resistor to the microcontroller's analog pin A0, likely forming a pressure sensor.
Arduino UNO Capacitive Touch Sensor Interface
This circuit consists of an Arduino UNO microcontroller connected to a capacitive touch sensor. The sensor's VCC and GND pins are powered by the Arduino's 5V and GND pins, respectively, and the sensor's output is connected to the Arduino's digital pin D10. The Arduino can read touch inputs from the sensor to perform various actions based on the provided code.
Arduino UNO Touch Sensor Interface
This circuit consists of an Arduino UNO microcontroller connected to a capacitive touch sensor. The sensor's VCC and GND pins are connected to the 5V and GND pins of the Arduino, respectively, while the sensor's output pin is connected to digital pin D10 on the Arduino. The setup is designed to detect touch inputs via the sensor and process them using the Arduino.
Common Applications and Use Cases
- Touch-sensitive control panels
- Interactive displays
- Home automation systems
- Consumer electronics
- DIY electronics projects
Technical Specifications
Key Technical Details
| Parameter | Value |
|---|---|
| Operating Voltage | 2.4V to 5.5V |
| Operating Current | 2.5mA (typical) |
| Response Time | 60ms (at low power mode) |
| Interface | Digital Output |
| Number of Channels | 4 |
| Touch Sensitivity | Adjustable via external resistor |
Pin Configuration and Descriptions
| Pin Number | Pin Name | Description |
|---|---|---|
| 1 | VCC | Power supply (2.4V to 5.5V) |
| 2 | GND | Ground |
| 3 | OUT1 | Digital output for touch channel 1 |
| 4 | OUT2 | Digital output for touch channel 2 |
| 5 | OUT3 | Digital output for touch channel 3 |
| 6 | OUT4 | Digital output for touch channel 4 |
| 7 | AHLB | Active high/low selection (default: active high) |
| 8 | MODE | Mode selection (default: fast mode) |
Usage Instructions
How to Use the Component in a Circuit
- Power Supply: Connect the VCC pin to a 3.3V or 5V power supply and the GND pin to the ground of your circuit.
- Output Connections: Connect the OUT1, OUT2, OUT3, and OUT4 pins to the digital input pins of your microcontroller or other control circuitry.
- Mode Selection: The MODE pin can be left unconnected for fast mode or connected to GND for low power mode.
- Active High/Low Selection: The AHLB pin can be left unconnected for active high output or connected to GND for active low output.
Important Considerations and Best Practices
- Sensitivity Adjustment: The touch sensitivity can be adjusted by changing the value of an external resistor connected to the sensor. Refer to the datasheet for recommended resistor values.
- Debouncing: Implement software debouncing in your microcontroller code to avoid false triggers due to noise.
- Environmental Factors: Capacitive touch sensors can be affected by environmental factors such as humidity and temperature. Ensure proper calibration and testing in the intended environment.
Example Code for Arduino UNO
// Example code to interface TTP224 with Arduino UNO

// Define the touch sensor output pins
const int touchPin1 = 2;
const int touchPin2 = 3;
const int touchPin3 = 4;
const int touchPin4 = 5;

void setup() {
  // Initialize serial communication
  Serial.begin(9600);

  // Set touch sensor pins as input
  pinMode(touchPin1, INPUT);
  pinMode(touchPin2, INPUT);
  pinMode(touchPin3, INPUT);
  pinMode(touchPin4, INPUT);
}

void loop() {
  // Read the state of each touch sensor pin
  int touchState1 = digitalRead(touchPin1);
  int touchState2 = digitalRead(touchPin2);
  int touchState3 = digitalRead(touchPin3);
  int touchState4 = digitalRead(touchPin4);

  // Print the state of each touch sensor pin to the serial monitor
  Serial.print("Touch 1: ");
  Serial.print(touchState1);
  Serial.print(" | Touch 2: ");
  Serial.print(touchState2);
  Serial.print(" | Touch 3: ");
  Serial.print(touchState3);
  Serial.print(" | Touch 4: ");
  Serial.println(touchState4);

  // Add a small delay to avoid flooding the serial monitor
  delay(100);
}
Troubleshooting and FAQs
Common Issues Users Might Face
- False Triggers: The sensor may register false touches due to noise or environmental factors.
- No Response: The sensor does not detect any touch inputs.
- Inconsistent Sensitivity: The touch sensitivity varies significantly.
Solutions and Tips for Troubleshooting
- False Triggers: Implement software debouncing and ensure proper grounding and shielding of the sensor.
- No Response: Check the power supply connections and ensure the sensor is properly connected to the microcontroller.
- Inconsistent Sensitivity: Adjust the external resistor value to fine-tune the touch sensitivity and ensure the sensor is calibrated in the intended environment.
By following this documentation, users can effectively integrate the 4-Channel Capacitive Touch Sensor (TTP224) into their projects, leveraging its capabilities for a wide range of applications.