Cirkit Designer
Your all-in-one circuit design IDE
Home /
Component Documentation
How to Use Infrared Thermal Camera Sensor: Examples, Pinouts, and Specs
Introduction
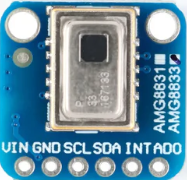
The Panasonic AMG8833 Infrared Thermal Camera Sensor is a highly sensitive device designed to detect infrared radiation and convert it into a thermal image. This allows for the visualization of temperature variations across a surface, making it an invaluable tool in various applications.
Explore Projects Built with Infrared Thermal Camera Sensor
Arduino Mega 2560 Based Motion-Activated Thermal Camera with Bluetooth Connectivity

This circuit features an Arduino Mega 2560 microcontroller interfaced with a PIR motion sensor, a Bluetooth HC-06 module, and an Adafruit MLX90640 thermal camera. The Arduino controls an LED through a resistor, receives motion detection signals, communicates via Bluetooth, and processes thermal images. The microcontroller's code structure is set up but contains no specific functionality yet.
ESP32C3-Based Thermal Imaging Camera with TFT Display

This circuit connects a 1.3 inch TFT Module 240×240 ST7789 display, a GY-MCU90640 thermal camera module, and a XIAO ESP32C3 microcontroller to create a thermal imaging system. The ESP32C3 microcontroller is programmed to read temperature data from the thermal camera, process it, and display a visual representation of the temperature distribution on the TFT screen. The circuit is designed for applications requiring thermal monitoring, such as detecting heat sources or monitoring temperature variations in an environment.
ESP32-Based Thermal Monitoring and GSM-Controlled Water Pump System
This circuit features an ESP32 microcontroller that interfaces with an Adafruit AMG8833 infrared thermal camera and two NTC analog temperature sensors for temperature monitoring. The ESP32 also communicates with a SIM900A module for cellular connectivity and controls a two-channel relay, which in turn operates a mini diaphragm water pump. The purpose of the circuit is likely for remote temperature monitoring and control of a water pump, possibly for applications like smart irrigation or climate control.
Arduino-Powered Security System with Wi-Fi Connectivity and Thermal Imaging
This circuit features two Arduino UNO microcontrollers interfaced with a variety of sensors and modules. One Arduino is connected to a mlx90614 infrared temperature sensor, a PIR motion sensor, a Micro SD card module for data storage, and an ESP8266 WiFi module for wireless communication. The other Arduino is interfaced with an OV7725 camera module for image capture. The purpose of this circuit is likely for monitoring an environment with motion detection, temperature sensing, image capture, and data logging capabilities with the potential for remote access or notifications via WiFi.
Explore Projects Built with Infrared Thermal Camera Sensor
Arduino Mega 2560 Based Motion-Activated Thermal Camera with Bluetooth Connectivity
This circuit features an Arduino Mega 2560 microcontroller interfaced with a PIR motion sensor, a Bluetooth HC-06 module, and an Adafruit MLX90640 thermal camera. The Arduino controls an LED through a resistor, receives motion detection signals, communicates via Bluetooth, and processes thermal images. The microcontroller's code structure is set up but contains no specific functionality yet.
ESP32C3-Based Thermal Imaging Camera with TFT Display
This circuit connects a 1.3 inch TFT Module 240×240 ST7789 display, a GY-MCU90640 thermal camera module, and a XIAO ESP32C3 microcontroller to create a thermal imaging system. The ESP32C3 microcontroller is programmed to read temperature data from the thermal camera, process it, and display a visual representation of the temperature distribution on the TFT screen. The circuit is designed for applications requiring thermal monitoring, such as detecting heat sources or monitoring temperature variations in an environment.
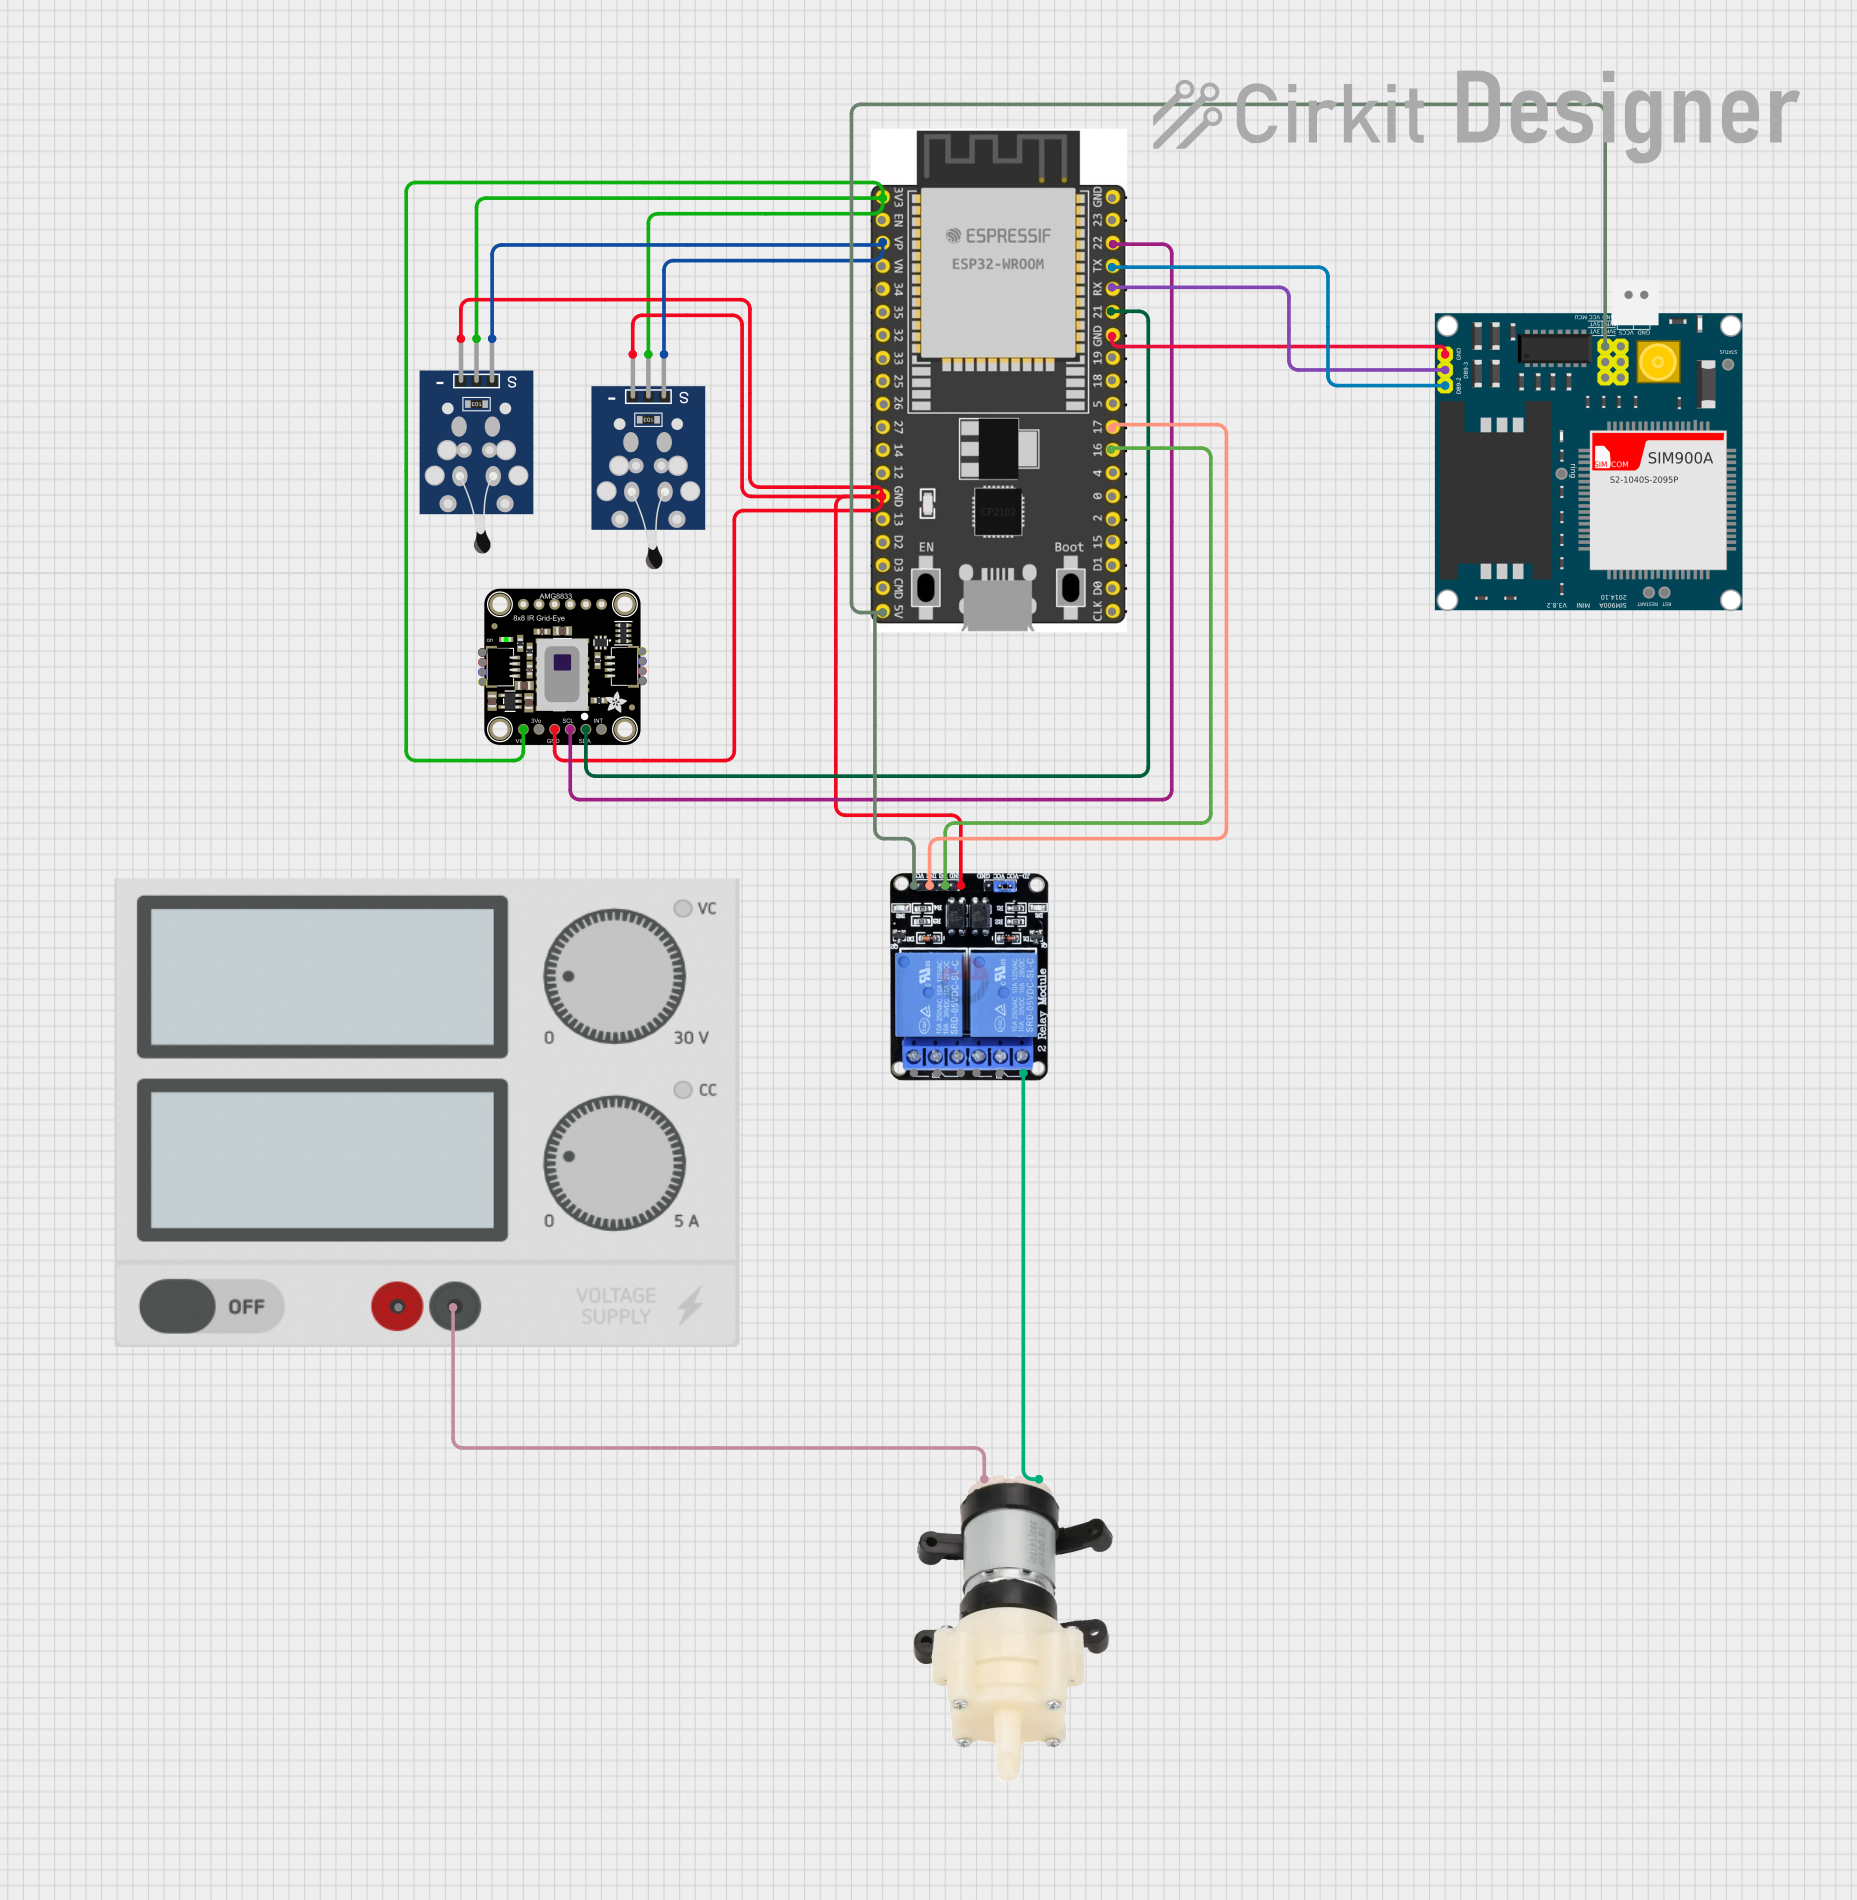
ESP32-Based Thermal Monitoring and GSM-Controlled Water Pump System
This circuit features an ESP32 microcontroller that interfaces with an Adafruit AMG8833 infrared thermal camera and two NTC analog temperature sensors for temperature monitoring. The ESP32 also communicates with a SIM900A module for cellular connectivity and controls a two-channel relay, which in turn operates a mini diaphragm water pump. The purpose of the circuit is likely for remote temperature monitoring and control of a water pump, possibly for applications like smart irrigation or climate control.
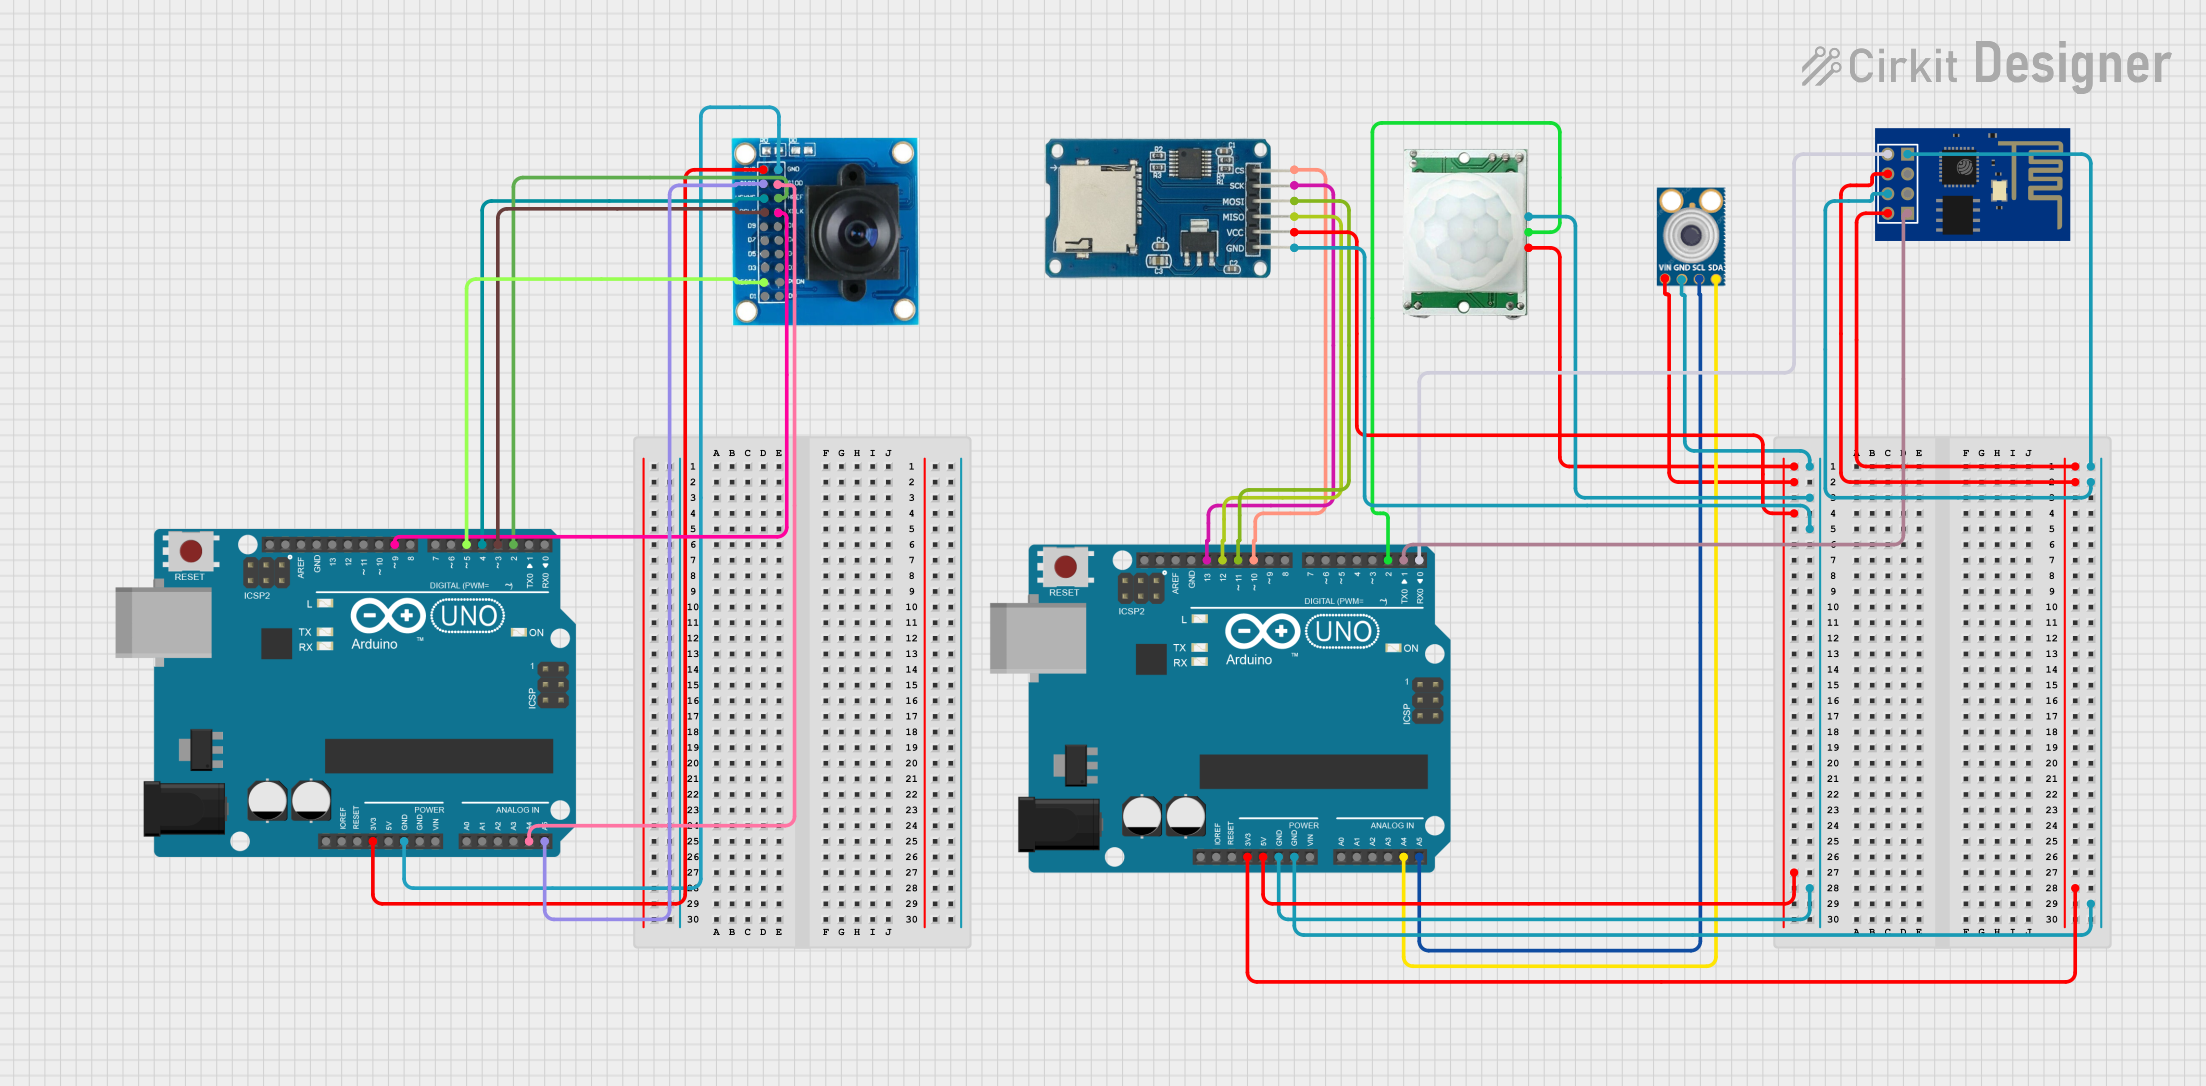
Arduino-Powered Security System with Wi-Fi Connectivity and Thermal Imaging
This circuit features two Arduino UNO microcontrollers interfaced with a variety of sensors and modules. One Arduino is connected to a mlx90614 infrared temperature sensor, a PIR motion sensor, a Micro SD card module for data storage, and an ESP8266 WiFi module for wireless communication. The other Arduino is interfaced with an OV7725 camera module for image capture. The purpose of this circuit is likely for monitoring an environment with motion detection, temperature sensing, image capture, and data logging capabilities with the potential for remote access or notifications via WiFi.
Common Applications and Use Cases
- Medical Diagnostics: Non-contact temperature measurement for fever screening.
- Industrial Monitoring: Detecting overheating components in machinery.
- Home Automation: Motion detection and presence sensing.
- Security Systems: Intruder detection based on body heat.
- DIY Projects: Integrating thermal imaging into custom electronics projects.
Technical Specifications
Key Technical Details
| Parameter | Value |
|---|---|
| Operating Voltage | 3.3V |
| Operating Current | 4.5mA |
| Field of View | 60° x 60° |
| Temperature Range | 0°C to 80°C |
| Temperature Resolution | ±2.5°C |
| Pixel Resolution | 8x8 (64 pixels) |
| Interface | I2C |
| Frame Rate | 10 FPS |
Pin Configuration and Descriptions
| Pin Number | Pin Name | Description |
|---|---|---|
| 1 | VDD | Power Supply (3.3V) |
| 2 | GND | Ground |
| 3 | SCL | I2C Clock Line |
| 4 | SDA | I2C Data Line |
| 5 | INT | Interrupt Output (Active Low) |
| 6 | AD_SELECT | I2C Address Select (Connect to GND or VDD) |
| 7 | NC | Not Connected |
| 8 | NC | Not Connected |
Usage Instructions
How to Use the Component in a Circuit
- Power Supply: Connect the VDD pin to a 3.3V power source and the GND pin to ground.
- I2C Communication: Connect the SCL pin to the I2C clock line and the SDA pin to the I2C data line of your microcontroller.
- Address Selection: Connect the AD_SELECT pin to either GND or VDD to set the I2C address.
- Interrupt Pin: Optionally, connect the INT pin to a digital input on your microcontroller to handle interrupts.
Important Considerations and Best Practices
- Power Supply: Ensure a stable 3.3V power supply to avoid damage to the sensor.
- I2C Pull-up Resistors: Use appropriate pull-up resistors (typically 4.7kΩ) on the SCL and SDA lines.
- Thermal Isolation: Minimize thermal interference from surrounding components to ensure accurate readings.
- Calibration: Periodically calibrate the sensor for consistent performance.
Sample Code for Arduino UNO
#include <Wire.h>
#include <Adafruit_AMG88xx.h>

Adafruit_AMG88xx amg;

void setup() {
  Serial.begin(9600);
  Wire.begin();

  if (!amg.begin()) {
    Serial.println("Could not find a valid AMG88xx sensor, check wiring!");
    while (1);
  }
  Serial.println("AMG88xx sensor initialized");
}

void loop() {
  float pixels[64]; // Array to hold pixel temperature values

  amg.readPixels(pixels); // Read pixel temperatures

  for (int i = 0; i < 64; i++) {
    Serial.print(pixels[i]);
    Serial.print(", ");
    if ((i + 1) % 8 == 0) {
      Serial.println();
    }
  }
  Serial.println();
  delay(1000); // Wait for 1 second before next reading
}
Troubleshooting and FAQs
Common Issues Users Might Face
Sensor Not Detected:
- Solution: Check the I2C connections and ensure the correct I2C address is used.
Inaccurate Temperature Readings:
- Solution: Ensure the sensor is thermally isolated from other heat sources and perform regular calibration.
Intermittent Data:
- Solution: Verify the power supply is stable and check for loose connections.
Solutions and Tips for Troubleshooting
- Check Connections: Ensure all connections are secure and correctly oriented.
- Use a Stable Power Supply: Fluctuations in power can cause erratic behavior.
- Verify I2C Address: Ensure the correct I2C address is set and used in your code.
- Consult the Datasheet: Refer to the Panasonic AMG8833 datasheet for detailed technical information and troubleshooting tips.
By following this documentation, users can effectively integrate the Panasonic AMG8833 Infrared Thermal Camera Sensor into their projects, ensuring accurate and reliable thermal imaging capabilities.