How to Use LED Light Strips (Violet): Examples, Pinouts, and Specs
Introduction
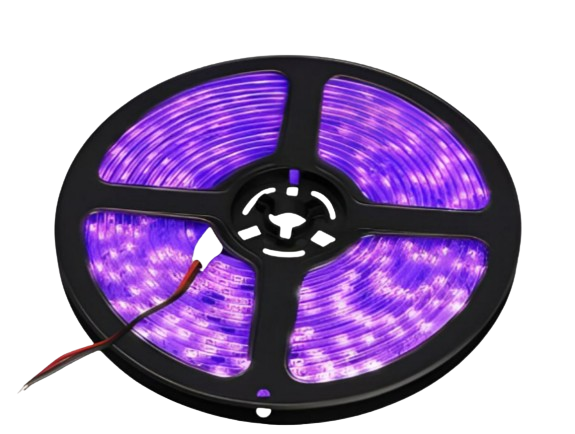
LED light strips are a versatile and energy-efficient lighting solution that have revolutionized the way we think about decorative and accent lighting. These flexible printed circuit boards are embedded with violet-colored light-emitting diodes (LEDs) and can be used in a variety of applications, from mood lighting in homes to accent lighting in commercial spaces. Their flexibility and ease of use make them a popular choice for DIY enthusiasts and professionals alike.
Explore Projects Built with LED Light Strips (Violet)

Explore Projects Built with LED Light Strips (Violet)
Common Applications and Use Cases
- Ambient room lighting
- Backlighting for TVs and monitors
- Accent lighting in bars and restaurants
- Under-cabinet lighting in kitchens
- Decorative lighting for events and parties
- Custom PC case lighting
- Signage and display cases
Technical Specifications
Key Technical Details
- Color: Violet
- Operating Voltage: Typically 12V DC
- Current Consumption: Varies with length and type, e.g., 600mA per meter
- Power Consumption: Varies with length and type, e.g., 7.2W per meter
- LED Density: Number of LEDs per meter (e.g., 60 LEDs/m)
- Luminous Flux: Measured in lumens per meter (lm/m)
- Beam Angle: The angle of light dispersion from the LEDs
- IP Rating: Ingress Protection rating, indicating the strip's resistance to dust and water
Pin Configuration and Descriptions
| Pin | Description |
|---|---|
| V+ | Positive voltage supply (usually marked as 12V or VCC) |
| GND | Ground connection |
| DIN | Data input for digital LED strips (if applicable) |
| DOUT | Data output for connecting to the next strip (if applicable) |
Usage Instructions
How to Use the Component in a Circuit
- Power Supply: Ensure you have a 12V DC power supply that can provide sufficient current for the length of the LED strip you are using.
- Connecting: Connect the positive terminal of the power supply to the V+ pad on the LED strip, and the negative terminal to the GND pad.
- Cutting and Extending: If you need to cut the strip, only do so at the designated cut points. To extend, use connectors or solder additional strips at the cut points, ensuring polarity is maintained.
- Mounting: Use the adhesive backing to mount the strip to a clean, dry surface. Avoid bending the strips sharply, as this may damage the circuitry.
Important Considerations and Best Practices
- Heat Dissipation: LED strips can generate heat; ensure they are mounted on a surface that can help dissipate heat.
- Voltage Drop: Over long runs, voltage can drop, causing the LEDs at the far end to appear dimmer. Use a higher gauge wire for power or inject power at multiple points.
- Dimming: If dimming is required, use a PWM dimmer that is compatible with the voltage and current of the LED strip.
- Waterproofing: If the LED strip is not waterproof (high IP rating), avoid using it in moist or outdoor environments without proper encasing.
Troubleshooting and FAQs
Common Issues
- LEDs Not Lighting Up: Check power supply and connections. Ensure the polarity is correct and that there are no loose wires.
- Dim LEDs: This could be due to a voltage drop. Try powering the strip from both ends or using a higher gauge wire.
- Flickering LEDs: This may be caused by a loose connection or an inadequate power supply. Check all connections and ensure the power supply is rated for the current draw of the strip.
Solutions and Tips for Troubleshooting
- Check Connections: Ensure all connections are secure and properly soldered if applicable.
- Test Power Supply: Verify that the power supply is functioning correctly and providing the correct voltage.
- Measure Voltage: Use a multimeter to check the voltage at the start and end of the strip to identify any voltage drop.
FAQs
Q: Can I connect multiple LED strips together? A: Yes, but be mindful of the total current draw and the capacity of your power supply.
Q: Are the LED strips dimmable? A: Yes, with the use of a compatible PWM dimmer.
Q: How do I know if my LED strip is waterproof? A: Check the IP rating. An IP65 or higher rating indicates that the strip is suitable for use in moist environments.
Q: How long can a single run of LED strip be before experiencing voltage drop? A: This varies by strip type and power supply, but a general rule of thumb is to avoid runs longer than 5 meters without power injection.
Example Arduino UNO Code for Digital LED Strip
#include <Adafruit_NeoPixel.h>

#define LED_PIN     6 // Pin where the data line is connected
#define LED_COUNT  30 // Number of LEDs in the strip

// Initialize the NeoPixel library.
Adafruit_NeoPixel strip(LED_COUNT, LED_PIN, NEO_GRB + NEO_KHZ800);

void setup() {
  strip.begin(); // Initialize the strip
  strip.show();  // Initialize all pixels to 'off'
}

void loop() {
  // Fill the strip with a violet color and then show it.
  strip.fill(strip.Color(150, 0, 255), 0, LED_COUNT);
  strip.show();
  delay(500);

  // Turn off all the LEDs.
  strip.clear();
  strip.show();
  delay(500);
}
Note: The above code is for digital LED strips that use a data line (DIN) for individually addressable LEDs. Make sure to install the Adafruit_NeoPixel library in the Arduino IDE before uploading this code to your Arduino UNO.