How to Use OAK-D pro camera: Examples, Pinouts, and Specs
Introduction
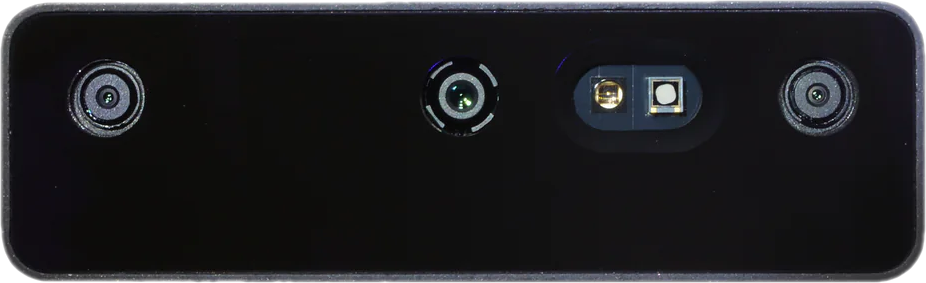
The OAK-D Pro Camera is a high-performance depth camera manufactured by OAK, designed to capture both RGB and depth data simultaneously. It is equipped with advanced computer vision capabilities, making it ideal for applications in robotics, augmented reality, and AI-based systems. The OAK-D Pro combines a high-resolution RGB camera with stereo depth sensors, enabling real-time 3D perception and object detection.
Explore Projects Built with OAK-D pro camera

Explore Projects Built with OAK-D pro camera
Common Applications and Use Cases
- Robotics and autonomous navigation
- Augmented reality (AR) and virtual reality (VR)
- Object detection and tracking
- Industrial automation and quality control
- Smart surveillance and security systems
- AI-based research and development
Technical Specifications
The OAK-D Pro Camera is packed with cutting-edge features and specifications to support a wide range of applications. Below are the key technical details:
General Specifications
| Parameter | Value |
|---|---|
| Manufacturer | OAK |
| Part ID | OAK-D Pro |
| RGB Camera Resolution | 12 MP (4K video support) |
| Depth Sensor Resolution | 1280 x 720 |
| Depth Range | 0.3 m to 35 m |
| Field of View (FOV) | 69° (RGB), 89° (depth sensors) |
| Connectivity | USB 3.0 Type-C, GPIO |
| Power Supply | 5V DC (via USB or external power source) |
| AI Processor | Myriad X VPU |
| Dimensions | 120 mm x 35 mm x 25 mm |
| Weight | 150 g |
Pin Configuration and Descriptions
The OAK-D Pro Camera features a USB Type-C port for data and power, as well as GPIO pins for additional interfacing. Below is the GPIO pin configuration:
| Pin Number | Name | Description |
|---|---|---|
| 1 | GND | Ground |
| 2 | 5V | 5V Power Input |
| 3 | GPIO_1 | General Purpose Input/Output (I/O) |
| 4 | GPIO_2 | General Purpose Input/Output (I/O) |
| 5 | GPIO_3 | General Purpose Input/Output (I/O) |
| 6 | GPIO_4 | General Purpose Input/Output (I/O) |
Usage Instructions
The OAK-D Pro Camera is designed for ease of use in a variety of applications. Below are the steps and best practices for integrating the camera into your project.
How to Use the OAK-D Pro Camera in a Circuit
- Power the Camera: Connect the OAK-D Pro to a 5V power source using the USB Type-C cable or an external power supply.
- Connect to a Host Device: Use the USB 3.0 Type-C port to connect the camera to a computer, Raspberry Pi, or other host devices.
- Install Required Software: Download and install the DepthAI SDK from the official OAK website. This SDK provides tools and libraries for interfacing with the camera.
- Run Example Code: Use the provided Python or C++ examples in the DepthAI SDK to test the camera's functionality.
- Integrate into Your Project: Use the GPIO pins for additional control or interfacing with external devices, such as motors or sensors.
Important Considerations and Best Practices
- Ensure the camera is mounted securely to avoid vibrations that may affect depth accuracy.
- Use a high-quality USB 3.0 cable to ensure reliable data transfer.
- Avoid exposing the camera to direct sunlight or reflective surfaces, as this may interfere with depth sensing.
- Keep the camera's lenses clean for optimal performance.
- When using the camera outdoors, consider adding a protective enclosure to shield it from dust and moisture.
Example Code for Arduino UNO Integration
While the OAK-D Pro is typically used with more powerful host devices, it can communicate with an Arduino UNO via GPIO for basic control. Below is an example of how to toggle an LED based on depth data:
// Example: Control an LED using depth data from the OAK-D Pro Camera
// Note: This example assumes the OAK-D Pro sends a HIGH signal to GPIO_1
// when an object is detected within a certain depth range.

const int ledPin = 13;  // Arduino pin connected to an LED
const int oakPin = 2;   // Arduino pin connected to OAK-D Pro GPIO_1

void setup() {
  pinMode(ledPin, OUTPUT);  // Set LED pin as output
  pinMode(oakPin, INPUT);   // Set OAK-D Pro GPIO_1 as input
}

void loop() {
  int oakSignal = digitalRead(oakPin);  // Read signal from OAK-D Pro

  if (oakSignal == HIGH) {
    digitalWrite(ledPin, HIGH);  // Turn on LED if object is detected
  } else {
    digitalWrite(ledPin, LOW);   // Turn off LED otherwise
  }
}
Troubleshooting and FAQs
Common Issues and Solutions
Camera Not Detected by Host Device
- Ensure the USB cable is securely connected.
- Verify that the DepthAI SDK is installed correctly.
- Check if the camera is receiving power (LED indicator should be on).
Depth Data is Inaccurate
- Clean the camera lenses to remove dust or smudges.
- Avoid reflective or transparent surfaces in the camera's field of view.
- Ensure the camera is not too close to the object (minimum depth range is 0.3 m).
Intermittent Connection
- Use a high-quality USB 3.0 cable.
- Avoid using USB hubs that may limit power or bandwidth.
GPIO Pins Not Responding
- Verify the pin configuration and ensure proper connections.
- Check the voltage levels on the GPIO pins using a multimeter.
Frequently Asked Questions
Q: Can the OAK-D Pro Camera be used outdoors?
A: Yes, but it is recommended to use a protective enclosure to shield the camera from dust, moisture, and extreme temperatures.
Q: What is the maximum frame rate of the OAK-D Pro?
A: The camera supports up to 60 FPS for depth data and 30 FPS for 4K RGB video.
Q: Does the OAK-D Pro support AI model deployment?
A: Yes, the Myriad X VPU allows for on-device AI inference, making it suitable for running neural networks.
Q: Can the camera be powered directly from an Arduino?
A: No, the OAK-D Pro requires a 5V power supply with sufficient current, which exceeds the capabilities of an Arduino.
Q: Where can I find additional resources and support?
A: Visit the official OAK website for documentation, SDK downloads, and community forums.