Cirkit Designer Logo
Cirkit Designer
Your all-in-one circuit design IDE
Home / 
Component Documentation

How to Use DFRobot EC Sensor: Examples, Pinouts, and Specs

Image of DFRobot EC Sensor
Cirkit Designer LogoDesign with DFRobot EC Sensor in Cirkit Designer

Introduction

The DFRobot EC Sensor is an electronic device designed to measure the electrical conductivity (EC) of a solution, which is a crucial parameter in determining the ionic content and thus the nutrient levels in water. This sensor is particularly useful in applications such as hydroponics, aquaponics, freshwater systems, and environmental water testing. By monitoring EC levels, users can ensure optimal conditions for plant growth and aquatic life.

Explore Projects Built with DFRobot EC Sensor

Use Cirkit Designer to design, explore, and prototype these projects online. Some projects support real-time simulation. Click "Open Project" to start designing instantly!
Arduino UNO-Based Battery-Powered Robotic System with Ultrasonic Sensors and Magnetometer
Image of Autonomous Mobile robot v1: A project utilizing DFRobot EC Sensor in a practical application
This circuit is a sensor-based robotic system controlled by an Arduino UNO. It includes three HC-SR04 ultrasonic sensors for distance measurement, a QMC5883L magnetometer for orientation detection, and an L298N motor driver to control two DC motors, all powered by a Li-ion 18650 battery.
Cirkit Designer LogoOpen Project in Cirkit Designer
ESP32 CAM and Ultrasonic Sensor-Based Wi-Fi Controlled Robotic Vehicle
Image of Mitra: A project utilizing DFRobot EC Sensor in a practical application
This circuit is a robotic system that uses an ESP32 CAM for image processing, multiple IR sensors for obstacle detection, and an HC-SR04 ultrasonic sensor for distance measurement. The system is controlled by a DRIVER SHIELD L293D, which also drives several DC motors and motorized wheels, powered by a 12V battery with a rocker switch and battery indicator for power management.
Cirkit Designer LogoOpen Project in Cirkit Designer
ESP32-Controlled Obstacle Avoidance Robot with L298N Motor Driver and HC-SR04 Sensors
Image of Robot TUDONG: A project utilizing DFRobot EC Sensor in a practical application
This circuit is designed for a robot with obstacle avoidance capabilities, utilizing three HC-SR04 ultrasonic sensors for detecting obstacles in front, left, and right directions. An ESP32 microcontroller processes the distance data from the sensors and controls the movement of the robot through an L298N DC motor driver, which in turn drives two gearmotors attached to the robot's wheels. The robot can move forward, backward, and turn left or right based on sensor inputs to navigate around obstacles.
Cirkit Designer LogoOpen Project in Cirkit Designer
Arduino Mega and ESP32 Powered Robotic Controller with Distance Sensing and Line Tracking
Image of PID Line Following Robot (Removing Second BB): A project utilizing DFRobot EC Sensor in a practical application
This circuit is designed for a mobile robot with environmental sensing and precise motor control. It features dual microcontroller architecture for complex tasks, integrating motion control, distance measurement, and surface detection, all powered by a rechargeable battery system with power management.
Cirkit Designer LogoOpen Project in Cirkit Designer

Explore Projects Built with DFRobot EC Sensor

Use Cirkit Designer to design, explore, and prototype these projects online. Some projects support real-time simulation. Click "Open Project" to start designing instantly!
Image of Autonomous Mobile robot v1: A project utilizing DFRobot EC Sensor in a practical application
Arduino UNO-Based Battery-Powered Robotic System with Ultrasonic Sensors and Magnetometer
This circuit is a sensor-based robotic system controlled by an Arduino UNO. It includes three HC-SR04 ultrasonic sensors for distance measurement, a QMC5883L magnetometer for orientation detection, and an L298N motor driver to control two DC motors, all powered by a Li-ion 18650 battery.
Cirkit Designer LogoOpen Project in Cirkit Designer
Image of Mitra: A project utilizing DFRobot EC Sensor in a practical application
ESP32 CAM and Ultrasonic Sensor-Based Wi-Fi Controlled Robotic Vehicle
This circuit is a robotic system that uses an ESP32 CAM for image processing, multiple IR sensors for obstacle detection, and an HC-SR04 ultrasonic sensor for distance measurement. The system is controlled by a DRIVER SHIELD L293D, which also drives several DC motors and motorized wheels, powered by a 12V battery with a rocker switch and battery indicator for power management.
Cirkit Designer LogoOpen Project in Cirkit Designer
Image of Robot TUDONG: A project utilizing DFRobot EC Sensor in a practical application
ESP32-Controlled Obstacle Avoidance Robot with L298N Motor Driver and HC-SR04 Sensors
This circuit is designed for a robot with obstacle avoidance capabilities, utilizing three HC-SR04 ultrasonic sensors for detecting obstacles in front, left, and right directions. An ESP32 microcontroller processes the distance data from the sensors and controls the movement of the robot through an L298N DC motor driver, which in turn drives two gearmotors attached to the robot's wheels. The robot can move forward, backward, and turn left or right based on sensor inputs to navigate around obstacles.
Cirkit Designer LogoOpen Project in Cirkit Designer
Image of PID Line Following Robot (Removing Second BB): A project utilizing DFRobot EC Sensor in a practical application
Arduino Mega and ESP32 Powered Robotic Controller with Distance Sensing and Line Tracking
This circuit is designed for a mobile robot with environmental sensing and precise motor control. It features dual microcontroller architecture for complex tasks, integrating motion control, distance measurement, and surface detection, all powered by a rechargeable battery system with power management.
Cirkit Designer LogoOpen Project in Cirkit Designer

Technical Specifications

Key Technical Details

  • Measurement Range: 1ms/cm to 20ms/cm
  • Accuracy: ±0.1ms/cm
  • Output: Analog signal corresponding to the EC value
  • Supply Voltage: 3.3V to 5.5V DC
  • Operating Current: 15mA (typical)
  • Operating Temperature: 5°C to 40°C

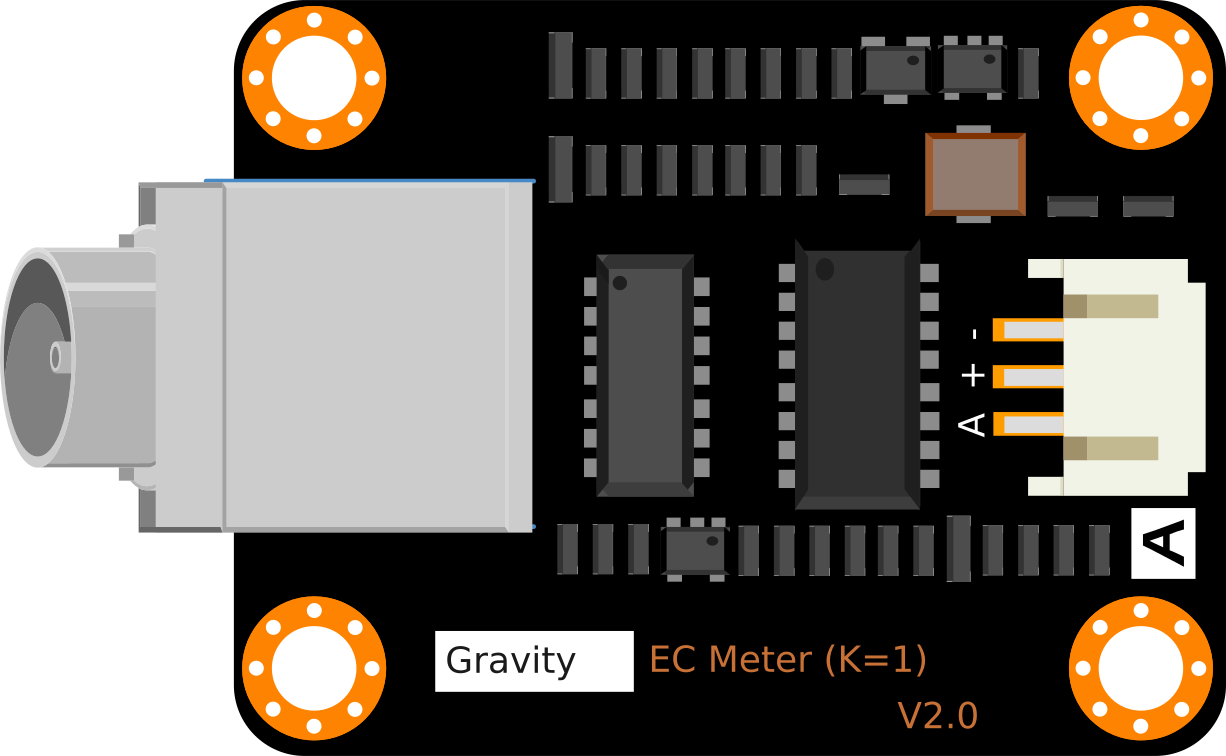
Pin Configuration and Descriptions

Pin Number Name Description
1 VCC Power supply (3.3V to 5.5V DC)
2 GND Ground connection
3 AOUT Analog output signal
4 TEMP Temperature sensor input (optional)

Usage Instructions

Integration with a Circuit

To use the DFRobot EC Sensor in a circuit:

  1. Connect the VCC pin to a power supply within the range of 3.3V to 5.5V.
  2. Attach the GND pin to the ground of the power supply.
  3. Connect the AOUT pin to an analog input on your microcontroller, such as an Arduino UNO.
  4. (Optional) Connect a temperature sensor to the TEMP pin for temperature compensation.

Best Practices

  • Always calibrate the sensor with a known EC standard solution before use.
  • Avoid placing the sensor in liquids that may cause corrosion or damage.
  • Ensure that the sensor is fully submerged in the solution for accurate readings.
  • Use shielded cables to connect the sensor to the microcontroller to minimize noise.

Example Code for Arduino UNO

// Include the necessary libraries
#include <Wire.h>

// Define the analog pin connected to the sensor
const int ecSensorPin = A0;

void setup() {
  // Begin serial communication at 9600 baud rate
  Serial.begin(9600);
}

void loop() {
  // Read the value from the EC sensor
  int ecValue = analogRead(ecSensorPin);
  
  // Convert the analog reading to EC value (example conversion, needs calibration)
  float ec = ecValue * (5.0 / 1023.0) / 100.0; // Convert to voltage and then to EC
  
  // Print the EC value to the Serial Monitor
  Serial.print("EC: ");
  Serial.print(ec);
  Serial.println("ms/cm");
  
  // Wait for a second before reading again
  delay(1000);
}

Troubleshooting and FAQs

Common Issues

  • Inaccurate Readings: Ensure the sensor is calibrated correctly with a standard solution. Check for any signs of corrosion or buildup on the sensor probes.
  • No Output Signal: Verify that the sensor is properly powered and that all connections are secure. Check the analog pin for correct configuration.
  • Temperature Fluctuations: If the temperature of the solution changes significantly, it can affect the EC readings. Use the TEMP pin to connect a temperature sensor for compensation.

FAQs

Q: Can the sensor be used in saltwater? A: The sensor is designed for freshwater applications. Using it in saltwater may lead to corrosion and damage.

Q: How often should the sensor be calibrated? A: Calibration frequency depends on usage, but it is generally recommended to calibrate the sensor before each critical measurement session.

Q: Is the sensor waterproof? A: The probe part of the sensor is waterproof, but the electronic components and connections are not. Care should be taken to only submerge the probe.

Q: What is the purpose of the TEMP pin? A: The TEMP pin allows for the connection of a temperature sensor. Temperature compensation is important for accurate EC measurements, as EC levels can vary with temperature.

For further assistance, please contact DFRobot technical support.