Cirkit Designer Logo
Cirkit Designer
Your all-in-one circuit design IDE
Home / 
Component Documentation

How to Use Proto_Pedal: Examples, Pinouts, and Specs

Image of Proto_Pedal
Cirkit Designer LogoDesign with Proto_Pedal in Cirkit Designer

Introduction

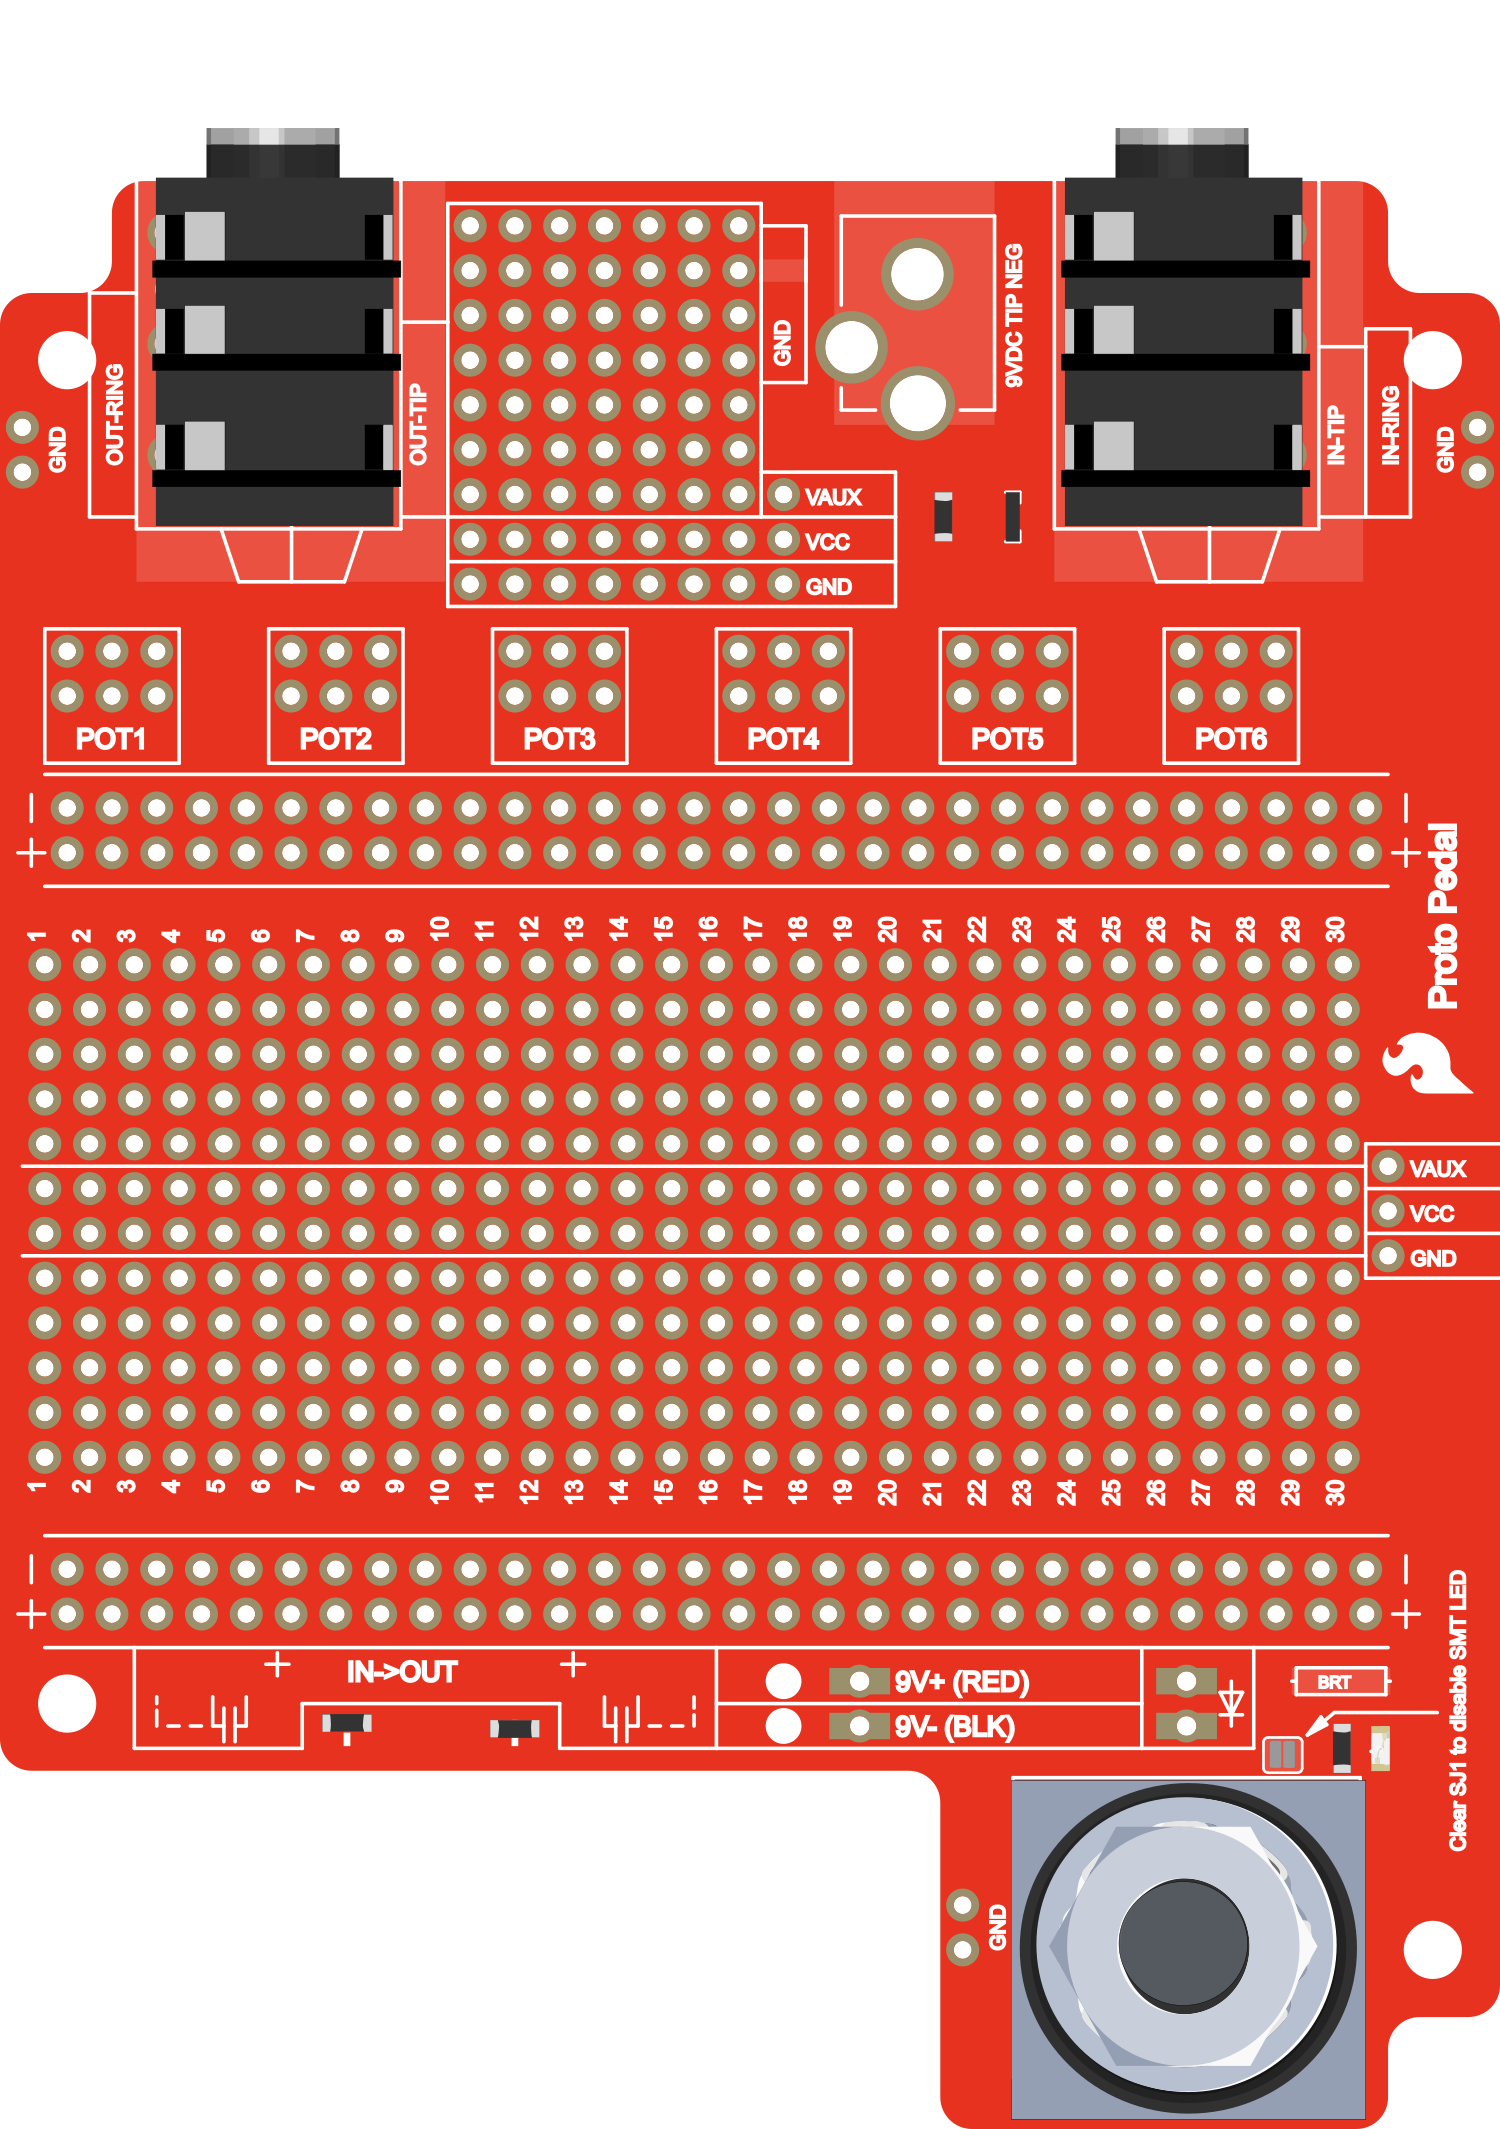
The Proto_Pedal is an innovative development platform tailored for the creation and experimentation of guitar effects pedals. This versatile tool allows both hobbyists and professional engineers to prototype various pedal circuits with ease. The Proto_Pedal's design is optimized for flexibility, enabling users to swap out components and test different configurations without the need for permanent soldering or complex setups.

Explore Projects Built with Proto_Pedal

Use Cirkit Designer to design, explore, and prototype these projects online. Some projects support real-time simulation. Click "Open Project" to start designing instantly!
Arduino Leonardo-Based Gaming Steering Wheel with Pedals and Gear Shifter
Image of DIY Steering Wheel: A project utilizing Proto_Pedal in a practical application
This circuit is a gaming steering wheel system with 3 pedals and a gear shifter, interfaced with an Arduino Leonardo. It includes a 600 PPR optical rotary encoder for steering, three potentiometers for pedal input, and multiple push buttons connected via an IO expander for gear shifting and additional controls. The Arduino processes inputs from these components and communicates the data for further processing or display.
Cirkit Designer LogoOpen Project in Cirkit Designer
Semi-Autonomous GPS-Navigated Wheelchair with Obstacle Avoidance and Joystick Control
Image of Copy of Copy of Copy of wheelchair : A project utilizing Proto_Pedal in a practical application
This circuit is designed for a semi-autonomous wheelchair addon that uses two 24V DC motors for propulsion, controlled by a Cytron motor driver. It features three HC-SR04 ultrasonic sensors for obstacle detection, a GPS module for navigation, and an analog thumbstick for manual control. The system is managed by an Arduino Mega 2560, which processes sensor inputs, controls motor outputs, and interfaces with an LCD display for user feedback, a buzzer for alerts, and a set of push buttons for additional input commands.
Cirkit Designer LogoOpen Project in Cirkit Designer
Arduino UNO Traffic Light System with Pedestrian Crossing
Image of feux de circulation: A project utilizing Proto_Pedal in a practical application
This circuit is a traffic light system with pedestrian crossing functionality controlled by an Arduino UNO. It uses three LEDs (red, yellow, green) for car traffic and two LEDs (red, green) for pedestrian traffic, with a pushbutton to request pedestrian crossing. The Arduino code manages the traffic light sequence and pedestrian crossing based on the button input.
Cirkit Designer LogoOpen Project in Cirkit Designer
Arduino Nano-Based Tractor Brake and Clutch Control System with BTS7960 Motor Drivers
Image of IDP Project: A project utilizing Proto_Pedal in a practical application
This circuit is designed to control the brake and clutch systems of a tractor using force-sensing resistors (FSRs) and potentiometers to measure input forces and positions. An Arduino Nano processes these inputs and drives linear actuators via BTS7960 motor drivers to assist in pedal operation when the force exceeds a set threshold.
Cirkit Designer LogoOpen Project in Cirkit Designer

Explore Projects Built with Proto_Pedal

Use Cirkit Designer to design, explore, and prototype these projects online. Some projects support real-time simulation. Click "Open Project" to start designing instantly!
Image of DIY Steering Wheel: A project utilizing Proto_Pedal in a practical application
Arduino Leonardo-Based Gaming Steering Wheel with Pedals and Gear Shifter
This circuit is a gaming steering wheel system with 3 pedals and a gear shifter, interfaced with an Arduino Leonardo. It includes a 600 PPR optical rotary encoder for steering, three potentiometers for pedal input, and multiple push buttons connected via an IO expander for gear shifting and additional controls. The Arduino processes inputs from these components and communicates the data for further processing or display.
Cirkit Designer LogoOpen Project in Cirkit Designer
Image of Copy of Copy of Copy of wheelchair : A project utilizing Proto_Pedal in a practical application
Semi-Autonomous GPS-Navigated Wheelchair with Obstacle Avoidance and Joystick Control
This circuit is designed for a semi-autonomous wheelchair addon that uses two 24V DC motors for propulsion, controlled by a Cytron motor driver. It features three HC-SR04 ultrasonic sensors for obstacle detection, a GPS module for navigation, and an analog thumbstick for manual control. The system is managed by an Arduino Mega 2560, which processes sensor inputs, controls motor outputs, and interfaces with an LCD display for user feedback, a buzzer for alerts, and a set of push buttons for additional input commands.
Cirkit Designer LogoOpen Project in Cirkit Designer
Image of feux de circulation: A project utilizing Proto_Pedal in a practical application
Arduino UNO Traffic Light System with Pedestrian Crossing
This circuit is a traffic light system with pedestrian crossing functionality controlled by an Arduino UNO. It uses three LEDs (red, yellow, green) for car traffic and two LEDs (red, green) for pedestrian traffic, with a pushbutton to request pedestrian crossing. The Arduino code manages the traffic light sequence and pedestrian crossing based on the button input.
Cirkit Designer LogoOpen Project in Cirkit Designer
Image of IDP Project: A project utilizing Proto_Pedal in a practical application
Arduino Nano-Based Tractor Brake and Clutch Control System with BTS7960 Motor Drivers
This circuit is designed to control the brake and clutch systems of a tractor using force-sensing resistors (FSRs) and potentiometers to measure input forces and positions. An Arduino Nano processes these inputs and drives linear actuators via BTS7960 motor drivers to assist in pedal operation when the force exceeds a set threshold.
Cirkit Designer LogoOpen Project in Cirkit Designer

Common Applications and Use Cases

  • Guitar effects pedal prototyping
  • Educational tool for electronics and signal processing
  • Custom pedal design for musicians
  • Research and development for new pedal concepts

Technical Specifications

Key Technical Details

  • Operating Voltage: 9V DC
  • Current Consumption: Varies with the circuit (typically <100mA)
  • Bypass: True bypass using a 3PDT switch
  • Input Impedance: Depends on the circuit (1MΩ recommended)
  • Output Impedance: Depends on the circuit (Less than 10kΩ recommended)
  • Enclosure: Robust aluminum case suitable for stomping

Pin Configuration and Descriptions

Pin Number Description Notes
1 Input Signal Connect to guitar/output source
2 Output Signal Connect to amplifier/input sink
3 +9V Power Supply Center-negative power supply
4 Ground (0V) Common ground for the circuit
5 Bypass Switch Input Connect to 3PDT switch
6 Bypass Switch Output Connect to 3PDT switch
7 LED+ Connect to status LED anode
8 LED- Connect to status LED cathode

Usage Instructions

How to Use the Component in a Circuit

  1. Power Supply: Ensure that a 9V center-negative power supply is used to power the Proto_Pedal.
  2. Signal Connections: Connect the input signal to Pin 1 and the output signal to Pin 2.
  3. Grounding: Establish a common ground by connecting all ground points to Pin 4.
  4. Bypass Wiring: Utilize a 3PDT switch to wire the true bypass functionality, connecting the switch to Pins 5 and 6.
  5. Status LED: Connect the status LED anode to Pin 7 and the cathode to Pin 8.

Important Considerations and Best Practices

  • Always disconnect the power supply before making changes to the circuit.
  • Use shielded cables for input and output connections to minimize noise.
  • Test the circuit without the enclosure first to ensure proper functionality.
  • Keep signal paths as short as possible to reduce the risk of interference.
  • When designing your circuit, consider the power consumption to avoid overloading the power supply.

Troubleshooting and FAQs

Common Issues Users Might Face

  • No Sound: Check the power supply and connections. Ensure the bypass switch is wired correctly.
  • Excessive Noise: Verify that all connections are secure and that there are no loose components. Use shielded cables for input/output.
  • LED Not Lighting Up: Check the LED polarity and connections. Ensure that the power supply is delivering the correct voltage.

Solutions and Tips for Troubleshooting

  • Signal Cutting Out: Re-solder any suspect connections and ensure that the bypass switch is functioning properly.
  • Distorted Sound: Ensure that none of the components are damaged and that they are within their operating specifications.
  • Intermittent LED: Check the LED connections for cold solder joints and verify the current-limiting resistor value.

Example Arduino UNO Code

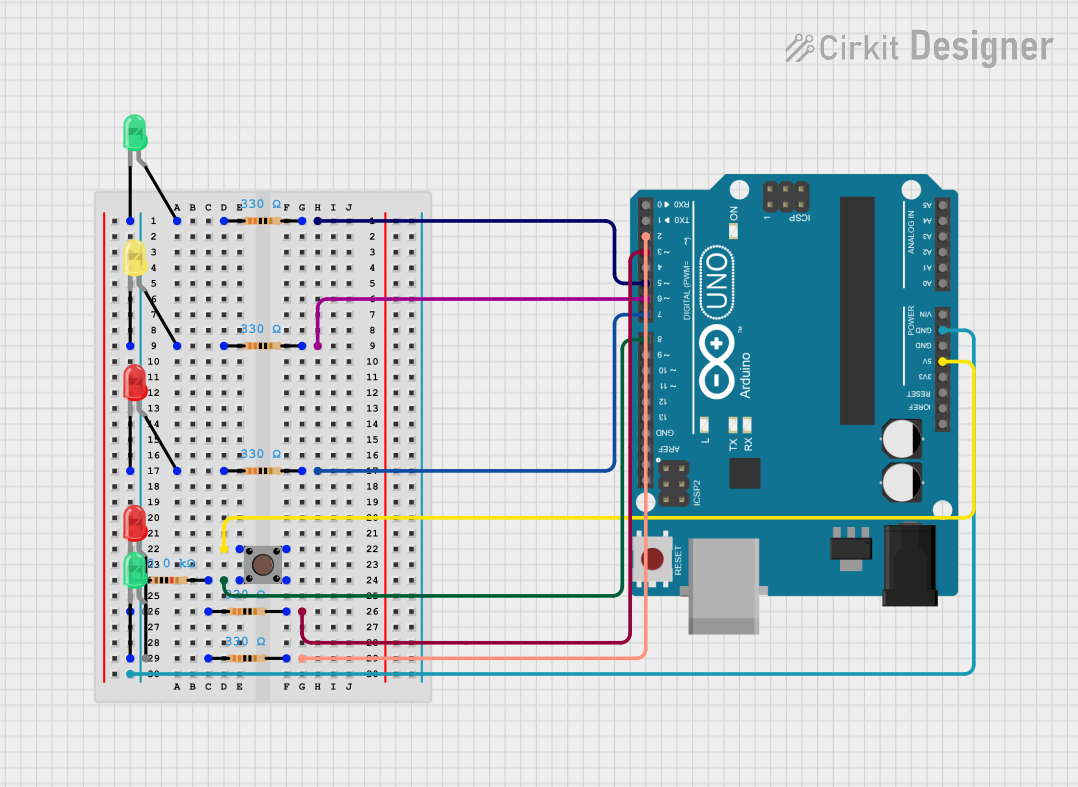
Below is an example code snippet for controlling an LED on the Proto_Pedal using an Arduino UNO. This could be used to indicate the effect's engagement status.

// Define the LED pin
const int ledPin = 13; // LED connected to digital pin 13

void setup() {
  // Initialize the digital pin as an output:
  pinMode(ledPin, OUTPUT);
}

void loop() {
  digitalWrite(ledPin, HIGH);   // Turn the LED on
  delay(1000);                  // Wait for a second
  digitalWrite(ledPin, LOW);    // Turn the LED off
  delay(1000);                  // Wait for a second
}

Remember to adjust the ledPin variable to match the digital pin connected to the Proto_Pedal's LED if it's interfaced with an Arduino UNO.

Note: This code is for illustrative purposes. The Proto_Pedal typically does not require an Arduino for standard operation as a guitar pedal, but an Arduino can be used for more advanced digital control applications.