How to Use Audio Amp SHIM: Examples, Pinouts, and Specs
Introduction
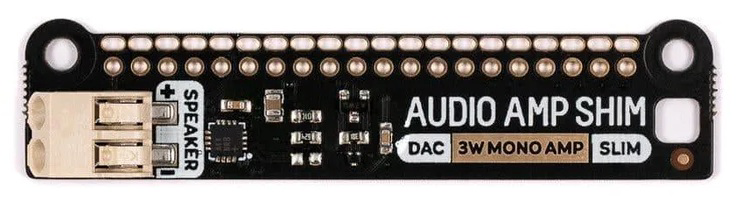
The Audio Amp SHIM is a compact audio amplifier board designed by Pimoroni, featuring the MAX98357A DAC. This component is tailored for use with the Raspberry Pi, offering high-quality sound output in a small form factor. Its SHIM (Shove Hardware in the Middle) design allows for easy integration into audio projects without taking up significant space. The Audio Amp SHIM is ideal for applications requiring amplified audio output, such as media players, smart assistants, and custom audio devices.
Explore Projects Built with Audio Amp SHIM


Explore Projects Built with Audio Amp SHIM
Common Applications
- Portable media players
- Smart home assistants
- Internet radios
- DIY audio projects
- Educational electronics projects
Technical Specifications
The Audio Amp SHIM is built around the MAX98357A DAC, a high-performance digital-to-analog converter with an integrated Class D amplifier. Below are the key technical details:
Key Specifications
| Parameter | Value |
|---|---|
| Input Voltage | 2.7V to 5.5V |
| Output Power | Up to 3.2W at 4Ω load |
| Signal-to-Noise Ratio | 98 dB |
| Supported Audio Formats | I2S (16-bit, 24-bit, and 32-bit) |
| Amplifier Type | Class D |
| Frequency Response | 20 Hz to 20 kHz |
| Dimensions | 40mm x 11mm x 2.5mm |
Pin Configuration
The Audio Amp SHIM connects to the Raspberry Pi via GPIO pins. Below is the pinout:
| Pin Name | GPIO Pin | Description |
|---|---|---|
| VIN | 5V | Power input (5V from Raspberry Pi) |
| GND | GND | Ground |
| DIN | GPIO 18 | I2S data input |
| BCLK | GPIO 19 | I2S bit clock |
| LRCLK | GPIO 21 | I2S left-right clock |
| SD_MODE | GPIO 23 | Shutdown mode (active low) |
Usage Instructions
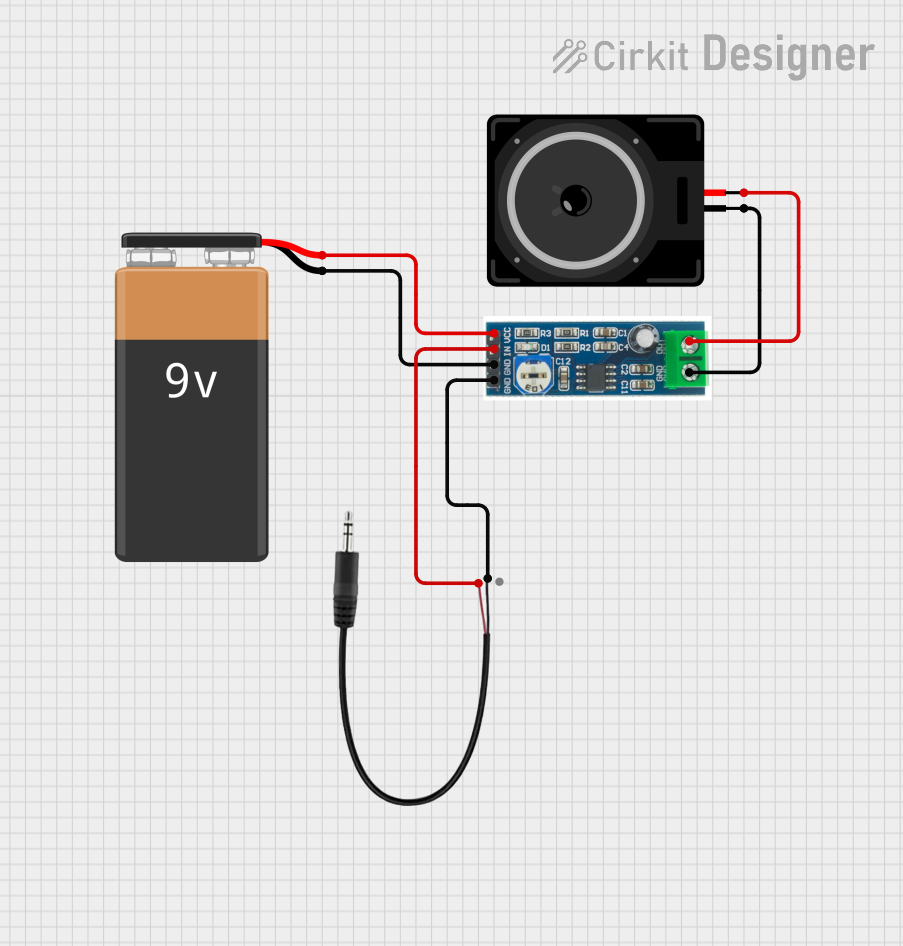
Connecting the Audio Amp SHIM
- Attach the SHIM to the Raspberry Pi GPIO header:
- Align the SHIM with the GPIO pins on the Raspberry Pi.
- Ensure the SHIM is securely seated on the pins.
- Connect a speaker:
- Attach a 4Ω or 8Ω speaker to the SHIM's output terminals.
- Ensure proper polarity (positive and negative terminals).
- Power the Raspberry Pi:
- The SHIM draws power directly from the Raspberry Pi's 5V GPIO pin.
Configuring the Raspberry Pi
- Enable I2S audio:
- Open the Raspberry Pi configuration tool:
sudo raspi-config - Navigate to
Advanced Options>Audio>I2Sand enable it.
- Open the Raspberry Pi configuration tool:
- Install required software:
- Install the necessary drivers and libraries:
sudo apt update
sudo apt install pimoroni-audio
- Install the necessary drivers and libraries:
- Test the audio output:
- Play a test audio file:
aplay /usr/share/sounds/alsa/Front_Center.wav
- Play a test audio file:
Example Code for Arduino UNO
While the Audio Amp SHIM is primarily designed for Raspberry Pi, it can also be used with an Arduino UNO for I2S audio output. Below is an example sketch:
#include <I2S.h> // Include the I2S library for audio output

void setup() {
  // Initialize I2S with 44100 Hz sample rate and 16-bit resolution
  if (!I2S.begin(I2S_PHILIPS_MODE, 44100, 16)) {
    // Print error message if I2S initialization fails
    Serial.println("Failed to initialize I2S!");
    while (1); // Halt execution
  }
}

void loop() {
  // Generate a simple sine wave for testing
  for (int i = 0; i < 360; i++) {
    float sample = sin(i * PI / 180); // Calculate sine wave value
    int16_t audioSample = (int16_t)(sample * 32767); // Scale to 16-bit range
    I2S.write(audioSample); // Send audio sample to the SHIM
  }
}
Best Practices
- Use a 4Ω or 8Ω speaker for optimal performance.
- Avoid shorting the speaker terminals to prevent damage to the amplifier.
- Ensure proper alignment of the SHIM on the GPIO header to avoid incorrect connections.
Troubleshooting and FAQs
Common Issues
No sound output:
- Ensure the SHIM is properly seated on the Raspberry Pi GPIO header.
- Verify that I2S audio is enabled in the Raspberry Pi configuration.
- Check the speaker connections for proper polarity and secure attachment.
Distorted audio:
- Ensure the speaker impedance matches the SHIM's specifications (4Ω or 8Ω).
- Verify that the audio source is not clipping or overdriving the amplifier.
SHIM overheating:
- Check for short circuits on the speaker terminals.
- Ensure the SHIM is not drawing excessive current from the Raspberry Pi.
FAQs
Q: Can I use the Audio Amp SHIM with other microcontrollers?
A: Yes, the SHIM can be used with any microcontroller that supports I2S audio output, such as Arduino or ESP32.
Q: What is the maximum speaker power supported?
A: The SHIM can deliver up to 3.2W of power to a 4Ω speaker.
Q: Can I use headphones with the Audio Amp SHIM?
A: No, the SHIM is designed for driving speakers and is not suitable for headphones.
Q: How do I disable the amplifier?
A: Pull the SD_MODE pin low to place the amplifier in shutdown mode.
By following this documentation, you can effectively integrate the Audio Amp SHIM into your audio projects and troubleshoot any issues that arise.