Cirkit Designer Logo
Cirkit Designer
Your all-in-one circuit design IDE
Home / 
Component Documentation

How to Use Terminal TRD H3Y-2: Examples, Pinouts, and Specs

Image of Terminal TRD H3Y-2
Cirkit Designer LogoDesign with Terminal TRD H3Y-2 in Cirkit Designer

Introduction

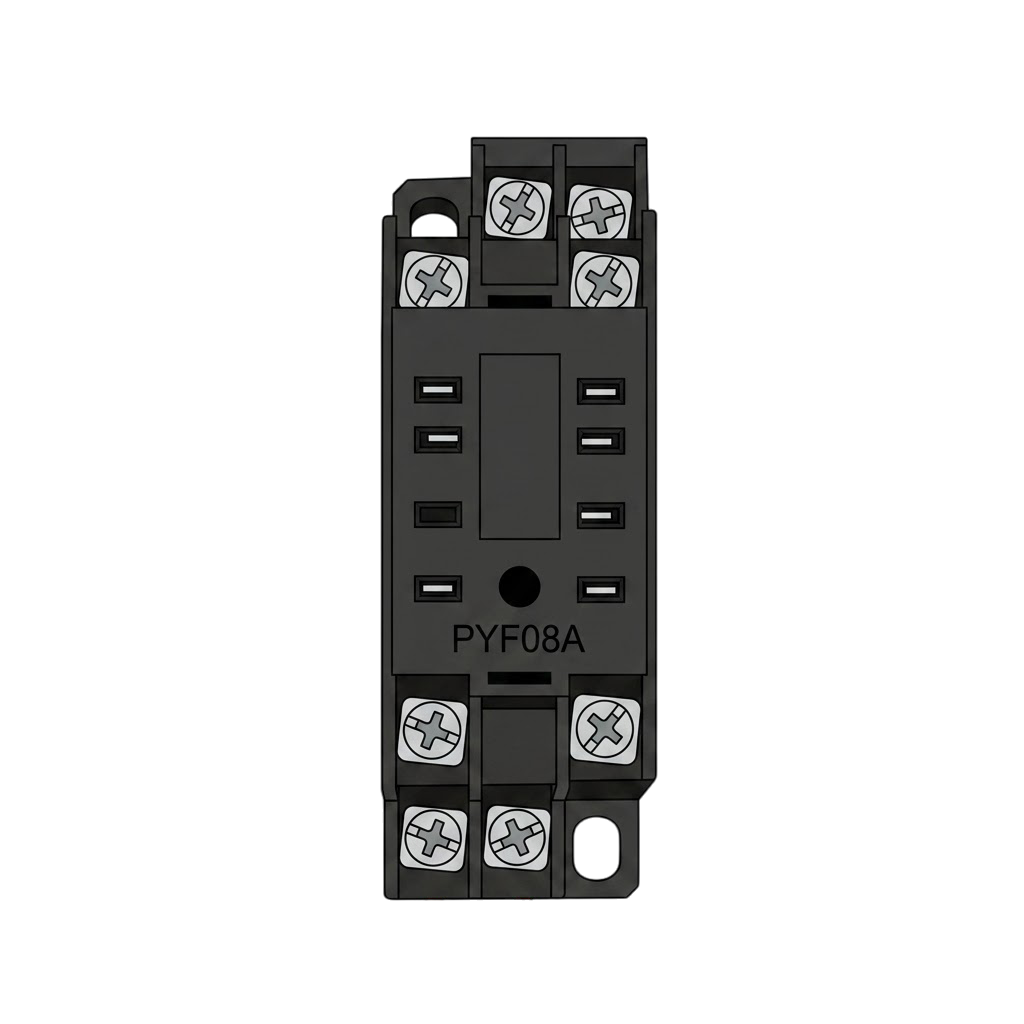
The Terminal TRD H3Y-2, manufactured by REKINSA-ITERA (Part ID: rayzestudio), is a terminal block designed for easy and secure connections in electrical circuits. It is commonly used for connecting wires to a circuit board or other components, ensuring reliable and efficient electrical connections. This terminal block is ideal for applications requiring frequent wiring changes or maintenance, such as industrial control systems, automation equipment, and power distribution panels.

Explore Projects Built with Terminal TRD H3Y-2

Use Cirkit Designer to design, explore, and prototype these projects online. Some projects support real-time simulation. Click "Open Project" to start designing instantly!
Battery-Powered Line Following Robot with IR Sensors and Cytron URC10 Motor Controller
Image of URC10 SUMO AUTO: A project utilizing Terminal TRD H3Y-2 in a practical application
This circuit is a robotic control system that uses multiple IR sensors for line detection and obstacle avoidance, powered by a 3S LiPo battery. The Cytron URC10 motor driver, controlled by a microcontroller, drives two GM25 DC motors based on input from the sensors and a rocker switch, with a 7-segment panel voltmeter displaying the battery voltage.
Cirkit Designer LogoOpen Project in Cirkit Designer
Arduino Nano-Powered PID Line Following Robot with Reflectance Sensor Array and Dual Motor Driver
Image of Line following bot: A project utilizing Terminal TRD H3Y-2 in a practical application
This circuit is designed for an advanced line-following robot that uses a QTRX-HD-07RC Reflectance Sensor Array for line sensing and a Motor Driver 1A Dual TB6612FNG to control two DC Mini Metal Gear Motors. The Arduino Nano serves as the microcontroller, running a PID control algorithm to adjust the motor speeds for precise tracking. Power is supplied by a 5V battery for the logic and a 12V battery for the motor driver.
Cirkit Designer LogoOpen Project in Cirkit Designer
ESP32-Based Wi-Fi Controlled Robotic Car with OLED Display and Laser Shooting
Image of 123: A project utilizing Terminal TRD H3Y-2 in a practical application
This circuit is a remote-controlled shooting game system using an ESP32 microcontroller, which interfaces with a PS3 controller to control two DC motors via a TB6612FNG motor driver, and a laser for shooting. The system includes an OLED display for game status, a photocell for detecting laser hits, and a piezo buzzer for sound feedback.
Cirkit Designer LogoOpen Project in Cirkit Designer
Battery-Powered LED and Buzzer Control Circuit Using BC547 Transistors
Image of Water level Indicator : A project utilizing Terminal TRD H3Y-2 in a practical application
This circuit is a multi-indicator system powered by a 9V battery, utilizing three BC547 transistors to control three LEDs (red, green, and yellow) and a buzzer. Each transistor is configured to switch its respective LED and the buzzer on and off, likely based on external signals connected via alligator clips.
Cirkit Designer LogoOpen Project in Cirkit Designer

Explore Projects Built with Terminal TRD H3Y-2

Use Cirkit Designer to design, explore, and prototype these projects online. Some projects support real-time simulation. Click "Open Project" to start designing instantly!
Image of URC10 SUMO AUTO: A project utilizing Terminal TRD H3Y-2 in a practical application
Battery-Powered Line Following Robot with IR Sensors and Cytron URC10 Motor Controller
This circuit is a robotic control system that uses multiple IR sensors for line detection and obstacle avoidance, powered by a 3S LiPo battery. The Cytron URC10 motor driver, controlled by a microcontroller, drives two GM25 DC motors based on input from the sensors and a rocker switch, with a 7-segment panel voltmeter displaying the battery voltage.
Cirkit Designer LogoOpen Project in Cirkit Designer
Image of Line following bot: A project utilizing Terminal TRD H3Y-2 in a practical application
Arduino Nano-Powered PID Line Following Robot with Reflectance Sensor Array and Dual Motor Driver
This circuit is designed for an advanced line-following robot that uses a QTRX-HD-07RC Reflectance Sensor Array for line sensing and a Motor Driver 1A Dual TB6612FNG to control two DC Mini Metal Gear Motors. The Arduino Nano serves as the microcontroller, running a PID control algorithm to adjust the motor speeds for precise tracking. Power is supplied by a 5V battery for the logic and a 12V battery for the motor driver.
Cirkit Designer LogoOpen Project in Cirkit Designer
Image of 123: A project utilizing Terminal TRD H3Y-2 in a practical application
ESP32-Based Wi-Fi Controlled Robotic Car with OLED Display and Laser Shooting
This circuit is a remote-controlled shooting game system using an ESP32 microcontroller, which interfaces with a PS3 controller to control two DC motors via a TB6612FNG motor driver, and a laser for shooting. The system includes an OLED display for game status, a photocell for detecting laser hits, and a piezo buzzer for sound feedback.
Cirkit Designer LogoOpen Project in Cirkit Designer
Image of Water level Indicator : A project utilizing Terminal TRD H3Y-2 in a practical application
Battery-Powered LED and Buzzer Control Circuit Using BC547 Transistors
This circuit is a multi-indicator system powered by a 9V battery, utilizing three BC547 transistors to control three LEDs (red, green, and yellow) and a buzzer. Each transistor is configured to switch its respective LED and the buzzer on and off, likely based on external signals connected via alligator clips.
Cirkit Designer LogoOpen Project in Cirkit Designer

Common Applications:

  • Industrial control systems
  • Automation equipment
  • Power distribution panels
  • Electrical testing and prototyping
  • Circuit board connections

Technical Specifications

Key Technical Details:

Parameter Value
Manufacturer REKINSA-ITERA
Part ID rayzestudio
Rated Voltage 250V AC/DC
Rated Current 10A
Insulation Resistance ≥ 1000 MΩ
Contact Resistance ≤ 20 mΩ
Operating Temperature -40°C to +85°C
Wire Size Compatibility 22-14 AWG
Mounting Type PCB Mount
Terminal Material Brass with nickel plating
Insulation Material Polyamide (PA66), UL94-V0

Pin Configuration and Descriptions:

The Terminal TRD H3Y-2 features a simple two-pin configuration for secure wire connections. Below is the pin description:

Pin Number Description
1 Input terminal for wire 1
2 Input terminal for wire 2

Usage Instructions

How to Use the Terminal TRD H3Y-2 in a Circuit:

  1. Mounting the Terminal Block:

    • Solder the terminal block onto the PCB using the provided mounting pins.
    • Ensure the solder joints are clean and secure to avoid loose connections.
  2. Connecting Wires:

    • Strip the insulation from the wire ends (approximately 5-7 mm).
    • Insert the stripped wire ends into the terminal openings.
    • Tighten the screws on the terminal block to secure the wires in place.
  3. Testing the Connection:

    • Use a multimeter to verify continuity between the connected wires.
    • Ensure there is no short circuit or loose connection.

Important Considerations and Best Practices:

  • Wire Compatibility: Ensure the wire gauge (22-14 AWG) matches the terminal block's specifications.
  • Tightening Torque: Do not overtighten the screws, as this may damage the terminal or the wire.
  • Environmental Conditions: Avoid exposing the terminal block to extreme temperatures or moisture beyond its rated limits.
  • Safety Precautions: Always disconnect power before making or modifying connections.

Example: Connecting to an Arduino UNO

The Terminal TRD H3Y-2 can be used to connect external components (e.g., sensors, motors) to an Arduino UNO. Below is an example of wiring and code for controlling an LED:

Circuit Setup:

  1. Connect one terminal of the TRD H3Y-2 to the Arduino's digital pin (e.g., D13).
  2. Connect the other terminal to the LED's positive leg.
  3. Connect the LED's negative leg to a resistor (220Ω) and then to the Arduino's GND.

Arduino Code:

// Define the pin connected to the terminal block
const int ledPin = 13;

void setup() {
  // Set the pin as an output
  pinMode(ledPin, OUTPUT);
}

void loop() {
  // Turn the LED on
  digitalWrite(ledPin, HIGH);
  delay(1000); // Wait for 1 second
  
  // Turn the LED off
  digitalWrite(ledPin, LOW);
  delay(1000); // Wait for 1 second
}

Troubleshooting and FAQs

Common Issues and Solutions:

  1. Loose Connections:

    • Issue: The wires are not securely connected, causing intermittent operation.
    • Solution: Ensure the wires are properly stripped and the screws are tightened securely.
  2. Overheating:

    • Issue: The terminal block becomes hot during operation.
    • Solution: Check if the current exceeds the rated 10A. Use wires with appropriate gauge.
  3. Corrosion or Oxidation:

    • Issue: The terminal contacts show signs of corrosion.
    • Solution: Use terminals in a dry environment or apply a protective coating to the contacts.
  4. Wire Slippage:

    • Issue: Wires slip out of the terminal block.
    • Solution: Verify that the screws are tightened to the correct torque and the wire gauge is compatible.

FAQs:

Q1: Can the Terminal TRD H3Y-2 handle AC and DC currents?
A1: Yes, it is rated for both AC and DC currents up to 250V.

Q2: Is the terminal block reusable?
A2: Yes, the terminal block can be reused multiple times as long as it is not physically damaged.

Q3: Can I use this terminal block for high-frequency signals?
A3: While it is primarily designed for power connections, it can handle low-frequency signals. For high-frequency applications, consider using specialized connectors.

Q4: What tools are required for installation?
A4: A screwdriver (flathead or Phillips, depending on the terminal design) and a wire stripper are typically required.

By following this documentation, users can effectively integrate the Terminal TRD H3Y-2 into their projects for secure and reliable electrical connections.