How to Use Programmable LED Strip: Examples, Pinouts, and Specs

Introduction
A Programmable LED Strip is a flexible strip of LEDs that can be individually controlled to display a wide range of colors and patterns. These strips are commonly used for decorative lighting, ambient effects, signage, and artistic installations. They are popular in DIY projects, gaming setups, architectural lighting, and even wearable technology due to their versatility and ease of use.
Programmable LED Strips typically use addressable LEDs, such as WS2812B or APA102, which allow each LED to be controlled independently. This enables dynamic effects like color gradients, animations, and custom patterns.
Explore Projects Built with Programmable LED Strip


Explore Projects Built with Programmable LED Strip
Technical Specifications
Below are the general technical specifications for a typical Programmable LED Strip. Note that specific models may vary slightly.
General Specifications
- Operating Voltage: 5V DC (common for WS2812B) or 12V DC (for some other models)
- Current Consumption: ~60mA per LED at full brightness (RGB white)
- LED Type: Addressable RGB LEDs (e.g., WS2812B, APA102)
- Communication Protocol: One-wire (WS2812B) or SPI (APA102)
- LED Density: 30, 60, or 144 LEDs per meter
- Strip Length: Typically sold in 1m, 2m, or 5m rolls
- Waterproofing: Available in non-waterproof, IP65 (silicone coating), or IP67 (silicone tube)
Pin Configuration
The pinout for a typical Programmable LED Strip (e.g., WS2812B) is as follows:
| Pin Name | Description |
|---|---|
| VCC | Power supply input (5V or 12V DC) |
| GND | Ground connection |
| DIN | Data input for controlling the LEDs |
| DOUT | Data output for chaining strips |
For strips with SPI-based LEDs (e.g., APA102), the pinout includes an additional clock pin:
| Pin Name | Description |
|---|---|
| VCC | Power supply input (5V or 12V DC) |
| GND | Ground connection |
| DIN | Data input for controlling the LEDs |
| CLK | Clock input for data synchronization |
Usage Instructions
How to Use the Component in a Circuit
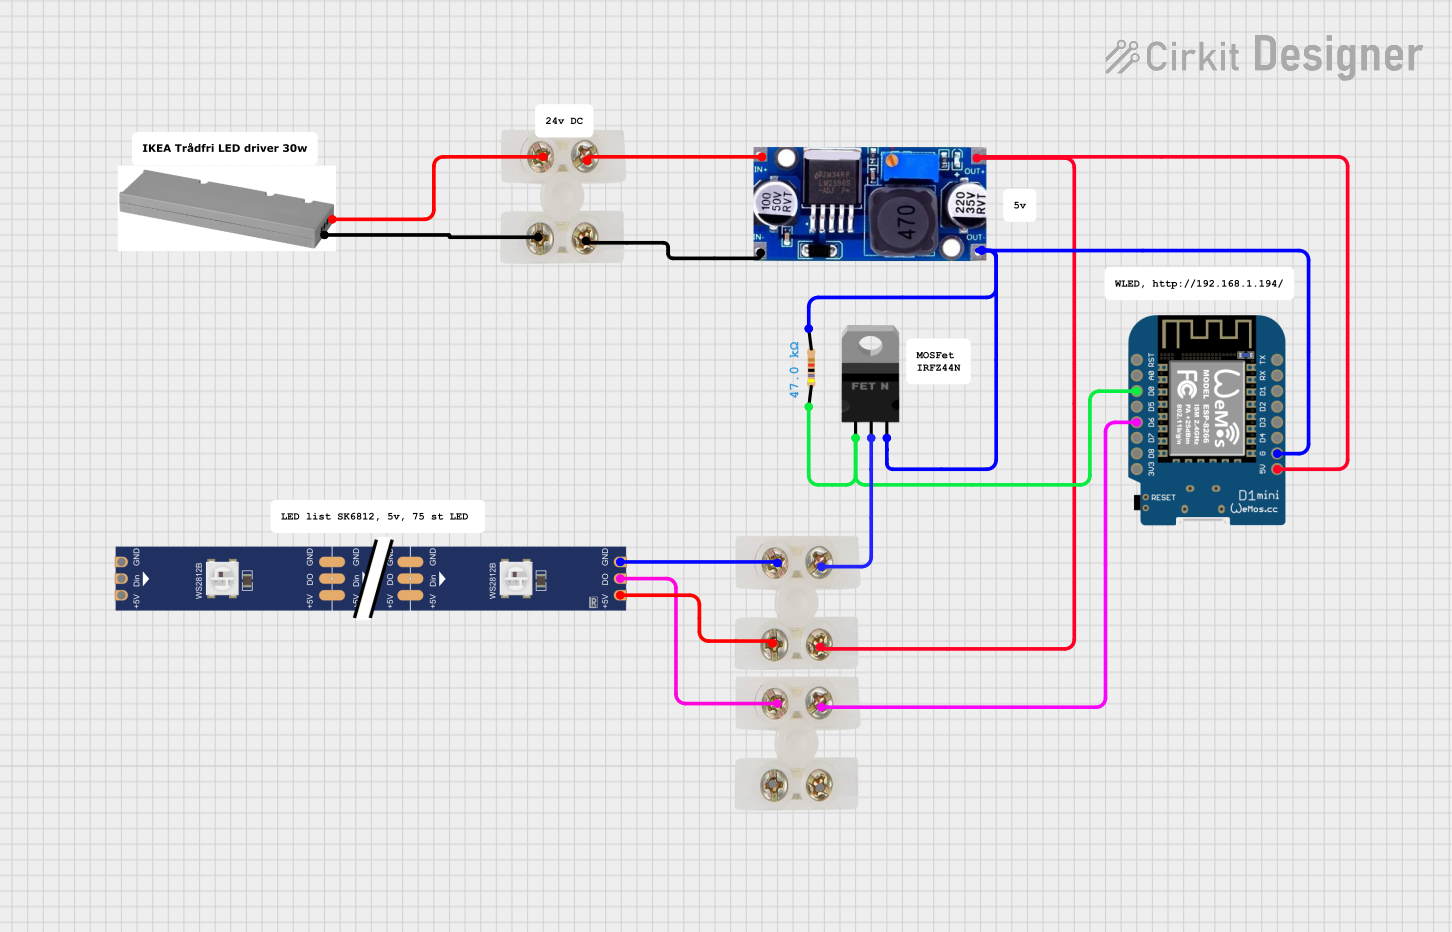
- Power Supply: Ensure you have a power supply that matches the voltage rating of your LED strip (e.g., 5V or 12V). The power supply must provide sufficient current for the number of LEDs in your strip. For example, a 1-meter strip with 60 LEDs at full brightness may require up to 3.6A (60mA × 60 LEDs).
- Connections:
- Connect the VCC pin of the strip to the positive terminal of the power supply.
- Connect the GND pin to the ground terminal of the power supply and the ground of your microcontroller.
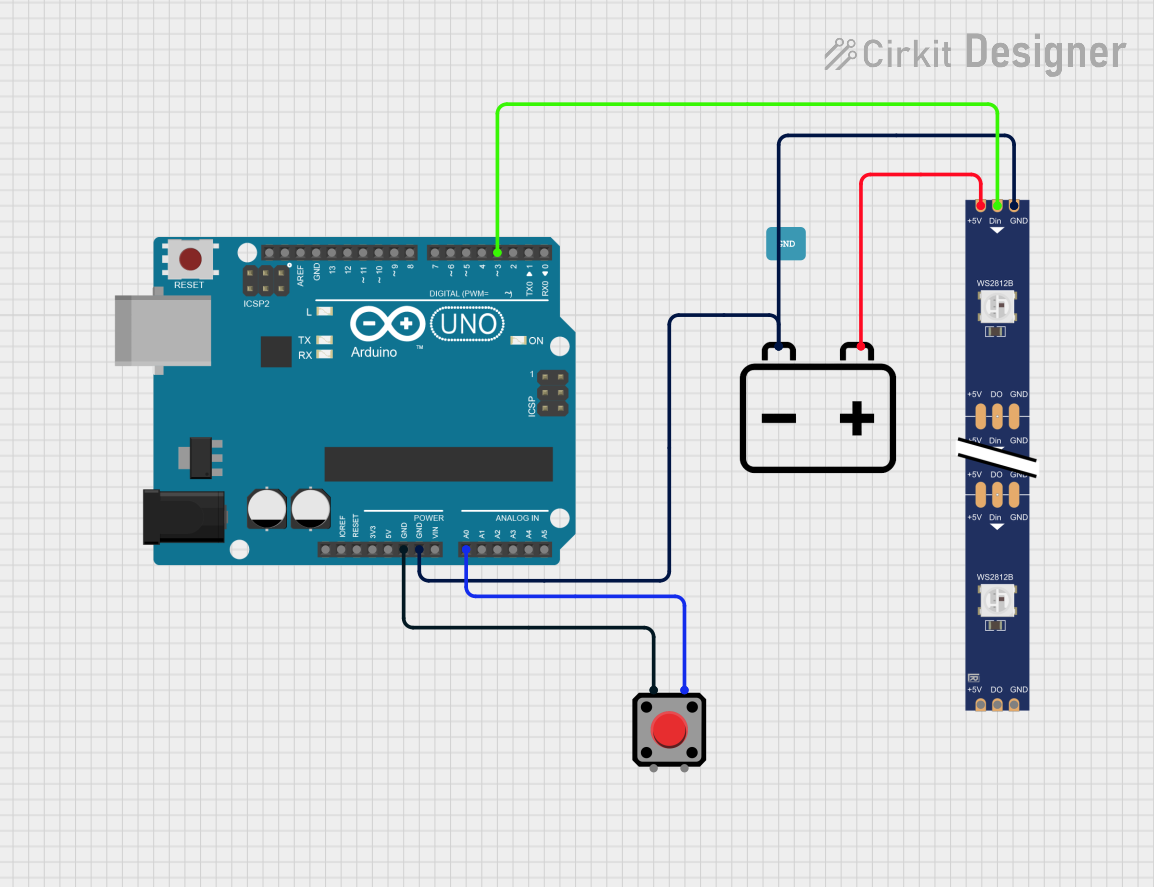
- Connect the DIN pin to the data output pin of your microcontroller (e.g., Arduino).
- Data Signal: Use a microcontroller (e.g., Arduino UNO) to send data signals to the strip. A resistor (330–470 ohms) is often placed between the microcontroller's data pin and the strip's DIN pin to protect the LEDs.
- Capacitor: Place a 1000µF capacitor across the VCC and GND pins near the strip to stabilize the power supply.
Arduino Example Code
Below is an example of how to control a WS2812B-based Programmable LED Strip using an Arduino UNO and the Adafruit NeoPixel library.
#include <Adafruit_NeoPixel.h>

// Define the pin connected to the LED strip
#define LED_PIN 6

// Define the number of LEDs in the strip
#define NUM_LEDS 60

// Create a NeoPixel object
Adafruit_NeoPixel strip = Adafruit_NeoPixel(NUM_LEDS, LED_PIN, NEO_GRB + NEO_KHZ800);

void setup() {
  strip.begin();  // Initialize the LED strip
  strip.show();   // Turn off all LEDs initially
}

void loop() {
  // Example: Display a rainbow animation
  rainbowCycle(20);  // Call the rainbowCycle function with a delay of 20ms
}

// Function to display a rainbow animation
void rainbowCycle(uint8_t wait) {
  uint16_t i, j;

  for (j = 0; j < 256 * 5; j++) {  // 5 cycles of all colors on the wheel
    for (i = 0; i < strip.numPixels(); i++) {
      strip.setPixelColor(i, Wheel(((i * 256 / strip.numPixels()) + j) & 255));
    }
    strip.show();  // Update the strip with new colors
    delay(wait);   // Wait for the specified delay
  }
}

// Helper function to generate rainbow colors
uint32_t Wheel(byte WheelPos) {
  WheelPos = 255 - WheelPos;
  if (WheelPos < 85) {
    return strip.Color(255 - WheelPos * 3, 0, WheelPos * 3);
  } else if (WheelPos < 170) {
    WheelPos -= 85;
    return strip.Color(0, WheelPos * 3, 255 - WheelPos * 3);
  } else {
    WheelPos -= 170;
    return strip.Color(WheelPos * 3, 255 - WheelPos * 3, 0);
  }
}
Important Considerations and Best Practices
- Power Injection: For long strips (e.g., >1 meter), inject power at multiple points to prevent voltage drop and uneven brightness.
- Heat Management: Avoid running the LEDs at full brightness for extended periods to prevent overheating.
- Signal Integrity: Use short data wires or add a level shifter if the microcontroller operates at 3.3V logic while the strip requires 5V logic.
- Chaining Strips: Connect the DOUT pin of one strip to the DIN pin of the next strip to chain multiple strips.
Troubleshooting and FAQs
Common Issues and Solutions
LEDs Not Lighting Up:
- Check the power supply voltage and current rating.
- Verify all connections, especially the DIN pin.
- Ensure the microcontroller is programmed correctly and the data pin matches the code.
Flickering or Incorrect Colors:
- Add a 330–470 ohm resistor between the microcontroller's data pin and the strip's DIN pin.
- Use a capacitor (1000µF) across the VCC and GND pins to stabilize the power supply.
- Check for loose or poor connections.
Voltage Drop:
- Inject power at multiple points along the strip.
- Use thicker wires for power and ground connections.
Microcontroller Compatibility:
- Ensure the microcontroller supports the required communication protocol (e.g., one-wire or SPI).
- Use a logic level shifter if the microcontroller operates at 3.3V and the strip requires 5V logic.
FAQs
Can I cut the LED strip? Yes, Programmable LED Strips can be cut at designated points (usually marked with a scissor icon). Ensure you reconnect the VCC, GND, and DIN pins properly if needed.
How many LEDs can I control with an Arduino? The number of LEDs depends on the available memory of your microcontroller. For an Arduino UNO, you can typically control up to ~500 LEDs.
Can I power the strip directly from the Arduino? No, the Arduino cannot supply enough current for the LEDs. Always use an external power supply.
Are these strips waterproof? Some models are waterproof (IP65 or IP67). Check the product specifications before use in wet environments.