Cirkit Designer Logo
Cirkit Designer
Your all-in-one circuit design IDE
Home / 
Component Documentation

How to Use Adafruit LED Sequin - Emerald Green: Examples, Pinouts, and Specs

Image of Adafruit LED Sequin - Emerald Green
Cirkit Designer LogoDesign with Adafruit LED Sequin - Emerald Green in Cirkit Designer

Introduction

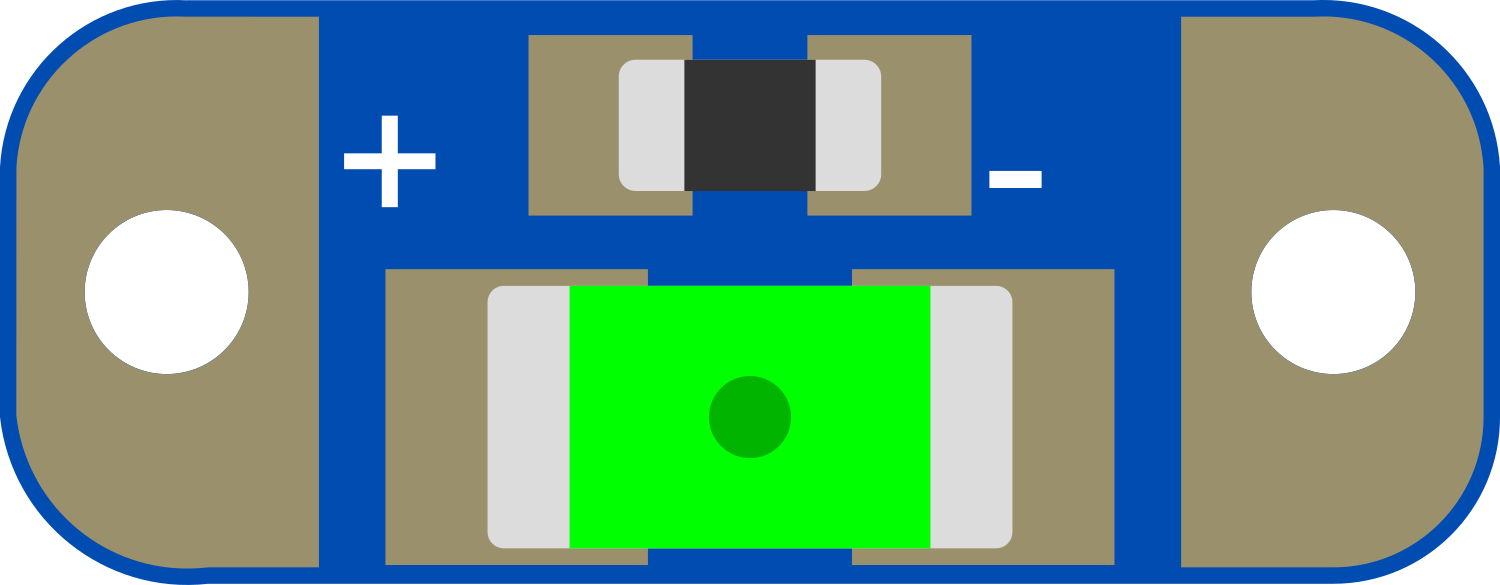
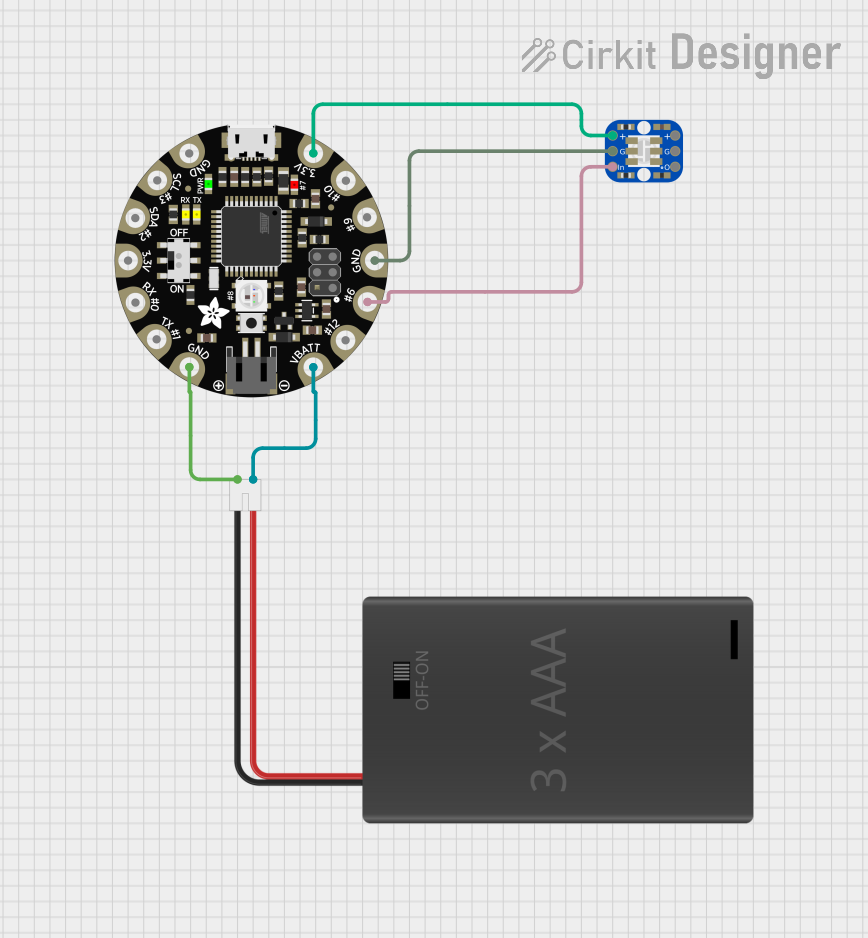
The Adafruit LED Sequin in Emerald Green is a compact, surface-mount LED module designed to add a touch of light to your electronic projects. These tiny LEDs are perfect for creating wearable electronics, adding visual indicators to your projects, or simply providing decorative lighting with a vibrant emerald green hue. Their small size and easy-to-use design make them suitable for hobbyists and professionals alike.

Explore Projects Built with Adafruit LED Sequin - Emerald Green

Use Cirkit Designer to design, explore, and prototype these projects online. Some projects support real-time simulation. Click "Open Project" to start designing instantly!
Arduino Nano Controlled Sound and Light Effects System with NeoPixel LEDs
Image of Proton Pack: A project utilizing Adafruit LED Sequin - Emerald Green in a practical application
This circuit features an Arduino Nano microcontroller connected to a series of WS2812B LEDs, Adafruit NeoPixel Jewels, and Sticks, forming an addressable LED array. The Arduino controls the LED patterns and sequences, and interfaces with an Adafruit Audio FX Mini Sound Board for audio playback, which is amplified by an Adafruit PAM8302 amplifier connected to piezo speakers. The circuit includes toggle and push switches for user interaction, and uses a lipo battery with MP1584EN power regulators for power management. The embedded code on the Arduino facilitates complex lighting effects and sound playback, responding to switch states and button presses to create an interactive experience.
Cirkit Designer LogoOpen Project in Cirkit Designer
Arduino UNO Ultrasonic Distance Sensor with LED Indicator
Image of Mini LED Light Test: A project utilizing Adafruit LED Sequin - Emerald Green in a practical application
This circuit uses an Arduino UNO to control an HC-SR04 ultrasonic sensor and an Adafruit LED Sequin. The Arduino measures the distance to an object using the ultrasonic sensor and adjusts the brightness of the LED based on the measured distance.
Cirkit Designer LogoOpen Project in Cirkit Designer
Arduino UNO Controlled NeoPixel Ring Light Show
Image of 6 Ring Series: A project utilizing Adafruit LED Sequin - Emerald Green in a practical application
This circuit consists of an Arduino UNO microcontroller connected to six Adafruit 12 NeoPixel Rings, each with 12 LEDs, for a total of 72 LEDs. The Arduino controls the LEDs to display a yellow color with varying brightness, creating a pulsating effect.
Cirkit Designer LogoOpen Project in Cirkit Designer
Battery-Powered Adafruit Flora RGB NeoPixel Light Show
Image of FloraTest: A project utilizing Adafruit LED Sequin - Emerald Green in a practical application
This circuit consists of an Adafruit Flora v3 microcontroller connected to a Breadboard-friendly RGB Smart NeoPixel and powered by a 3xAAA battery pack. The microcontroller runs code to control the NeoPixel, displaying various colors and patterns.
Cirkit Designer LogoOpen Project in Cirkit Designer

Explore Projects Built with Adafruit LED Sequin - Emerald Green

Use Cirkit Designer to design, explore, and prototype these projects online. Some projects support real-time simulation. Click "Open Project" to start designing instantly!
Image of Proton Pack: A project utilizing Adafruit LED Sequin - Emerald Green in a practical application
Arduino Nano Controlled Sound and Light Effects System with NeoPixel LEDs
This circuit features an Arduino Nano microcontroller connected to a series of WS2812B LEDs, Adafruit NeoPixel Jewels, and Sticks, forming an addressable LED array. The Arduino controls the LED patterns and sequences, and interfaces with an Adafruit Audio FX Mini Sound Board for audio playback, which is amplified by an Adafruit PAM8302 amplifier connected to piezo speakers. The circuit includes toggle and push switches for user interaction, and uses a lipo battery with MP1584EN power regulators for power management. The embedded code on the Arduino facilitates complex lighting effects and sound playback, responding to switch states and button presses to create an interactive experience.
Cirkit Designer LogoOpen Project in Cirkit Designer
Image of Mini LED Light Test: A project utilizing Adafruit LED Sequin - Emerald Green in a practical application
Arduino UNO Ultrasonic Distance Sensor with LED Indicator
This circuit uses an Arduino UNO to control an HC-SR04 ultrasonic sensor and an Adafruit LED Sequin. The Arduino measures the distance to an object using the ultrasonic sensor and adjusts the brightness of the LED based on the measured distance.
Cirkit Designer LogoOpen Project in Cirkit Designer
Image of 6 Ring Series: A project utilizing Adafruit LED Sequin - Emerald Green in a practical application
Arduino UNO Controlled NeoPixel Ring Light Show
This circuit consists of an Arduino UNO microcontroller connected to six Adafruit 12 NeoPixel Rings, each with 12 LEDs, for a total of 72 LEDs. The Arduino controls the LEDs to display a yellow color with varying brightness, creating a pulsating effect.
Cirkit Designer LogoOpen Project in Cirkit Designer
Image of FloraTest: A project utilizing Adafruit LED Sequin - Emerald Green in a practical application
Battery-Powered Adafruit Flora RGB NeoPixel Light Show
This circuit consists of an Adafruit Flora v3 microcontroller connected to a Breadboard-friendly RGB Smart NeoPixel and powered by a 3xAAA battery pack. The microcontroller runs code to control the NeoPixel, displaying various colors and patterns.
Cirkit Designer LogoOpen Project in Cirkit Designer

Common Applications and Use Cases

  • Wearable electronics (e.g., costumes, fashion accessories)
  • Decorative lighting for models and miniatures
  • Visual indicators for user interfaces or status displays
  • Educational projects to teach basic electronics and soldering

Technical Specifications

Key Technical Details

  • Color: Emerald Green
  • Operating Voltage: 3.0V - 3.6V
  • Current: 5mA (typical)
  • Brightness: 500 mcd (typical)
  • Viewing Angle: 120 degrees

Pin Configuration and Descriptions

Pin Number Name Description
1 + Anode (positive side)
2 - Cathode (negative side)

Usage Instructions

How to Use the Component in a Circuit

  1. Power Supply: Ensure that your power supply is within the operating voltage range of 3.0V to 3.6V. Exceeding this voltage can damage the LED.

  2. Current Limiting Resistor: Always use a current-limiting resistor in series with the LED to prevent it from drawing too much current. A resistor value of 150Ω to 220Ω is typically used when powered by a 3.3V source.

  3. Soldering: The LED sequin has small pads for soldering to your circuit. Use a fine-tip soldering iron and be careful not to overheat the LED.

  4. Polarity: Pay attention to the polarity of the LED. The '+' pad should be connected to the positive side of the power supply, and the '-' pad to the negative side or ground.

Important Considerations and Best Practices

  • Avoid reverse polarity as it can permanently damage the LED.
  • Do not exceed the maximum current rating of 5mA.
  • When sewing the LED Sequin into wearable projects, ensure that conductive threads do not short-circuit.
  • Test the LED with a multimeter before installation to confirm functionality.

Example Circuit with Arduino UNO

// Define the pin connected to the LED Sequin
const int ledPin = 9; // PWM pin for brightness control

void setup() {
  pinMode(ledPin, OUTPUT); // Set the LED pin as an output
}

void loop() {
  analogWrite(ledPin, 127); // Set brightness to approximately 50%
  delay(1000);              // Wait for 1 second
  analogWrite(ledPin, 255); // Set brightness to 100%
  delay(1000);              // Wait for 1 second
}

Note: When connecting the LED Sequin to an Arduino, ensure you use a current-limiting resistor and that the Arduino's output does not exceed the LED's maximum voltage.

Troubleshooting and FAQs

Common Issues

  • LED Not Lighting Up: Check the polarity of the connections and ensure the power supply is within the specified voltage range.
  • LED Too Dim: Confirm that the current-limiting resistor is not too high and that the power supply voltage is adequate.
  • LED Burnt Out: This can happen if the LED was subjected to reverse polarity or if the voltage/current exceeded the specifications.

Solutions and Tips for Troubleshooting

  • Always double-check the polarity before powering up the LED.
  • Use a multimeter to verify the voltage across the LED and the current through the circuit.
  • If the LED is not working, replace it and recheck the circuit for any potential issues.

FAQs

Q: Can I chain multiple LED Sequins together? A: Yes, you can chain them in parallel, ensuring each LED has its own current-limiting resistor.

Q: How do I attach the LED Sequin to fabric? A: You can sew the LED Sequin onto fabric using conductive thread, but ensure there are no short circuits.

Q: Are these LEDs washable? A: The LED Sequins are not designed to be washed. If they are part of a wearable project, remove the electronics before washing the fabric.

For further assistance or questions, please contact Adafruit customer support or refer to the community forums.