How to Use Labjack T7: Examples, Pinouts, and Specs
Introduction
The LabJack T7 is a versatile and high-performance data acquisition (DAQ) device designed for measuring and controlling a wide range of signals. Manufactured by LabJack, the T7 supports multiple analog and digital input/output channels, making it suitable for a variety of applications. It features USB and Ethernet connectivity, providing flexibility for integration into laboratory, industrial, and automation systems. The T7 is widely used for data logging, signal monitoring, and process control.
Explore Projects Built with Labjack T7


Explore Projects Built with Labjack T7
Common Applications and Use Cases
- Laboratory experiments requiring precise data acquisition
- Industrial automation and process control
- Environmental monitoring and data logging
- Signal conditioning and analysis
- Prototyping and testing of electronic circuits
Technical Specifications
Key Technical Details
| Parameter | Specification |
|---|---|
| Manufacturer | LabJack |
| Model | T7 |
| Part ID | DB25/DB37 |
| Analog Input Channels | 14 (12-bit or 16-bit resolution) |
| Analog Output Channels | 2 (12-bit resolution) |
| Digital I/O Channels | 23 |
| Communication Interfaces | USB 2.0, Ethernet |
| Input Voltage Range | ±10 V (configurable) |
| Sampling Rate | Up to 100 kS/s (depending on mode) |
| Operating Voltage | 5 V (via USB) or external power |
| Operating Temperature | -40°C to 85°C |
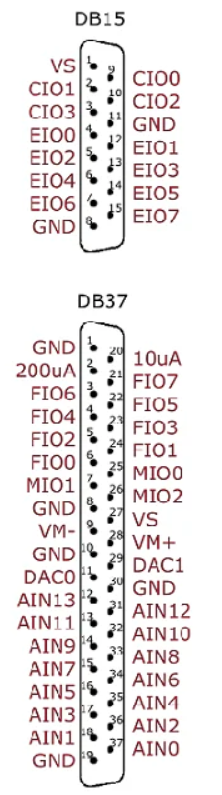
Pin Configuration and Descriptions
The LabJack T7 uses DB25 and DB37 connectors for interfacing with external devices. Below is the pin configuration for the DB37 connector:
| Pin Number | Signal Name | Description |
|---|---|---|
| 1 | GND | Ground |
| 2 | AIN0 | Analog Input Channel 0 |
| 3 | AIN1 | Analog Input Channel 1 |
| 4 | DAC0 | Analog Output Channel 0 |
| 5 | DAC1 | Analog Output Channel 1 |
| 6 | FIO0 | Flexible Digital I/O Channel 0 |
| 7 | FIO1 | Flexible Digital I/O Channel 1 |
| 8 | FIO2 | Flexible Digital I/O Channel 2 |
| 9 | FIO3 | Flexible Digital I/O Channel 3 |
| 10 | EIO0 | Extended Digital I/O Channel 0 |
| 11 | EIO1 | Extended Digital I/O Channel 1 |
| 12 | GND | Ground |
| ... | ... | ... (Refer to the full datasheet) |
For a complete pinout, refer to the LabJack T7 user manual.
Usage Instructions
How to Use the LabJack T7 in a Circuit
Powering the Device:
- Connect the T7 to a computer via USB for power and communication. Alternatively, use an external power supply if required.
Connecting Signals:
- Use the DB25 or DB37 connectors to interface with analog and digital signals. Ensure proper grounding to avoid noise or damage.
Configuring the Device:
- Install the LabJack software (LJControlPanel) on your computer to configure the T7. This software allows you to set input ranges, sampling rates, and other parameters.
Programming the Device:
- The T7 can be controlled using various programming languages, including Python, C++, and LabVIEW. LabJack provides libraries and APIs for easy integration.
Important Considerations and Best Practices
- Signal Conditioning: Use appropriate signal conditioning (e.g., voltage dividers, filters) to ensure signals are within the T7's input range.
- Grounding: Proper grounding is critical to avoid noise and ensure accurate measurements.
- Overvoltage Protection: Avoid applying voltages beyond the specified range to prevent damage to the device.
- Firmware Updates: Regularly check for firmware updates to ensure optimal performance and compatibility.
Example: Using the LabJack T7 with Arduino UNO
The LabJack T7 can be used alongside an Arduino UNO for advanced data acquisition. Below is an example of reading an analog signal from the T7 using Python:
Import the LabJack library
import u3
Initialize the LabJack T7 device
device = u3.U3() # Replace with u6.U6() or ue9.UE9() for other models
Configure the analog input channel (e.g., AIN0)
Set the range to ±10V
device.configAnalog(0)
Read the analog input value from AIN0
analog_value = device.getAIN(0)
Print the analog value
print(f"Analog Input Value (AIN0): {analog_value:.3f} V")
Close the device connection
device.close()
**Note**: Install the `LabJackPython` library to run the above code. Use `pip install LabJackPython` to install it.
Troubleshooting and FAQs
Common Issues and Solutions
Device Not Detected:
- Ensure the USB cable is securely connected.
- Verify that the LabJack drivers are installed correctly.
- Try a different USB port or cable.
Incorrect Measurements:
- Check the input signal range and ensure it matches the T7's configuration.
- Verify proper grounding and shielding of the signal wires.
- Use signal conditioning if necessary.
Communication Errors:
- Ensure the correct IP address is used for Ethernet communication.
- Check for firewall or network restrictions.
- Update the firmware and software to the latest versions.
FAQs
Q: Can the T7 be powered via Ethernet (PoE)?
A: No, the T7 does not support Power over Ethernet (PoE). Use USB or an external power supply.
Q: What is the maximum sampling rate of the T7?
A: The T7 supports a maximum sampling rate of 100 kS/s in stream mode, depending on the configuration.
Q: Is the T7 compatible with Raspberry Pi?
A: Yes, the T7 can be used with Raspberry Pi via USB or Ethernet. Use the LabJack Python library for integration.
For additional support, refer to the LabJack T7 user manual or contact LabJack technical support.