How to Use Arduino Nicla Vision: Examples, Pinouts, and Specs
Introduction
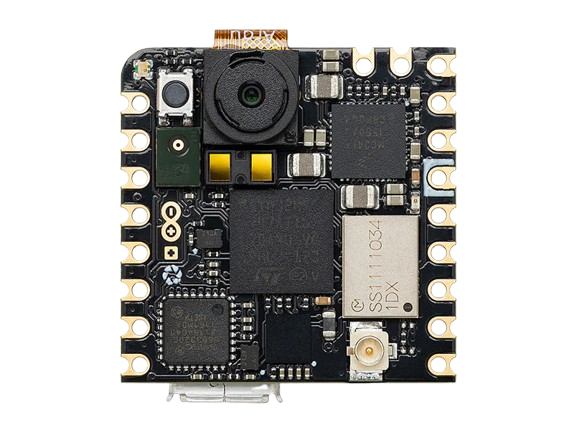
The Arduino Nicla Vision is a compact and powerful microcontroller board designed specifically for vision-based applications. It features an integrated camera, machine learning capabilities, and a range of connectivity options, making it ideal for IoT projects, edge computing, and AI-powered vision tasks. With its small form factor and robust processing power, the Nicla Vision is perfect for applications such as object detection, facial recognition, and environmental monitoring.
Explore Projects Built with Arduino Nicla Vision

Explore Projects Built with Arduino Nicla Vision
Common Applications and Use Cases
- Object detection and tracking
- Facial recognition and gesture control
- Smart home automation
- Industrial monitoring and quality control
- Environmental sensing and data collection
- IoT edge computing with AI/ML integration
Technical Specifications
The Arduino Nicla Vision is equipped with advanced hardware to support demanding vision and AI applications. Below are its key technical specifications:
| Specification | Details |
|---|---|
| Microcontroller | STM32H747AII6 (Dual ARM Cortex-M7 @ 480 MHz + Cortex-M4 @ 240 MHz) |
| Camera | 2 MP RGB camera (OV5640) |
| Memory | 8 MB SDRAM, 16 MB NOR Flash |
| Connectivity | Wi-Fi (802.11 b/g/n), Bluetooth® Low Energy (BLE) 4.2 |
| Sensors | 6-axis IMU (accelerometer + gyroscope), microphone |
| Power Supply | 3.7V Li-Po battery or USB-C (5V) |
| Operating Voltage | 3.3V |
| Dimensions | 22.86 mm x 22.86 mm |
| Weight | 5 g |
| Operating Temperature | -40°C to 85°C |
Pin Configuration and Descriptions
The Nicla Vision features a 16-pin connector for interfacing with external components. Below is the pinout description:
| Pin | Name | Type | Description |
|---|---|---|---|
| 1 | VIN | Power Input | Input voltage (3.7V Li-Po or 5V USB-C) |
| 2 | GND | Ground | Ground connection |
| 3 | SDA | I2C Data | I2C data line for communication |
| 4 | SCL | I2C Clock | I2C clock line for communication |
| 5 | TX | UART TX | UART transmit line |
| 6 | RX | UART RX | UART receive line |
| 7 | GPIO1 | Digital I/O | General-purpose input/output |
| 8 | GPIO2 | Digital I/O | General-purpose input/output |
| 9 | PWM1 | PWM Output | Pulse-width modulation output |
| 10 | PWM2 | PWM Output | Pulse-width modulation output |
| 11 | SPI_MOSI | SPI Data Out | SPI master-out, slave-in |
| 12 | SPI_MISO | SPI Data In | SPI master-in, slave-out |
| 13 | SPI_SCK | SPI Clock | SPI clock line |
| 14 | SPI_CS | SPI Chip Select | SPI chip select |
| 15 | ADC1 | Analog Input | Analog-to-digital converter input |
| 16 | ADC2 | Analog Input | Analog-to-digital converter input |
Usage Instructions
How to Use the Nicla Vision in a Circuit
- Powering the Board:
- Connect a 3.7V Li-Po battery to the VIN and GND pins, or power the board via USB-C (5V).
- Connecting Peripherals:
- Use the I2C, UART, or SPI pins to interface with external sensors or modules.
- Programming the Board:
- The Nicla Vision can be programmed using the Arduino IDE or OpenMV IDE. Install the necessary board support package (BSP) from the Arduino Boards Manager.
- Deploying Machine Learning Models:
- Train your model using TensorFlow Lite or Edge Impulse, then upload it to the board for real-time inference.
Important Considerations and Best Practices
- Ensure the board is powered within the specified voltage range to avoid damage.
- Use a stable power source for consistent performance, especially during camera operation.
- When deploying machine learning models, optimize them for the board's memory and processing capabilities.
- Avoid exposing the board to extreme temperatures or moisture to maintain reliability.
Example: Using Nicla Vision with Arduino UNO
The Nicla Vision can communicate with an Arduino UNO via I2C. Below is an example code snippet to read data from the Nicla Vision:
#include <Wire.h> // Include the Wire library for I2C communication

#define NICLA_I2C_ADDRESS 0x3C // Replace with the actual I2C address of Nicla Vision

void setup() {
  Wire.begin(); // Initialize I2C communication
  Serial.begin(9600); // Start serial communication for debugging
  Serial.println("Initializing Nicla Vision...");
}

void loop() {
  Wire.beginTransmission(NICLA_I2C_ADDRESS); // Start communication with Nicla Vision
  Wire.write(0x01); // Example command to request data (replace with actual command)
  Wire.endTransmission();

  delay(10); // Wait for the response

  Wire.requestFrom(NICLA_I2C_ADDRESS, 10); // Request 10 bytes of data
  while (Wire.available()) {
    char c = Wire.read(); // Read each byte
    Serial.print(c); // Print the received data
  }
  Serial.println();

  delay(1000); // Wait 1 second before the next request
}
Troubleshooting and FAQs
Common Issues and Solutions
The board does not power on:
- Ensure the power source is connected properly and provides the correct voltage (3.7V or 5V).
- Check for loose connections or damaged cables.
Unable to upload code:
- Verify that the correct board and port are selected in the Arduino IDE.
- Ensure the Nicla Vision is in bootloader mode by double-pressing the reset button.
Camera not working:
- Confirm that the camera is not obstructed or damaged.
- Check the software configuration to ensure the camera is initialized correctly.
I2C communication issues:
- Verify the I2C address of the Nicla Vision and ensure it matches the code.
- Use pull-up resistors on the SDA and SCL lines if necessary.
FAQs
Q: Can I use the Nicla Vision without an external microcontroller?
A: Yes, the Nicla Vision is a standalone board with its own microcontroller and can operate independently.
Q: What IDEs are compatible with the Nicla Vision?
A: The Nicla Vision is compatible with the Arduino IDE and OpenMV IDE for programming and development.
Q: Can I connect the Nicla Vision to the cloud?
A: Yes, the board supports Wi-Fi and BLE, enabling cloud connectivity for IoT applications.
Q: How do I update the firmware?
A: Use the Arduino IDE or the Arduino CLI to update the firmware. Ensure the board is connected via USB-C and in bootloader mode.