
How to Use Terminal Strip 2x6: Examples, Pinouts, and Specs
 Design with Terminal Strip 2x6 in Cirkit Designer
Introduction
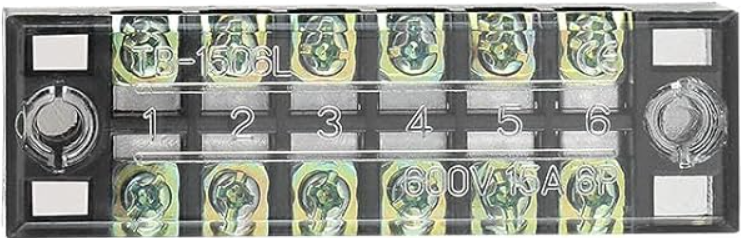
The Terminal Strip 2x6 is a versatile and reliable component designed for organizing and connecting multiple wires in a circuit. It features 2 rows and 6 columns of connection points, providing a total of 12 terminals for efficient wire management. This component is commonly used in electrical and electronic projects to simplify wiring, ensure secure connections, and facilitate troubleshooting.
Explore Projects Built with Terminal Strip 2x6
 Open Project in Cirkit Designer
 Open Project in Cirkit Designer
 Open Project in Cirkit Designer
 Open Project in Cirkit Designer
Explore Projects Built with Terminal Strip 2x6
Open Project in Cirkit DesignerOpen Project in Cirkit DesignerOpen Project in Cirkit DesignerOpen Project in Cirkit DesignerCommon Applications and Use Cases
- Prototyping and testing circuits: Easily connect and disconnect wires during development.
- Industrial control panels: Organize wiring for clean and efficient layouts.
- Home automation systems: Manage connections for sensors, actuators, and controllers.
- Audio and speaker systems: Distribute signals to multiple devices.
- Power distribution: Connect multiple devices to a single power source.
Technical Specifications
The following table outlines the key technical details of the Terminal Strip 2x6:
| Specification | Details |
|---|---|
| Number of Terminals | 12 (2 rows x 6 columns) |
| Rated Voltage | Up to 300V AC/DC |
| Rated Current | Up to 15A |
| Material | Insulating base: Polycarbonate (PC) |
| Terminal contacts: Nickel-plated brass | |
| Wire Size Compatibility | 22 AWG to 12 AWG |
| Mounting Type | Screw-mount or adhesive backing |
| Operating Temperature | -40°C to 105°C |
| Dimensions | 60mm x 20mm x 15mm (L x W x H) |
Pin Configuration and Descriptions
The Terminal Strip 2x6 does not have traditional "pins" like an IC but instead features screw terminals for wire connections. Each terminal is paired with a corresponding terminal in the opposite row, allowing for easy bridging or distribution of signals and power.
| Terminal Pair | Description |
|---|---|
| 1A, 1B | First pair of terminals for wire connections |
| 2A, 2B | Second pair of terminals |
| 3A, 3B | Third pair of terminals |
| 4A, 4B | Fourth pair of terminals |
| 5A, 5B | Fifth pair of terminals |
| 6A, 6B | Sixth pair of terminals |
Usage Instructions
How to Use the Terminal Strip 2x6 in a Circuit
Prepare the wires:
- Strip approximately 5-7mm of insulation from the ends of the wires you want to connect.
- Ensure the exposed wire is clean and free of frayed strands.
Insert the wires:
- Loosen the screw on the desired terminal using a screwdriver.
- Insert the stripped end of the wire into the terminal opening.
- Tighten the screw securely to clamp the wire in place.
Connect additional wires:
- Repeat the process for other wires, ensuring proper organization and avoiding short circuits.
Optional bridging:
- To connect terminals in the same row, use a jumper wire or a pre-made terminal bridge.
Mount the terminal strip:
- Secure the terminal strip to a surface using screws or adhesive backing, if applicable.
Important Considerations and Best Practices
- Avoid over-tightening screws: Excessive force can damage the terminal or strip the screw threads.
- Use appropriate wire sizes: Ensure the wire gauge is within the specified range (22 AWG to 12 AWG).
- Label connections: For complex circuits, label wires and terminals to simplify troubleshooting.
- Check for loose connections: Periodically inspect and tighten screws to maintain reliable connections.
- Avoid exceeding ratings: Do not exceed the voltage or current ratings to prevent overheating or damage.
Example: Connecting to an Arduino UNO
The Terminal Strip 2x6 can be used to organize connections between an Arduino UNO and external components. For example, you can connect multiple sensors and actuators to the Arduino using the terminal strip.
// Example: Connecting an LED and a button to an Arduino UNO using a Terminal Strip 2x6

const int ledPin = 13;  // Pin connected to the LED via the terminal strip
const int buttonPin = 7; // Pin connected to the button via the terminal strip

void setup() {
  pinMode(ledPin, OUTPUT);  // Set the LED pin as an output
  pinMode(buttonPin, INPUT_PULLUP); // Set the button pin as an input with pull-up
}

void loop() {
  int buttonState = digitalRead(buttonPin); // Read the button state

  if (buttonState == LOW) {
    // If the button is pressed, turn on the LED
    digitalWrite(ledPin, HIGH);
  } else {
    // If the button is not pressed, turn off the LED
    digitalWrite(ledPin, LOW);
  }
}
Troubleshooting and FAQs
Common Issues and Solutions
Loose connections:
- Issue: Wires are not securely clamped, leading to intermittent connections.
- Solution: Ensure screws are tightened properly without over-tightening.
Short circuits:
- Issue: Adjacent terminals are accidentally bridged.
- Solution: Double-check wiring and use insulation or spacers if necessary.
Overheating:
- Issue: The terminal strip becomes hot during operation.
- Solution: Verify that the current and voltage do not exceed the rated limits.
Wire slipping out:
- Issue: Wires come loose from the terminals.
- Solution: Strip the wire to the correct length and ensure the screw is tightened securely.
FAQs
Q: Can I use the Terminal Strip 2x6 for AC and DC circuits?
- A: Yes, the terminal strip is suitable for both AC and DC circuits, provided the voltage and current ratings are not exceeded.
Q: Can I cut the terminal strip to a smaller size?
- A: Yes, the terminal strip can be cut to the desired size using appropriate tools, but ensure the cut edges are smooth and safe to handle.
Q: Is the terminal strip reusable?
- A: Yes, the terminal strip can be reused multiple times as long as it is not physically damaged.
Q: Can I use stranded wires with the terminal strip?
- A: Yes, stranded wires are compatible, but it is recommended to use ferrules for a more secure connection.
This documentation provides all the necessary details to effectively use the Terminal Strip 2x6 in your projects.