Cirkit Designer Logo
Cirkit Designer
Your all-in-one circuit design IDE
Home / 
Component Documentation

How to Use Keyestudio KS0064 - Matrix LED 8x8 I2C (HT16K33): Examples, Pinouts, and Specs

Image of Keyestudio KS0064 - Matrix LED 8x8 I2C (HT16K33)
Cirkit Designer LogoDesign with Keyestudio KS0064 - Matrix LED 8x8 I2C (HT16K33) in Cirkit Designer

Introduction

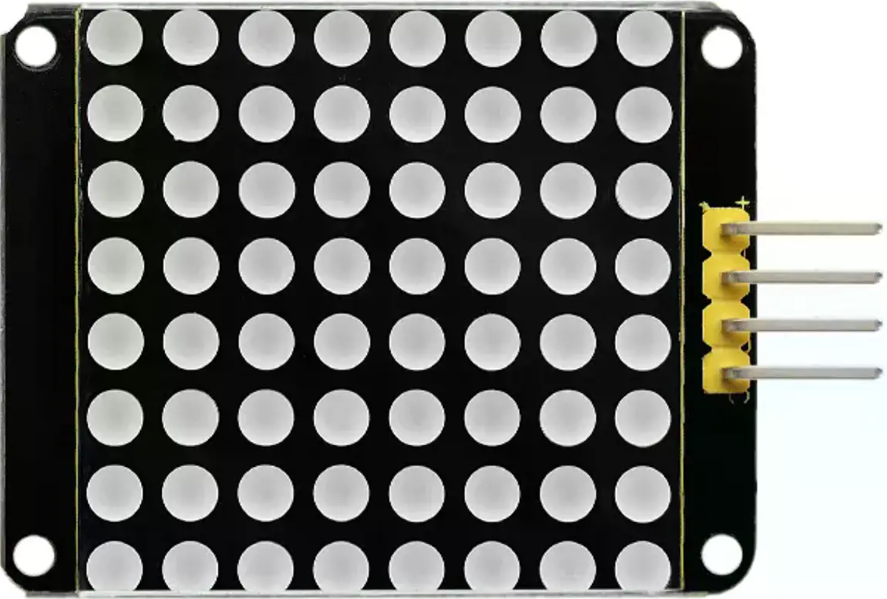
The Keyestudio KS0064 is an 8x8 LED matrix display module powered by the HT16K33 driver chip. This module communicates via the I2C protocol, making it easy to integrate into microcontroller-based projects. It allows users to control individual LEDs to display patterns, text, and simple graphics. The compact design and efficient communication make it ideal for applications such as digital clocks, scrolling text displays, and visual indicators.

Explore Projects Built with Keyestudio KS0064 - Matrix LED 8x8 I2C (HT16K33)

Use Cirkit Designer to design, explore, and prototype these projects online. Some projects support real-time simulation. Click "Open Project" to start designing instantly!
Arduino UNO Controlled Interactive Display with Joystick and Buzzer Feedback
Image of joystick: A project utilizing Keyestudio KS0064 - Matrix LED 8x8 I2C (HT16K33) in a practical application
This circuit features an Arduino UNO microcontroller connected to an 8x8 LED matrix, an LCD display with I2C interface, a KY-023 Dual Axis Joystick Module, and a Piezo Buzzer. The Arduino controls the LED matrix via digital pins and provides an interface for the joystick's analog inputs and button press. The LCD display is used for output, and the buzzer is driven by a digital pin for audio feedback.
Cirkit Designer LogoOpen Project in Cirkit Designer
Arduino UNO Controlled LED Matrix and LCD Interface with Joystick Interaction
Image of Digital Game Circuit: A project utilizing Keyestudio KS0064 - Matrix LED 8x8 I2C (HT16K33) in a practical application
This circuit features an Arduino UNO microcontroller interfaced with an 8x8 LED matrix, an LCD screen, and a KY-023 Dual Axis Joystick Module. The Arduino controls the LED matrix via digital pins D10-D12 and powers the matrix, LCD, and joystick module from its 5V output. The joystick's analog outputs are connected to the Arduino's analog inputs A0 and A1 for position sensing, while the LCD is controlled through digital pins D2-D6 and D13 for display purposes.
Cirkit Designer LogoOpen Project in Cirkit Designer
Arduino Mega 2560-Based Smart Home Control System with LCD Display and Flame Sensor
Image of Copy of schoolproject (1): A project utilizing Keyestudio KS0064 - Matrix LED 8x8 I2C (HT16K33) in a practical application
This circuit is a multi-functional embedded system featuring an Arduino Mega 2560 microcontroller that interfaces with a 4x4 membrane keypad, a 20x4 I2C LCD, an 8x8 LED matrix, a DS3231 RTC module, a passive buzzer, and a KY-026 flame sensor. The system is powered by a 5V PSU and is designed to provide real-time clock functionality, user input via the keypad, visual output on the LCD and LED matrix, and flame detection with an audible alert.
Cirkit Designer LogoOpen Project in Cirkit Designer
ESP32-Based Smart Weather Station with LED Display and Multiple Sensors
Image of Copy of Zegarek (1): A project utilizing Keyestudio KS0064 - Matrix LED 8x8 I2C (HT16K33) in a practical application
This circuit is a sensor and display system powered by an ESP32 microcontroller. It integrates multiple sensors (BH1750 light sensor, BMP280 pressure sensor, DS3231 RTC, and DS18B20 temperature sensor) and drives a series of MAX7219 8x8 LED matrices for visual output. The ESP32 communicates with the sensors via I2C and controls the LED matrices to display data.
Cirkit Designer LogoOpen Project in Cirkit Designer

Explore Projects Built with Keyestudio KS0064 - Matrix LED 8x8 I2C (HT16K33)

Use Cirkit Designer to design, explore, and prototype these projects online. Some projects support real-time simulation. Click "Open Project" to start designing instantly!
Image of joystick: A project utilizing Keyestudio KS0064 - Matrix LED 8x8 I2C (HT16K33) in a practical application
Arduino UNO Controlled Interactive Display with Joystick and Buzzer Feedback
This circuit features an Arduino UNO microcontroller connected to an 8x8 LED matrix, an LCD display with I2C interface, a KY-023 Dual Axis Joystick Module, and a Piezo Buzzer. The Arduino controls the LED matrix via digital pins and provides an interface for the joystick's analog inputs and button press. The LCD display is used for output, and the buzzer is driven by a digital pin for audio feedback.
Cirkit Designer LogoOpen Project in Cirkit Designer
Image of Digital Game Circuit: A project utilizing Keyestudio KS0064 - Matrix LED 8x8 I2C (HT16K33) in a practical application
Arduino UNO Controlled LED Matrix and LCD Interface with Joystick Interaction
This circuit features an Arduino UNO microcontroller interfaced with an 8x8 LED matrix, an LCD screen, and a KY-023 Dual Axis Joystick Module. The Arduino controls the LED matrix via digital pins D10-D12 and powers the matrix, LCD, and joystick module from its 5V output. The joystick's analog outputs are connected to the Arduino's analog inputs A0 and A1 for position sensing, while the LCD is controlled through digital pins D2-D6 and D13 for display purposes.
Cirkit Designer LogoOpen Project in Cirkit Designer
Image of Copy of schoolproject (1): A project utilizing Keyestudio KS0064 - Matrix LED 8x8 I2C (HT16K33) in a practical application
Arduino Mega 2560-Based Smart Home Control System with LCD Display and Flame Sensor
This circuit is a multi-functional embedded system featuring an Arduino Mega 2560 microcontroller that interfaces with a 4x4 membrane keypad, a 20x4 I2C LCD, an 8x8 LED matrix, a DS3231 RTC module, a passive buzzer, and a KY-026 flame sensor. The system is powered by a 5V PSU and is designed to provide real-time clock functionality, user input via the keypad, visual output on the LCD and LED matrix, and flame detection with an audible alert.
Cirkit Designer LogoOpen Project in Cirkit Designer
Image of Copy of Zegarek (1): A project utilizing Keyestudio KS0064 - Matrix LED 8x8 I2C (HT16K33) in a practical application
ESP32-Based Smart Weather Station with LED Display and Multiple Sensors
This circuit is a sensor and display system powered by an ESP32 microcontroller. It integrates multiple sensors (BH1750 light sensor, BMP280 pressure sensor, DS3231 RTC, and DS18B20 temperature sensor) and drives a series of MAX7219 8x8 LED matrices for visual output. The ESP32 communicates with the sensors via I2C and controls the LED matrices to display data.
Cirkit Designer LogoOpen Project in Cirkit Designer

Common Applications

  • Digital clocks and timers
  • Scrolling text displays
  • Visual indicators for IoT devices
  • Educational projects and prototyping
  • Simple animations and graphics

Technical Specifications

Key Details

Parameter Value
Manufacturer Keyestudio
Part ID KY-KS0064
Driver IC HT16K33
Communication Protocol I2C
Operating Voltage 5V DC
Operating Current ~20mA (varies with LED usage)
LED Matrix Size 8x8 (64 LEDs)
Dimensions 3.2cm x 3.2cm
I2C Address (Default) 0x70

Pin Configuration

The Keyestudio KS0064 module has a 4-pin interface for I2C communication and power.

Pin Name Description
VCC Power supply (5V DC)
GND Ground
SDA I2C data line
SCL I2C clock line

Usage Instructions

Connecting the KS0064 to an Arduino UNO

  1. Wiring: Connect the module to the Arduino UNO as follows:

    • VCC to the Arduino 5V pin.
    • GND to the Arduino GND pin.
    • SDA to the Arduino A4 pin (I2C data line).
    • SCL to the Arduino A5 pin (I2C clock line).
  2. Install Required Libraries:

    • Download and install the Adafruit GFX and Adafruit LED Backpack libraries from the Arduino Library Manager.
  3. Arduino Code Example: The following code demonstrates how to display a simple pattern on the LED matrix.

    // Include necessary libraries
    #include <Wire.h>
    #include <Adafruit_GFX.h>
    #include <Adafruit_LEDBackpack.h>
    
    // Create an instance of the LED matrix
    Adafruit_8x8matrix matrix = Adafruit_8x8matrix();
    
    void setup() {
      // Initialize the matrix
      matrix.begin(0x70); // Default I2C address for HT16K33
      matrix.clear();     // Clear the display
      matrix.writeDisplay();
    }
    
    void loop() {
      // Display a simple pattern (diagonal line)
      matrix.clear(); // Clear the display buffer
      for (int i = 0; i < 8; i++) {
        matrix.drawPixel(i, i, LED_ON); // Turn on diagonal LEDs
      }
      matrix.writeDisplay(); // Update the display
      delay(1000);           // Wait for 1 second
    
      // Clear the display and wait
      matrix.clear();
      matrix.writeDisplay();
      delay(1000);
    }
    

Important Considerations

  • Power Supply: Ensure the module is powered with a stable 5V DC source.
  • I2C Address: The default I2C address is 0x70. If multiple devices are used, ensure each has a unique address by configuring the address pins on the HT16K33.
  • Brightness Control: The brightness of the LEDs can be adjusted programmatically using the setBrightness() function in the Adafruit LED Backpack library.

Troubleshooting and FAQs

Common Issues

  1. No Display Output:

    • Verify the wiring connections, especially the SDA and SCL lines.
    • Ensure the correct I2C address (0x70) is used in the code.
    • Check if the required libraries are installed and included in the code.
  2. Flickering LEDs:

    • Ensure the power supply provides sufficient current for the module.
    • Avoid using long or thin wires for power connections to minimize voltage drops.
  3. Incorrect Patterns or Text:

    • Verify the code logic for drawing patterns or text.
    • Ensure the matrix is initialized correctly in the setup() function.

FAQs

Q: Can I use this module with microcontrollers other than Arduino?
A: Yes, the KS0064 can be used with any microcontroller that supports I2C communication, such as Raspberry Pi, ESP32, or STM32.

Q: How do I change the I2C address of the module?
A: The HT16K33 driver allows address configuration using the address pins (A0, A1, A2). Refer to the HT16K33 datasheet for details on setting a new address.

Q: Can I display scrolling text on the matrix?
A: Yes, the Adafruit GFX library provides functions for displaying and scrolling text. Refer to the library documentation for examples.

Q: What is the maximum brightness level?
A: The HT16K33 supports 16 levels of brightness, which can be adjusted using the setBrightness() function.