How to Use 4 Point Terminal Block: Examples, Pinouts, and Specs
Introduction
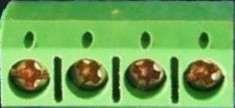
A 4 Point Terminal Block is a type of electrical connector designed to facilitate the secure and organized connection of multiple wires to a single point. It features four individual terminals, each capable of holding a wire, making it an essential component in electrical and electronic systems. Terminal blocks are widely used in control panels, electrical junctions, and industrial automation systems due to their reliability and ease of use.
Explore Projects Built with 4 Point Terminal Block


Explore Projects Built with 4 Point Terminal Block
Common Applications and Use Cases
- Control Panels: For connecting sensors, actuators, and other devices to a central controller.
- Electrical Junctions: To organize and distribute power or signals across multiple circuits.
- Industrial Automation: For wiring programmable logic controllers (PLCs) and other industrial equipment.
- Prototyping and Testing: To create temporary or semi-permanent connections in experimental setups.
Technical Specifications
Key Technical Details
- Number of Terminals: 4
- Rated Voltage: Up to 300V (varies by model)
- Rated Current: Typically 10A to 30A (check specific model for exact rating)
- Wire Gauge Compatibility: 22 AWG to 12 AWG (varies by model)
- Material: Flame-retardant plastic housing with metal contacts (e.g., brass or copper alloy)
- Mounting Type: Screw mount or DIN rail mount (depending on the model)
- Connection Type: Screw clamp or spring clamp
Pin Configuration and Descriptions
The 4 Point Terminal Block does not have traditional "pins" like an IC but instead features terminals for wire connections. Below is a description of the terminal layout:
| Terminal Number | Description | Typical Use Case |
|---|---|---|
| 1 | Terminal 1 | Connects to the first wire or circuit |
| 2 | Terminal 2 | Connects to the second wire or circuit |
| 3 | Terminal 3 | Connects to the third wire or circuit |
| 4 | Terminal 4 | Connects to the fourth wire or circuit |
Usage Instructions
How to Use the Component in a Circuit
Prepare the Wires:
- Strip the insulation from the ends of the wires to expose approximately 5-7mm of conductor.
- Ensure the wire ends are clean and free of frayed strands.
Connect the Wires:
- Loosen the screws or clamps on the terminal block using a screwdriver.
- Insert the exposed wire ends into the corresponding terminals.
- Tighten the screws or clamps to secure the wires in place. Ensure a firm connection without over-tightening, which could damage the wire or terminal.
Mount the Terminal Block:
- If the terminal block is screw-mounted, secure it to a panel or enclosure using screws.
- For DIN rail-mounted models, snap the terminal block onto the DIN rail.
Verify Connections:
- Double-check that all wires are securely connected and that there are no loose strands.
- Test the circuit to ensure proper functionality.
Important Considerations and Best Practices
- Wire Compatibility: Always use wires within the specified gauge range for the terminal block.
- Tightening Torque: Follow the manufacturer's recommended torque specifications to avoid damaging the terminal or wire.
- Insulation Clearance: Ensure that no part of the exposed conductor is touching adjacent terminals or components.
- Environmental Conditions: Use terminal blocks rated for the operating temperature and humidity of your application.
- Safety: Disconnect power before making or modifying connections to avoid electrical shock or damage.
Example: Connecting to an Arduino UNO
While a 4 Point Terminal Block is not directly connected to an Arduino UNO, it can be used to organize and distribute power or signals to multiple devices in an Arduino-based project. Below is an example of how to use a terminal block to distribute power from the Arduino's 5V pin:
// Example: Distributing 5V power from Arduino UNO to multiple devices
// Connect the Arduino's 5V pin to Terminal 1 of the block
// Connect the GND pin to Terminal 2 of the block
// Use Terminals 3 and 4 to power additional devices

void setup() {
  // No specific code is required for the terminal block itself
  // Ensure proper wiring and secure connections
}

void loop() {
  // Your main code logic goes here
  // For example, controlling devices powered via the terminal block
}
Troubleshooting and FAQs
Common Issues and Solutions
Loose Connections:
- Issue: Wires are not securely held in the terminal block.
- Solution: Ensure screws or clamps are tightened properly. Avoid over-tightening.
Overheating:
- Issue: Terminal block becomes hot during operation.
- Solution: Check for loose connections or wires with insufficient gauge. Ensure the current does not exceed the terminal block's rating.
Wire Slippage:
- Issue: Wires slip out of the terminals.
- Solution: Verify that the wire ends are stripped to the correct length and that the screws are tightened securely.
Short Circuits:
- Issue: Adjacent terminals are shorted due to exposed wire strands.
- Solution: Trim and tidy wire ends to prevent stray strands from causing shorts.
FAQs
Q: Can I use a 4 Point Terminal Block for high-frequency signals?
A: Terminal blocks are generally suitable for low-frequency or DC applications. For high-frequency signals, consider using specialized connectors to minimize signal loss.Q: How do I choose the right terminal block for my application?
A: Consider factors such as voltage and current ratings, wire gauge compatibility, mounting type, and environmental conditions.Q: Can I connect more than one wire to a single terminal?
A: While it is possible, it is not recommended as it may compromise the connection's reliability. Use a larger terminal block or additional blocks if needed.Q: Are terminal blocks reusable?
A: Yes, terminal blocks can be reused as long as they are not damaged. Ensure proper inspection before reusing.
This documentation provides a comprehensive guide to understanding, using, and troubleshooting a 4 Point Terminal Block.