How to Use UV-C LED: Examples, Pinouts, and Specs

Introduction
- A UV-C LED is a light-emitting diode that emits ultraviolet light in the UV-C range (100-280 nm). This range is particularly effective for disinfection and sterilization purposes, as it can destroy the DNA and RNA of bacteria, viruses, and other microorganisms, rendering them inactive.
- Common applications include water purification, air sterilization, surface disinfection, medical equipment sterilization, and use in portable sanitization devices.
Explore Projects Built with UV-C LED


Explore Projects Built with UV-C LED
Technical Specifications
- Wavelength Range: 100-280 nm (typically 260-280 nm for optimal germicidal effect)
- Forward Voltage: 5-7 V (varies by model)
- Forward Current: 20-150 mA (depending on the specific LED)
- Power Output: 1-100 mW (varies by model)
- Viewing Angle: 120° (typical)
- Operating Temperature: -30°C to 85°C
- Lifespan: 5,000 to 10,000 hours (depending on usage conditions)
Pin Configuration and Descriptions
| Pin Number | Pin Name | Description |
|---|---|---|
| 1 | Anode (+) | Positive terminal; connect to the positive side of the power supply. |
| 2 | Cathode (-) | Negative terminal; connect to the ground or negative side of the power supply. |
Usage Instructions
How to Use the UV-C LED in a Circuit
- Power Supply: Ensure the power supply matches the forward voltage and current requirements of the UV-C LED. Use a constant current driver to prevent overdriving the LED, which can reduce its lifespan.
- Current Limiting Resistor: If not using a constant current driver, include a resistor in series with the LED to limit the current. Calculate the resistor value using Ohm's Law: [ R = \frac{V_{supply} - V_{forward}}{I_{forward}} ] where (V_{supply}) is the supply voltage, (V_{forward}) is the forward voltage of the LED, and (I_{forward}) is the forward current.
- Heat Management: UV-C LEDs generate significant heat during operation. Use a heatsink or thermal management system to prevent overheating.
- Safety Precautions: UV-C light is harmful to human skin and eyes. Always operate the LED in an enclosed or shielded environment to avoid exposure.
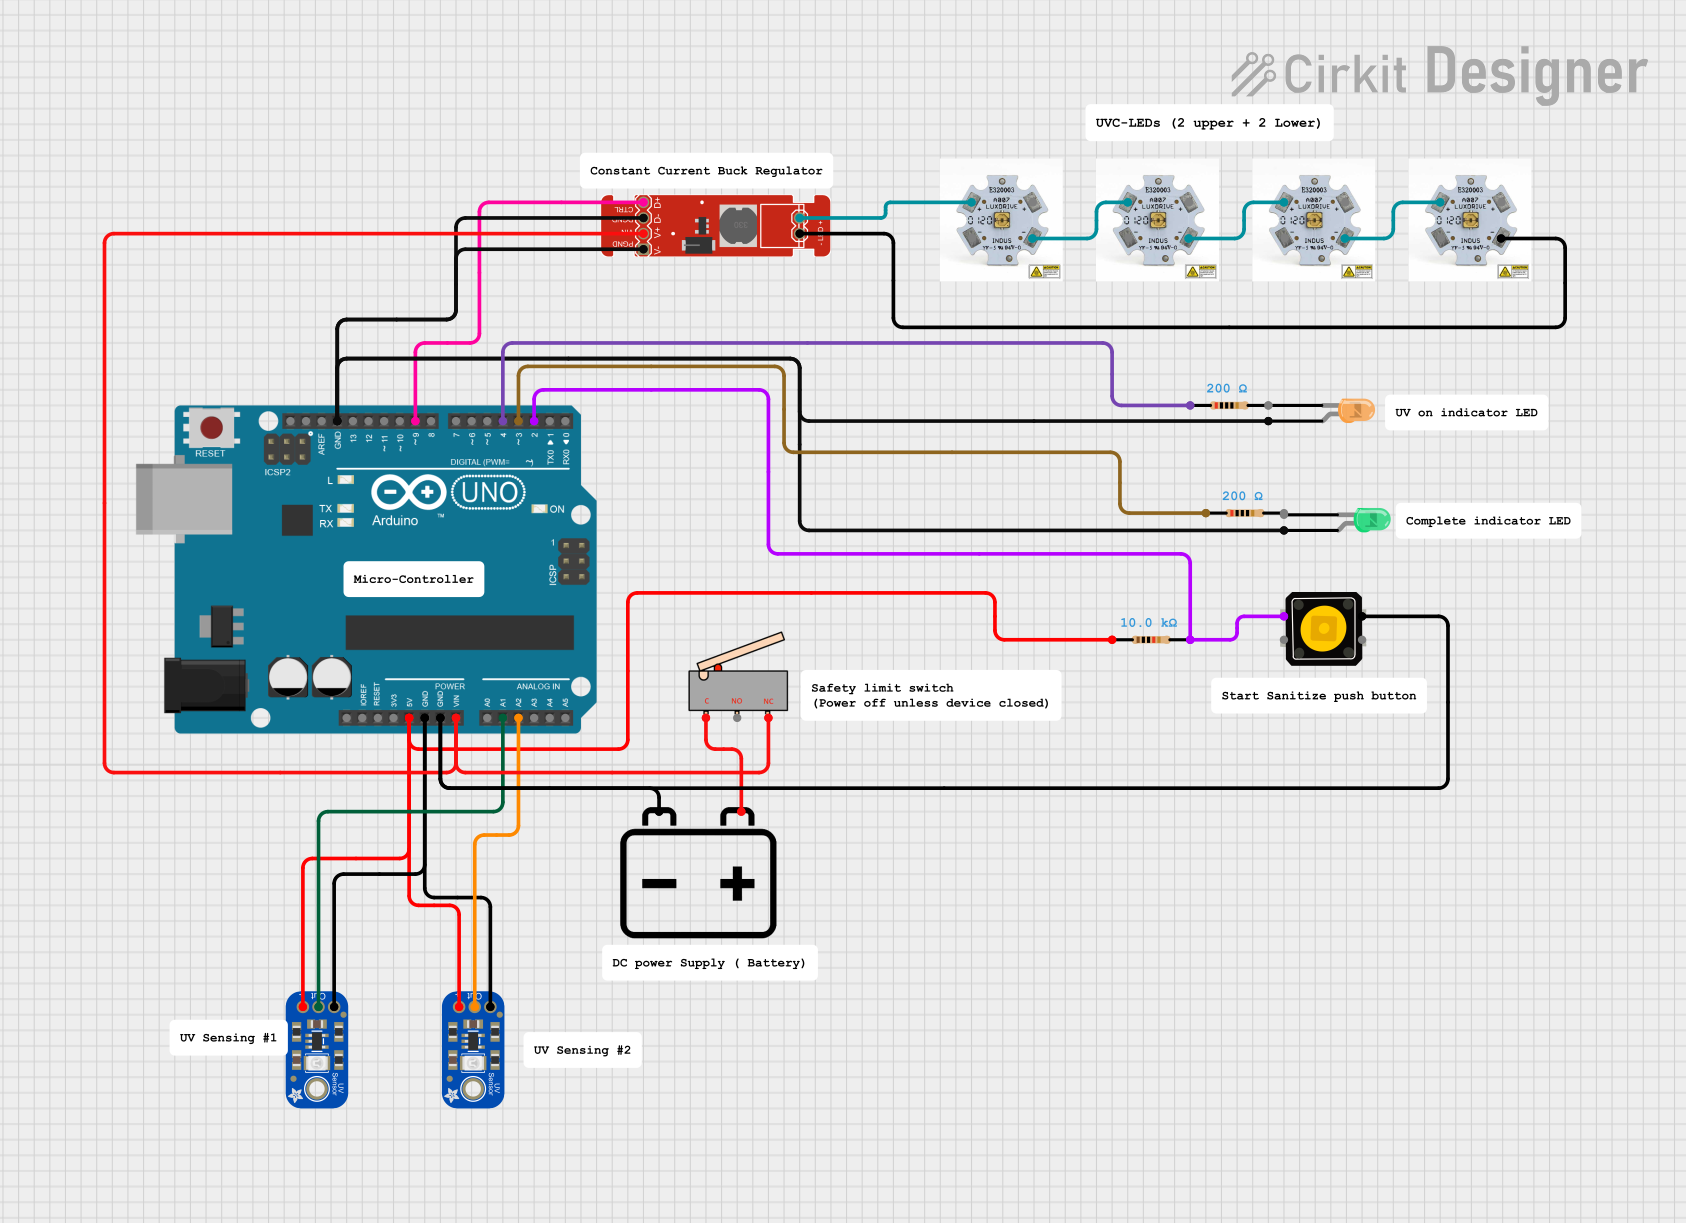
Example Circuit with Arduino UNO
Below is an example of how to control a UV-C LED using an Arduino UNO and a transistor as a switch.
Circuit Components:
- UV-C LED
- NPN Transistor (e.g., 2N2222)
- 1 kΩ Resistor (for the transistor base)
- Current-limiting resistor for the LED (calculated as described above)
- Arduino UNO
- Power supply (matching the LED's voltage and current requirements)
Circuit Diagram:
Arduino Pin 9 ----> 1 kΩ Resistor ----> Transistor Base
Transistor Collector ----> UV-C LED Anode (+)
UV-C LED Cathode (-) ----> Current-Limiting Resistor ----> Ground
Transistor Emitter ----> Ground
Arduino Code:
// UV-C LED Control with Arduino UNO
// This code turns the UV-C LED on for 5 seconds and off for 5 seconds in a loop.

const int ledPin = 9; // Pin connected to the transistor base

void setup() {
  pinMode(ledPin, OUTPUT); // Set pin as output
}

void loop() {
  digitalWrite(ledPin, HIGH); // Turn on the UV-C LED
  delay(5000);               // Keep it on for 5 seconds
  digitalWrite(ledPin, LOW);  // Turn off the UV-C LED
  delay(5000);               // Keep it off for 5 seconds
}
Important Considerations and Best Practices
- Avoid Overdriving: Exceeding the rated current or voltage can permanently damage the LED.
- Protective Enclosure: Operate the UV-C LED in a sealed or shielded enclosure to prevent accidental exposure to UV-C light.
- Ventilation: Ensure proper ventilation or cooling to dissipate heat generated by the LED.
- Testing: Use a UV-C light meter to verify the output and ensure the LED is functioning as expected.
Troubleshooting and FAQs
Common Issues and Solutions
LED Does Not Light Up:
- Check the power supply voltage and current to ensure they meet the LED's requirements.
- Verify the polarity of the connections (Anode to positive, Cathode to ground).
- Inspect the circuit for loose connections or damaged components.
LED Flickers or Turns Off Unexpectedly:
- Ensure the power supply is stable and capable of providing sufficient current.
- Check for overheating; add a heatsink or improve ventilation if necessary.
Low UV-C Output:
- Verify the LED's operating current is within the specified range.
- Check for dirt or debris on the LED lens that may block UV-C light.
Arduino Does Not Control the LED:
- Confirm the transistor is correctly connected and functioning.
- Ensure the Arduino pin is set as an output and is providing the correct signal.
FAQs
Q: Can I power a UV-C LED directly from an Arduino pin?
A: No, Arduino pins cannot supply enough current to drive a UV-C LED. Use a transistor or MOSFET as a switch and an external power supply.
Q: How do I calculate the resistor value for my UV-C LED?
A: Use the formula (R = \frac{V_{supply} - V_{forward}}{I_{forward}}). For example, if (V_{supply} = 12V), (V_{forward} = 6V), and (I_{forward} = 100mA), then (R = \frac{12 - 6}{0.1} = 60 , \Omega).
Q: Is UV-C light safe?
A: No, UV-C light is harmful to skin and eyes. Always use protective measures, such as shielding or enclosures, when operating UV-C LEDs.
Q: Can I use a UV-C LED for general lighting?
A: No, UV-C LEDs are not suitable for general lighting as they emit ultraviolet light, which is invisible and harmful to humans. They are designed specifically for sterilization and disinfection purposes.