
How to Use 4 Point Terminal Block: Examples, Pinouts, and Specs
 Design with 4 Point Terminal Block in Cirkit Designer
Introduction
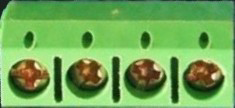
A 4 Point Terminal Block is a type of electrical connector designed to facilitate the secure and organized connection of multiple wires to a single point. It features four terminals, each capable of accommodating a wire, making it an essential component in electrical and electronic systems. Terminal blocks are widely used in control panels, junction boxes, industrial automation, and other electrical installations where reliable and efficient wiring is required.
Explore Projects Built with 4 Point Terminal Block
 Open Project in Cirkit Designer
 Open Project in Cirkit Designer
 Open Project in Cirkit Designer
 Open Project in Cirkit Designer
Explore Projects Built with 4 Point Terminal Block
Open Project in Cirkit DesignerOpen Project in Cirkit DesignerOpen Project in Cirkit DesignerOpen Project in Cirkit DesignerCommon Applications and Use Cases
- Control Panels: For connecting sensors, switches, and actuators.
- Junction Boxes: To organize and distribute electrical connections.
- Industrial Automation: For wiring PLCs, relays, and other devices.
- Prototyping and Testing: To create temporary or semi-permanent connections.
- Power Distribution: For splitting or combining power lines in low-voltage systems.
Technical Specifications
Key Technical Details
| Parameter | Value/Description |
|---|---|
| Number of Terminals | 4 |
| Rated Voltage | Typically 300V to 600V (varies by model) |
| Rated Current | Typically 10A to 30A (varies by model) |
| Wire Size Compatibility | 22 AWG to 12 AWG |
| Terminal Type | Screw-type or spring-loaded |
| Material | Insulating body: Polyamide (PA66) |
| Mounting Style | DIN rail or panel mount |
| Operating Temperature | -40°C to +105°C |
Pin Configuration and Descriptions
The 4 Point Terminal Block does not have traditional "pins" like an IC but instead features four terminals for wire connections. Below is a description of the terminals:
| Terminal Number | Description |
|---|---|
| Terminal 1 | Connection point for wire 1 |
| Terminal 2 | Connection point for wire 2 |
| Terminal 3 | Connection point for wire 3 |
| Terminal 4 | Connection point for wire 4 |
Each terminal is equipped with a screw or spring mechanism to securely hold the wire in place.
Usage Instructions
How to Use the Component in a Circuit
Prepare the Wires:
- Strip the insulation from the ends of the wires to expose approximately 5-7 mm of conductor.
- Ensure the wire gauge is compatible with the terminal block (e.g., 22 AWG to 12 AWG).
Connect the Wires:
- Loosen the screw or open the spring clamp for the desired terminal.
- Insert the stripped end of the wire into the terminal opening.
- Tighten the screw or release the spring clamp to secure the wire.
Verify the Connection:
- Gently tug on the wire to ensure it is firmly held in place.
- Check for any exposed conductor to avoid short circuits.
Mount the Terminal Block:
- Attach the terminal block to a DIN rail or secure it to a panel using screws, depending on the mounting style.
Important Considerations and Best Practices
- Avoid Over-Tightening: Over-tightening the screws can damage the wire or the terminal block.
- Use Proper Tools: Use a screwdriver that fits the terminal screws to avoid stripping them.
- Check Voltage and Current Ratings: Ensure the terminal block's ratings match the requirements of your circuit.
- Label Connections: For complex systems, label each terminal to simplify troubleshooting and maintenance.
- Insulation: Ensure no exposed wires are touching other components to prevent short circuits.
Example: Connecting to an Arduino UNO
While a 4 Point Terminal Block is not directly connected to an Arduino UNO, it can be used to organize and distribute connections between the Arduino and other components. For example, you can use it to connect multiple sensors or actuators to the Arduino's GPIO pins.
// Example: Controlling an LED connected via a 4 Point Terminal Block
// Terminal 1: Connected to Arduino pin 13 (digital output)
// Terminal 2: Connected to LED anode
// Terminal 3: Connected to LED cathode
// Terminal 4: Connected to GND

const int ledPin = 13; // Arduino pin connected to Terminal 1

void setup() {
  pinMode(ledPin, OUTPUT); // Set pin 13 as an output
}

void loop() {
  digitalWrite(ledPin, HIGH); // Turn the LED on
  delay(1000);               // Wait for 1 second
  digitalWrite(ledPin, LOW);  // Turn the LED off
  delay(1000);               // Wait for 1 second
}
Troubleshooting and FAQs
Common Issues Users Might Face
Loose Connections:
- Problem: Wires are not securely held in the terminals.
- Solution: Ensure the screws are tightened properly or the spring clamps are fully engaged.
Overheating:
- Problem: Terminal block becomes hot during operation.
- Solution: Check that the current does not exceed the rated capacity of the terminal block.
Wire Slippage:
- Problem: Wires slip out of the terminals.
- Solution: Verify that the wire gauge is compatible and that the stripped length is correct.
Short Circuits:
- Problem: Exposed wires cause unintended connections.
- Solution: Ensure all wires are properly insulated and securely connected.
FAQs
Q: Can I use a 4 Point Terminal Block for high-voltage applications?
A: Yes, but ensure the terminal block's rated voltage matches or exceeds the voltage in your application.
Q: How do I mount the terminal block?
A: Most terminal blocks can be mounted on a DIN rail or secured to a panel using screws. Check the specific model for mounting options.
Q: Can I connect wires of different gauges to the same terminal block?
A: Yes, as long as the wire gauges are within the terminal block's compatibility range (e.g., 22 AWG to 12 AWG).
Q: Is it safe to use a terminal block outdoors?
A: Only if the terminal block is rated for outdoor use and protected from moisture and extreme temperatures.
By following this documentation, you can effectively use a 4 Point Terminal Block in your electrical and electronic projects.