Cirkit Designer Logo
Cirkit Designer
Your all-in-one circuit design IDE
Home / 
Component Documentation

How to Use Terminal Block: Examples, Pinouts, and Specs

Image of Terminal Block
Cirkit Designer LogoDesign with Terminal Block in Cirkit Designer

Introduction

A terminal block is a modular, insulated block that secures two or more wires together. It provides a convenient way to connect and disconnect electrical circuits, ensuring safe and organized wiring. Manufactured by HSEAMALL, the 12 Position Terminal Block is designed for reliable and efficient electrical connections in a variety of applications.

Explore Projects Built with Terminal Block

Use Cirkit Designer to design, explore, and prototype these projects online. Some projects support real-time simulation. Click "Open Project" to start designing instantly!
Peltier-Controlled Thermal Management System with SPST Switch
Image of Mini car refrigerator circuit: A project utilizing Terminal Block in a practical application
This circuit consists of multiple Peltier modules and fans connected in parallel to a digital power supply, with a rocker switch (SPST) controlling the power flow to one of the Peltier modules and multiple fans. The 2.1mm Barrel Jack with Terminal Block serves as the power input connector, and the rocker switch allows for selective enabling or disabling of the connected devices. The circuit is designed to provide cooling or heating through the Peltier modules while the fans assist in heat dissipation or air circulation.
Cirkit Designer LogoOpen Project in Cirkit Designer
Battery-Powered Relay Control System with Directional Switch
Image of Skema Lampu D2: A project utilizing Terminal Block in a practical application
This circuit involves a 12V battery powering a relay system controlled by a directional switch. The relays are connected through terminal blocks and are used to switch between different outputs, indicated by the AdaGator Top components.
Cirkit Designer LogoOpen Project in Cirkit Designer
Arduino Mega 2560 Hall Sensor Interface for Real-Time Magnetic Field Detection
Image of Hall Effect CD: A project utilizing Terminal Block in a practical application
This circuit uses an Arduino Mega 2560 to read data from a Hall Sensor, which is powered through a terminal block connected to the Arduino's 5V supply. The sensor's ground is connected to the Arduino's ground, and its signal output is read by the Arduino on pin D2.
Cirkit Designer LogoOpen Project in Cirkit Designer
High Voltage Generator with Push Switch Activation
Image of Women Safety Device : A project utilizing Terminal Block in a practical application
This circuit features a high voltage generator connected to a terminal PCB for output, with its power supply controlled by a 2-pin push switch. The high voltage generator's VCC is connected through the switch, allowing the user to turn the high voltage output on and off. The circuit is powered by a 7.4V battery, with the positive terminal connected to the switch and the negative terminal connected to the generator's ground.
Cirkit Designer LogoOpen Project in Cirkit Designer

Explore Projects Built with Terminal Block

Use Cirkit Designer to design, explore, and prototype these projects online. Some projects support real-time simulation. Click "Open Project" to start designing instantly!
Image of Mini car refrigerator circuit: A project utilizing Terminal Block in a practical application
Peltier-Controlled Thermal Management System with SPST Switch
This circuit consists of multiple Peltier modules and fans connected in parallel to a digital power supply, with a rocker switch (SPST) controlling the power flow to one of the Peltier modules and multiple fans. The 2.1mm Barrel Jack with Terminal Block serves as the power input connector, and the rocker switch allows for selective enabling or disabling of the connected devices. The circuit is designed to provide cooling or heating through the Peltier modules while the fans assist in heat dissipation or air circulation.
Cirkit Designer LogoOpen Project in Cirkit Designer
Image of Skema Lampu D2: A project utilizing Terminal Block in a practical application
Battery-Powered Relay Control System with Directional Switch
This circuit involves a 12V battery powering a relay system controlled by a directional switch. The relays are connected through terminal blocks and are used to switch between different outputs, indicated by the AdaGator Top components.
Cirkit Designer LogoOpen Project in Cirkit Designer
Image of Hall Effect CD: A project utilizing Terminal Block in a practical application
Arduino Mega 2560 Hall Sensor Interface for Real-Time Magnetic Field Detection
This circuit uses an Arduino Mega 2560 to read data from a Hall Sensor, which is powered through a terminal block connected to the Arduino's 5V supply. The sensor's ground is connected to the Arduino's ground, and its signal output is read by the Arduino on pin D2.
Cirkit Designer LogoOpen Project in Cirkit Designer
Image of Women Safety Device : A project utilizing Terminal Block in a practical application
High Voltage Generator with Push Switch Activation
This circuit features a high voltage generator connected to a terminal PCB for output, with its power supply controlled by a 2-pin push switch. The high voltage generator's VCC is connected through the switch, allowing the user to turn the high voltage output on and off. The circuit is powered by a 7.4V battery, with the positive terminal connected to the switch and the negative terminal connected to the generator's ground.
Cirkit Designer LogoOpen Project in Cirkit Designer

Common Applications and Use Cases

  • Industrial control systems
  • Electrical panel wiring
  • Home automation systems
  • Power distribution in circuits
  • Prototyping and testing setups

Technical Specifications

The HSEAMALL 12 Position Terminal Block is designed to handle a wide range of electrical requirements. Below are its key technical details:

General Specifications

Parameter Value
Manufacturer HSEAMALL
Part ID 12 Position
Number of Positions 12
Rated Voltage 600V
Rated Current 15A
Wire Size Compatibility 22-12 AWG
Material Flame-retardant plastic (body)
Mounting Type Screw mount
Operating Temperature -40°C to 105°C

Pin Configuration and Descriptions

The terminal block does not have traditional "pins" but instead features screw terminals for wire connections. Below is a description of its layout:

Position Number Description
1-12 Screw terminals for wire connection
Mounting Holes Holes for securing the block to a surface

Usage Instructions

How to Use the Terminal Block in a Circuit

  1. Prepare the Wires: Strip the insulation from the ends of the wires you want to connect. Ensure the exposed conductor is clean and free of damage.
  2. Insert the Wires: Loosen the screws on the terminal block using a screwdriver. Insert the stripped end of the wire into the terminal slot.
  3. Secure the Connection: Tighten the screw to clamp the wire securely in place. Avoid overtightening, as this may damage the wire or the terminal block.
  4. Repeat for Additional Wires: Repeat the process for all wires you need to connect, ensuring proper organization and spacing.
  5. Mount the Terminal Block: Use the mounting holes to secure the terminal block to a panel or surface, if required.

Important Considerations and Best Practices

  • Wire Size: Ensure the wire gauge is within the supported range (22-12 AWG) for a secure connection.
  • Tightening Torque: Do not overtighten the screws, as this can strip the threads or damage the wires.
  • Insulation Check: Ensure no exposed conductor is visible outside the terminal block to prevent short circuits.
  • Environment: Avoid using the terminal block in environments with excessive moisture, dust, or vibration unless additional protection is provided.

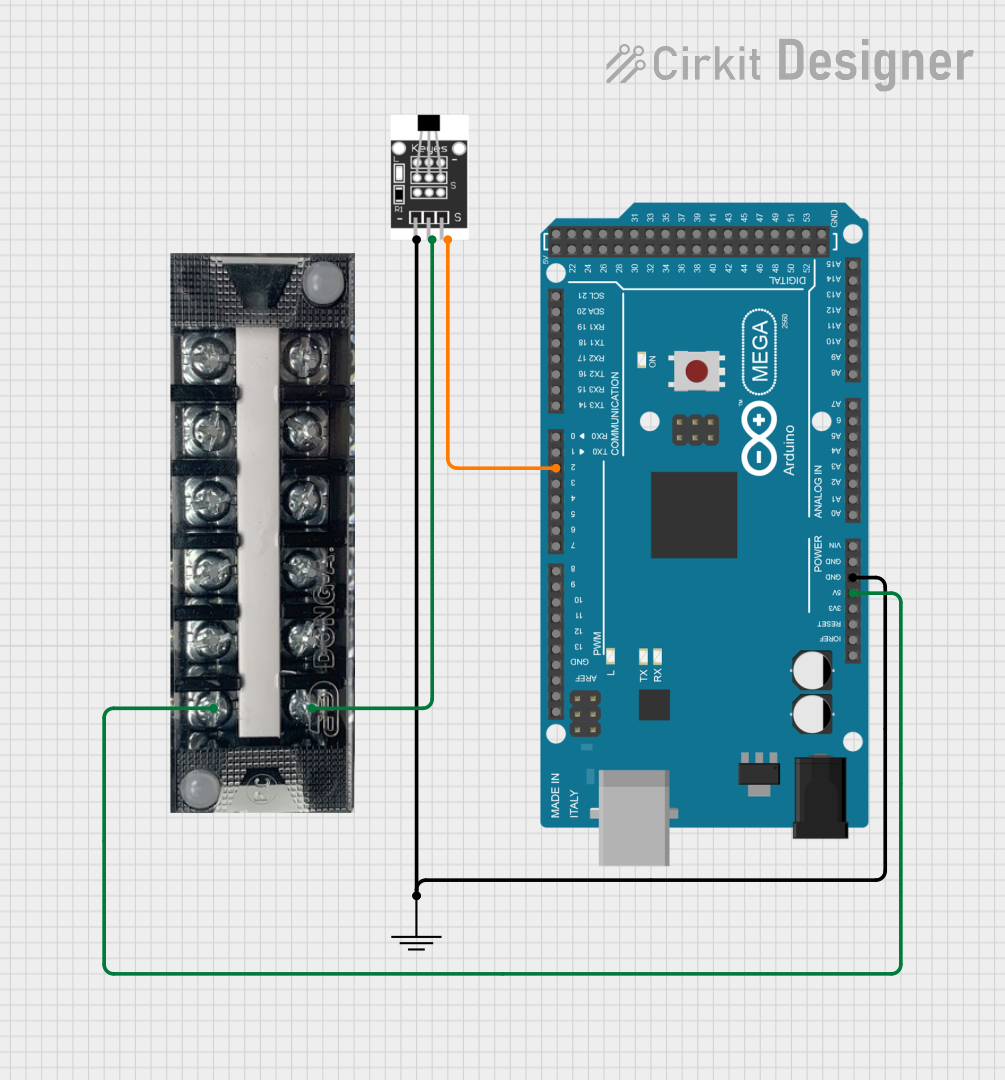
Example: Connecting to an Arduino UNO

While terminal blocks are not directly connected to an Arduino UNO, they can be used to organize and distribute power or signals in a circuit involving the Arduino. Below is an example of how to use a terminal block to distribute power to multiple components:

// Example: Distributing 5V power from Arduino to multiple components
// Connect the Arduino's 5V and GND pins to the terminal block
// Use the terminal block to distribute power to sensors, modules, etc.

// No specific code is required for the terminal block itself, as it is a passive
// component. Ensure proper wiring and secure connections for reliable operation.

Troubleshooting and FAQs

Common Issues Users Might Face

  1. Loose Connections: Wires may come loose if screws are not tightened properly.
    • Solution: Ensure screws are securely tightened without overtightening.
  2. Overheating: The terminal block may overheat if the current exceeds the rated 15A.
    • Solution: Verify the current requirements of your circuit and ensure they are within the terminal block's specifications.
  3. Wire Slippage: Wires may slip out of the terminal if the stripped length is too short.
    • Solution: Strip the wire to the recommended length (approximately 5-7mm) for a secure fit.
  4. Corrosion: Connections may degrade over time in humid or corrosive environments.
    • Solution: Use terminal blocks with additional protection or apply anti-corrosion treatments.

FAQs

Q: Can I use this terminal block for AC and DC circuits?
A: Yes, the terminal block is suitable for both AC and DC circuits, provided the voltage and current ratings are not exceeded.

Q: How do I mount the terminal block?
A: The terminal block features mounting holes that can be used with screws to secure it to a panel or surface.

Q: Can I connect wires of different gauges in the same terminal?
A: It is not recommended to mix wire gauges in the same terminal, as this may result in an unreliable connection.

Q: Is the terminal block reusable?
A: Yes, the terminal block can be reused. Simply loosen the screws to disconnect wires and reinsert new ones as needed.

By following these guidelines and best practices, the HSEAMALL 12 Position Terminal Block can provide a reliable and efficient solution for your wiring needs.