How to Use Key Studo Shield: Examples, Pinouts, and Specs
Introduction
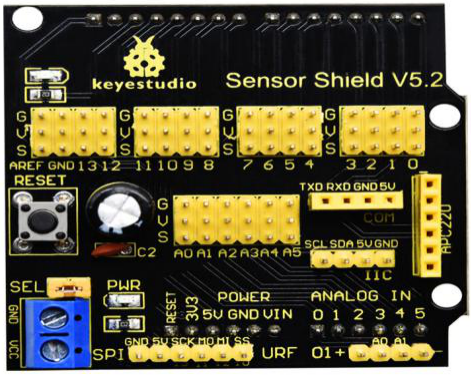
The Key Studo Shield is a versatile and user-friendly expansion board designed for use with microcontrollers, such as the Arduino UNO. It provides easy access to a variety of input and output interfaces, including buttons, LEDs, and sensor connectors, making it an ideal tool for rapid prototyping and development. This shield simplifies the process of connecting and testing components, enabling users to focus on their project design and functionality.
Explore Projects Built with Key Studo Shield


Explore Projects Built with Key Studo Shield
Common Applications and Use Cases
- Rapid prototyping of electronic circuits
- Educational projects and learning environments
- Testing and debugging sensors and actuators
- Building interactive systems with buttons, LEDs, and other peripherals
- Simplifying connections for Arduino-based projects
Technical Specifications
The Key Studo Shield is designed to be compatible with standard Arduino boards, such as the Arduino UNO, and offers a range of features to support various applications.
Key Technical Details
- Operating Voltage: 5V (supplied by the Arduino board)
- Compatible Microcontrollers: Arduino UNO, Mega, Leonardo, and similar boards
- Interfaces:
- Push buttons (momentary switches)
- LEDs (with current-limiting resistors)
- Analog and digital pin headers
- Sensor connectors (3-pin: VCC, GND, Signal)
- Dimensions: Standard Arduino shield size
- Weight: Approximately 30g
Pin Configuration and Descriptions
The following table outlines the key pins and their functions on the Key Studo Shield:
| Pin | Description |
|---|---|
| D2 - D13 | Digital I/O pins for connecting LEDs, buttons, or other digital components |
| A0 - A5 | Analog input pins for reading sensor data or other analog signals |
| 3.3V, 5V | Power output pins for powering external components |
| GND | Ground pins for completing circuits |
| Reset | Reset pin for restarting the microcontroller |
| Sensor Ports | 3-pin connectors (VCC, GND, Signal) for easy sensor integration |
| PWM Pins | Digital pins with PWM capability (e.g., D3, D5, D6, D9, D10, D11) |
Usage Instructions
The Key Studo Shield is designed to simplify the process of connecting and testing components with an Arduino board. Follow these steps to get started:
Step 1: Attach the Shield
- Align the pins of the Key Studo Shield with the headers on your Arduino board.
- Gently press the shield onto the Arduino until it is securely connected.
Step 2: Connect Components
- Use the digital and analog pin headers to connect LEDs, buttons, or other components.
- For sensors, use the 3-pin sensor connectors (VCC, GND, Signal) for quick and reliable connections.
Step 3: Write and Upload Code
Write your Arduino sketch to control the components connected to the shield. Below is an example code snippet to blink an LED connected to digital pin D13 and read a button state from digital pin D2:
// Define pin numbers for the LED and button
const int ledPin = 13;  // LED connected to digital pin 13
const int buttonPin = 2; // Button connected to digital pin 2

void setup() {
  pinMode(ledPin, OUTPUT);  // Set the LED pin as an output
  pinMode(buttonPin, INPUT_PULLUP); // Set the button pin as an input with pull-up resistor
}

void loop() {
  int buttonState = digitalRead(buttonPin); // Read the button state

  if (buttonState == LOW) {
    // If button is pressed (LOW due to pull-up), turn on the LED
    digitalWrite(ledPin, HIGH);
  } else {
    // If button is not pressed, turn off the LED
    digitalWrite(ledPin, LOW);
  }
}
Important Considerations and Best Practices
- Ensure the shield is properly aligned with the Arduino board to avoid damaging the pins.
- Use current-limiting resistors for LEDs if not already included on the shield.
- Avoid exceeding the current limits of the Arduino board when powering external components.
- Use the
INPUT_PULLUPmode for buttons to simplify wiring and reduce noise.
Troubleshooting and FAQs
Common Issues and Solutions
The shield does not power on:
- Ensure the Arduino board is properly connected to a power source (USB or external power).
- Check that the shield is securely attached to the Arduino headers.
Components are not responding:
- Verify the connections to the shield's pins and ensure they match the pin numbers in your code.
- Check for loose wires or faulty components.
Button presses are not detected:
- Ensure the button is connected to the correct pin and configured as
INPUT_PULLUPin the code. - Test the button with a multimeter to confirm it is functioning.
- Ensure the button is connected to the correct pin and configured as
LED does not light up:
- Confirm the LED is connected to the correct pin and oriented properly (long leg to positive).
- Check for a working current-limiting resistor if required.
FAQs
Q: Can I use the Key Studo Shield with boards other than the Arduino UNO?
A: Yes, the shield is compatible with other Arduino boards, such as the Mega and Leonardo, as long as the pin layout matches.
Q: Do I need additional components to use the shield?
A: The shield includes basic components like buttons and LEDs, but you may need additional sensors or actuators depending on your project.
Q: How do I connect a sensor to the shield?
A: Use the 3-pin sensor connectors (VCC, GND, Signal) to easily connect sensors. Ensure the sensor's voltage requirements match the shield's output.
Q: Can I stack other shields on top of the Key Studo Shield?
A: Yes, as long as the additional shield does not block access to the required pins or interfere with the components on the Key Studo Shield.